By default, Microsoft Exchange 2013 and 2016/2019 on-premise servers come with a 2GB mailbox size for all users. But as an IT administrator, you will be needing to increase the mailbox size from 2GB to different sizes for a specific user or all users at a time. This guide shows you how to increase mailbox size in on-premise Exchange 2013 and 2016/2019 servers for an individual user or globally (for all users) at the database level.
Exchange server mailbox size can be increased either by EAC (Exchange Administration Console) or Powershell. It’s quite easy to expand mailbox size, but you would be searching for the option if you are already familiar with older versions of Exchange 2010 or 2007. EAC works completely on the web browser and you can control, manage and modify settings by accessing it in a web browser.
Read Also: How to troubleshoot Exchange Server Issue after a failed update
NOTE: You can use the same following methods in Exchange hybrid setup. Adjusting the mailbox size for Office 365 users/mailboxes can be done from the exchange online admin centre – that is not covered in this article.
Knowing the Types on Limits in EmailBox Storage
When you set up your email storage quotas, there are three limits to worry about: the warning limit, send limit and send/receive limit. Whether you are changing the mailbox size limit on GUI (ECP) or PowerShell commands, these three parameters should be provided.
Warning Limit: The user’s Exchange mailbox account is about to reach its email storage limits, and the user should delete non-critical emails before this happens. If there’s not enough space for future messages, the sending limit will be applied at the next level. The user will see this warning in MS Outlook or webmail.
Send Limit: The user can’t send any new emails anymore. It can be fixed by deleting the existing emails and cleaning up the trash folder too. This is the second level warning to clean up the mailbox or increase the mailbox size by the administrator. The user still can receive new emails at this stage.
Send/receive Limit: Both send and receive new emails will be stopped at this level. The sender will receive a non-delivery report (NDR) if the mailbox is not cleaned up or expanded to gain free space.
Increase Mailbox Size in Exchange 2013/2016/2019 for Particular Single User
On most occasions, you would probably need to increase the mailbox size for an individual user, not all users in your organization. Follow these steps to complete this task.
1) Access the ECP of Exchange 2016/2019 (definitely you must know this process, typing /ecp after the mail server URL in a web browser). Though the below screenshots are taken from the 2013 version, still, it is applicable for 2016/2019 servers since the interface almost stays the same.
2) Under ‘Recipients’, select the user mailbox you need to increase the size. Click on ‘Edit’ to open the properties.
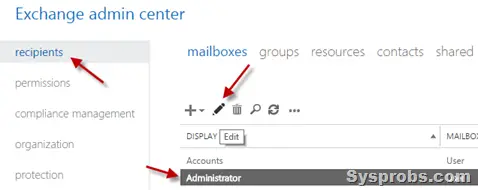
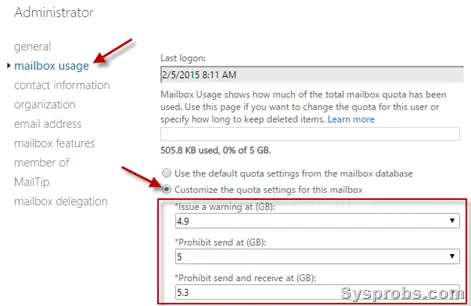
3) Select ‘mailbox usage’ to increase the size. You need to click on ‘More Options’ to get the option to set mailbox limits as below.
Usually, the mailbox size settings will inherit from database limit (which is shown in the next step) settings. If you need to modify the quota settings, check the ‘Customize the quota settings…’ and set the size in GB. You can also set ‘Unlimited’ here. Unlike the earlier Exchange 2007 version, the size increase will take effect immediately and the user can see the changes immediately on MS Outlook or Outlook Web Access.
Do this from PowerShell:
Open the Exchange management shell from the mailbox as administrator.
Execute the following command. Replace ‘Dinesh Kumar’ with the correct account name in your environment.
Set-Mailbox -Identity "Dinesh Kumar" -IssueWarningQuota 9.5gb -
ProhibitSendQuota 9.75gb -ProhibitSendReceiveQuota 10gb -
UseDatabaseQuotaDefaults $false
How to Set the Mailbox Size in Database Level – For All Users
When you modify the mailbox size quota at the database level, it will apply to all mailboxes/users in the database.
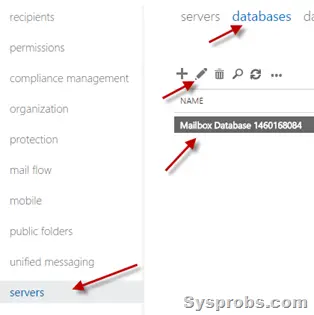
4) In the same ECP, click on the ‘Servers’ and ‘Databases’ tab. Then select the database you need to modify the quota settings globally, and click ‘Edit’ to open the particular database’s properties.
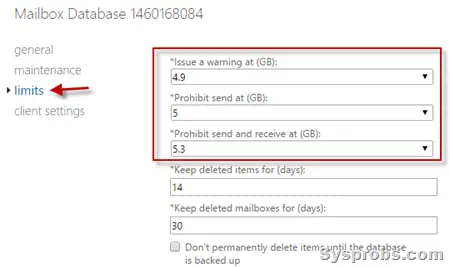
5) Click on ‘limits’ and set the size quota for a particular database. This size restriction will be applied to all mailboxes in the database (if you have not set the size limits separately as shown in step 3)
To see whether the changes have been applied to mailboxes, you can open a mailbox of a user (as shown in steps 2 & 3) and see the new modified quota limit. The change will take effect depending on the database size and the number of mailboxes.
How to Change Mailbox Size in Database level by PowerShell:
Open the Exchange management shell from the mailbox as administrator.
Execute the following command. Replace ‘TopUsersDB’ with the correct database name in your environment.
Set-MailboxDatabase "TopUsersDb" -
ProhibitSendReceiveQuota 10GB -ProhibitSendQuota 9.75GB -
IssueWarningQuota 9.5GB
We hope this simple step-by-step guide is helpful to increase your mailbox size in on-premise Exchange 2013, 2016 or 2019 servers. We would love to hear your feedback on this article. Please let us know if it was helpful or if there are any other ways in which we can improve!
![Active Directory property ’homeMDB’ is Not Writeable [Fixed]](https://www.sysprobs.com/wp-content/uploads/2017/01/office-365-211x150.png)


Great article! Thanks!
Thank you for the detailed information.