Section break in Microsoft Word is handy if you want different formats on different pages on a single document. For example, suppose you like to have 2 columns paragraphs on specific pages only. In that case, the Section break feature is convenient to keep different formats like page numbers, header and footer on every page but in the same Office Word document.
Here is the guide about how to remove section break in Word 2013/2016/2019 and Office 365. Also, we will show you how to view and insert it wherever you want in the document.
You can use these same steps for previous MS office versions, such as Word 2010 and Word 2007. You will find similar options in each version but could be with a different interface or in a location.
Insert Section Break in Word
1) Keep the cursor where you want to have section breaks.

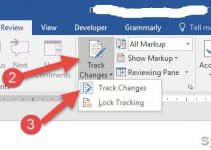
Go to ‘Page Layout (or Layout)’ in the MS Word ribbon and click ‘Breaks’.
You can select Next Page or Continues in this area. ‘Next Page’ is to add the section break on the next page. If you like to change the format from the next page, you can use this option.
‘Continues’ can be used if you need to break and change the format on the same page.

2) You can’t see section breaks in MS Word in the standard view. To view the existing page breaks in your document, change the view option to ‘Draft’ as shown below.

Or you can enable ‘Show/Hide’ in the main home ribbon bar.

CTRL+SHIFT+8 in the keyboard shortcut to enable and disable Show/hide.
Using the above methods, you can view all section breaks in MS Word in older and newer versions like Office 365 and 2019.
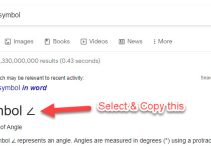
Related: How to insert/add Angle Symbol in MS Word document
How to Remove Section Break in MS Word
Sometimes we need to remove section breaks to keep the same header, footer, page numbering and format of the page/paragraph across all the pages in a Word document.
You can simply delete the section breaks in Word when you see them using one of the earlier mentioned methods. Keep the cursor and press Delete on the keyboard.

This simple and small guide would help insert, view and delete page breaks in all Word versions on any Operating system like Windows or Mac computers.


![[Fixed] Outlook Password Pop Up Screen is Blank/White – Disappears](https://www.sysprobs.com/wp-content/uploads/2019/11/MS-Outlook-211x150.jpg)
it seem complicated for me because it so long I doest use in Word
Hi,
This is a helpful article for me, I really appreciate you efforts 🙂
I just downloaded Office 365. The toolbars look nothing like what you show. I can’t put the cursor anywhere near the section break.
Sorry, had a typo on my email for the previous comment