If you are still using an older version of Mac OS X on Intel or AMD Computers by any of the desktop virtualization software like VMware or VirtualBox, this guide will be helpful to increase the screen resolution size of Snow Leopard. Adjusting screen size including widescreen on VMware is easy since VMware tools (with VGA driver) are available, but setting up screen resolution in VirtualBox is slightly different for each installation method.
VMware users
Most of the latest macOS versions can work without any issues on VMware with multiple screen resolutions. If you are still using the older version of Mac OS X and VMware, then you can follow the steps to install the VMware VGA driver to get proper screen resolutions.
1) Download the Mac VGA driver for VMware here.
2) Install the package on Mac OS X virtual machine.

3) Restart the Mac Virtual machine. That’s it. Now you can see multiple screen resolution options inside the VM.
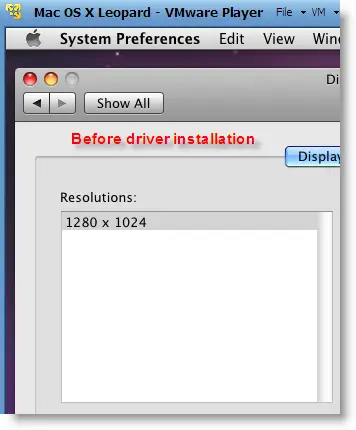
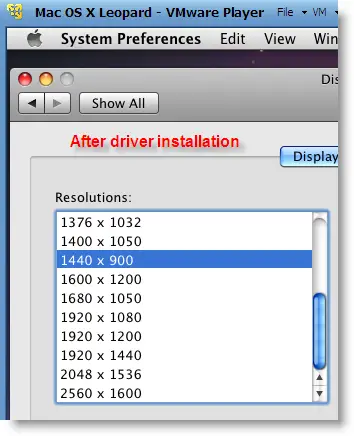
This VGA driver worked well in VMware workstation and VMware Player for Mac virtual machines Leopard and Snow Leopard. We have not tested on the latest macOS versions.
VirtualBox Users
We mentioned several ways to use Mac OS X as a virtual machine on VirtualBox, if you are using any of the methods, the following tricks will be helpful.
Method -1
If you installed Mac OS X by any of the hackintosh ISO files, then do this method first. Also, it can work on vanilla installation from the original DVD or ISO file.
Increase Mac OS X Virtual Machine Screen Resolution in VirtualBox
1) Start the Virtual Machine.
2) Open /Library/Preferences/SystemConfiguration/com.apple.Boot.plist in text editor.
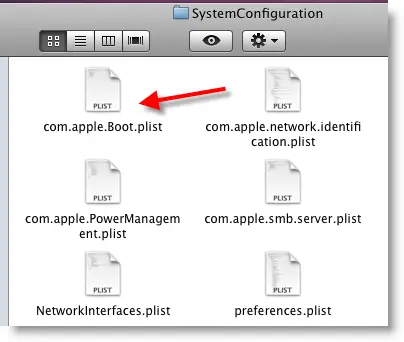
3) Input the below entries.
<key>Graphics Mode</key>
<string>1280x1024x32</string>
1280x1024x32 – is your option. Type the correct screen resolution which matches your monitor resolution.
Here is the screenshot of my file.

4) Select Save As in the Text editor file menu and save it on the desktop or somewhere else.
Make sure to save with the same .plist file extension. (Remove the tick as mentioned below)
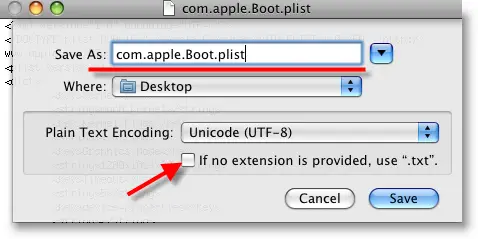
5) Now, copy or drag com.apple.Boot.plist file from desktop to /Library/Preferences/SystemConfiguration/ or /Extra location where ever it needs to be replaced.
Enter the Mac root (admin) password to authenticate replacing the file.
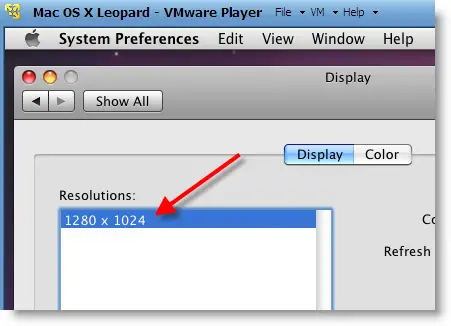
6) Restart the Mac virtual machine now. By default, the Mac OS X will start in the screen resolution inserted in com.apple.Boot.plist. We can confirm it by checking in ‘Display’ under ‘System preferences’.
Method -2
Try this method if method 1 fails.
We will modify the VirtualBox settings of the Mac VM in this method.
a) Close VirtualBox completely and execute the following command,
VBoxManage setextradata “VM name” “CustomVideoMode1″ “1280×800×32”
“VM name” – Exact virtual machine name of Mac OS X, execute this command with quotes.
Make sure the VBoxManage command is added to the Windows path, if not, execute this command from the VirtualBox installed folder.
b) The above command will modify the XML file of the Virtual machine. Boot the virtual machine and see whether it’s working.
c) If it doesn’t work, type the below command while booting at the EFI boot loader screen;
“Graphics Mode”=”1280x800x32” and press Enter.
Always better to give the same screen resolution size mentioned in com.apple.Boot.plist file.
Method -3
This is similar to method 2 but slightly different.
Execute this command from the VirtualBox folder:
VBoxManage setextradata “VM name” VBoxInternal2/EfiGopMode 3
“VM name” – Exact virtual machine name of Mac OS X, execute it with quotes.
No 3 – this is the number of video modes. Only 5 resolutions are supported:
0 – 640×480
1 – 800×600
2 – 1024×768
3 – 1280×1024
4 – 1440×900
In another way, you can add a string to the Virtual machine’s XML file to apply every time the virtual machine boots up.
<ExtraDataItem name=”VBoxInternal2/EfiGopMode” value=”3″>
Warning – If you are copying any of the commands from this article, make sure the opening and closing quotes are correct!!
I’m sure one of these will work with VirtualBox to increase Snow Leopard screen resolution. Have fun.




Comments are closed.