Do you want to configure your Windows 10 computer as an FTP server? This guide shows how to set up an FTP server on Windows 10 which is applicable for Windows 8.1 by using the built-in Microsoft features. You can make any computer as an FTP server by installing third-party applications like Filezilla FTP server which is quite easy. But the following step by step guide shows how to use the Windows services, features and IIS on a Windows 10 computer without installing any third-party software or tools.
Having an FTP server on an internal or external network is always an easier and faster way to share files over the network. Windows 10 and 8.1 come with built-in FTP server module under Internet Information Service features which need to be installed before use. Of course, most of the Windows server versions also have this feature.
You can give access to your FTP site by restricting users with username/password or anonymously. It mainly depends on the purpose of an FTP site on your internal or external network.
Setup FTP Server on Windows 10 or Windows 8.1
1) Open Programs and Features in Control panel. Click on ‘Turn Windows features on or off’ as shown below.
If IIS (Internet Information Services) was not installed on a particular Windows computer, you need to install other features of IIS (as shown by arrow marks below). See the below screenshot for the actual requirements to run FTP server on Windows 10/8.1 (All features which are ticked need to be installed).
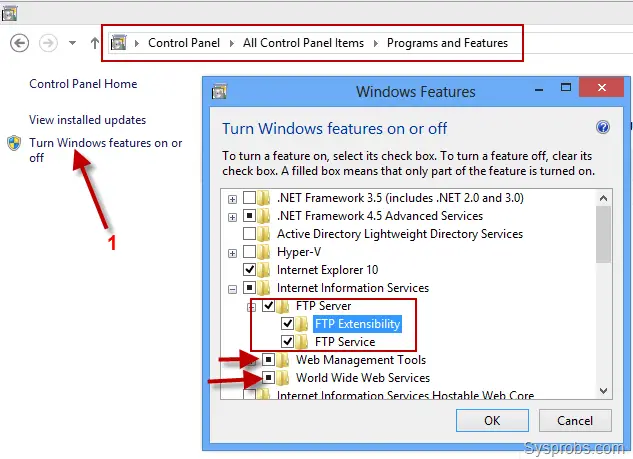
Press OK to install the selected features.
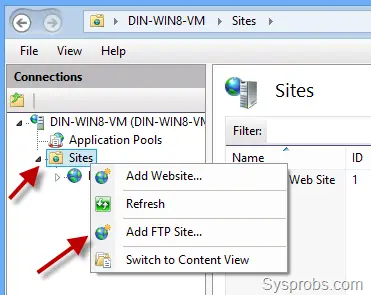
2) After installation is completed, open ‘Internet Information Services (IIS) Manager’ in ‘Administrative Tools’ – Control Panel.
Expand the sites, right-click on it and ‘Add FTP Site’.
Recommended Readings:
How to enable telnet in Windows 10
How to install Windows TFTP Client on Windows 10
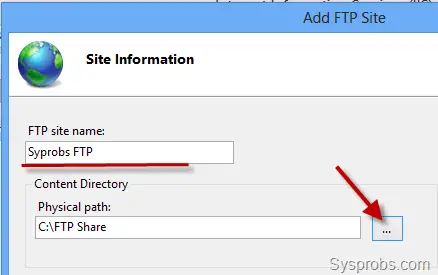
3) Give a name for FTP site and browse the local folder which you need to give access to others through FTP server. (I already created a folder called ‘FTP Share’ on C drive before reaching this step).
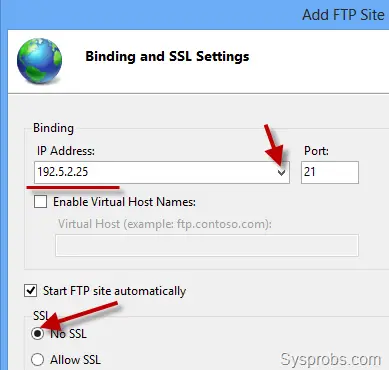
4) In the next screen, you need to select the local IP address from the drop-down box. It is recommended to setup static IP for this Windows 10 computer where you are setting up the FTP server. Having a dynamic IP will create issues later since the IP of this computer keeps changing.
Under SSL option, select No SSL to make the connection without an SSL certificate. In a production environment for professional and secured FTP server setup, you may need to enable SSL which requires a certificate.
How to Set Up FTP Access Permission on Windows 10
5) Now we can set the permission for users who access the FTP site. Here we need to decide how others will be accessing the FTP share and who will have Read-only or Read & Write access.
In this scenario let’s assume that we need specific users to have read and write access. So obviously they must type a user name and password for it. Other users can access the FTP site without any credentials which will allow only read access, that is called anonymous users access.
There are several ways to accomplish this setup, but here is the simple way that worked for me.
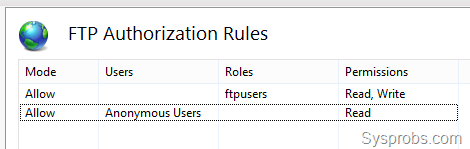
First, create a user group on Windows 10 local computer (if you are not using domain environment) and add the users who will be having write access on FTP site. In this example, I have created ‘ftpusers’ group and added required users inside it.
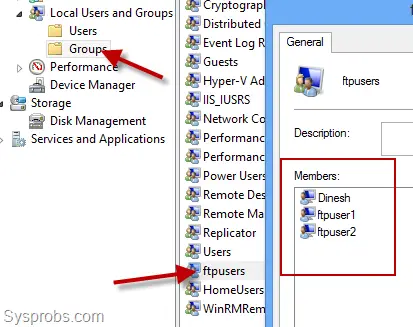
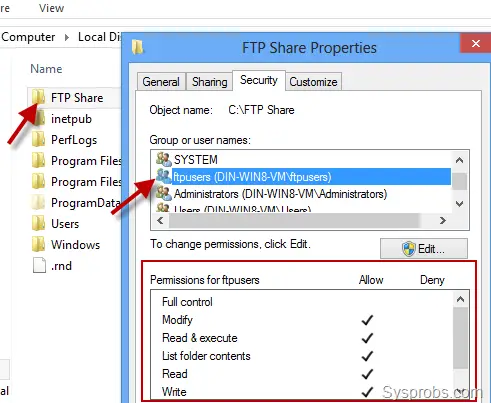
You must give ‘Modify’ access (Windows permission) for this group to the specific folder which is linked to the FTP site. ‘FTP share’ is the one in this example.
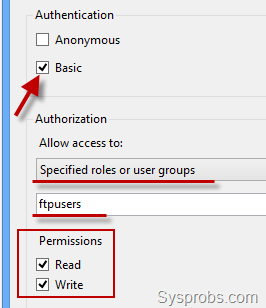
Let’s continue the other FTP settings. The next screen is to give the permission, select ‘Basic’ type which will prompt for user name and password when someone tries to access the FTP share. Select Specified roles or groups option from the drop-down and type the correct group name we created earlier. Set Read and Write permission for the group.
Press Finish to complete the setup.
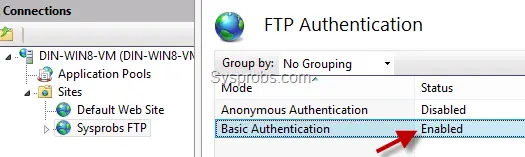
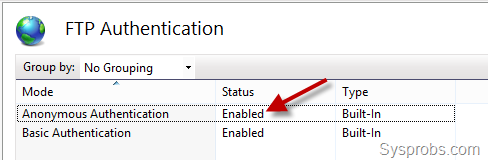
By default, Basic Authentication is enabled on Windows 10 or 8.1 IIS, but you can cross-check it. Open ‘FTP Authentication’ settings of the site and make sure Basic Authentication is enabled as shown below.
Let’s set up the anonymous users access with read-only permission.
Open ‘FTP Authorization Rules’ for the FTP site you created. Create an ‘Add Allow Rule’ and set the permissions as below.
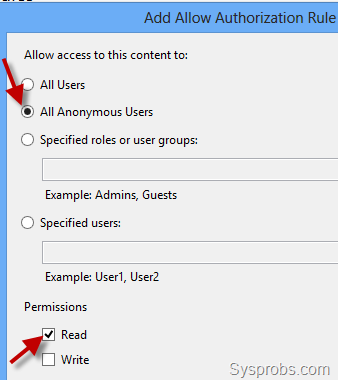
Make sure that the second rule also listed.
You need to enable anonymous access under FTP Authentication settings of the site.
Check the Firewall! It should allow FTP traffic.
We are almost done and completed the all necessary steps. Now, you need to either disable the complete Windows firewall or allow FTP inbound and outbound traffic on Windows 10 or 8.1 computer. I hope you can do it easily.
Read this step by step guide to enable incoming and outgoing FTP traffic on Windows firewall (in Windows 10 & 8.1).
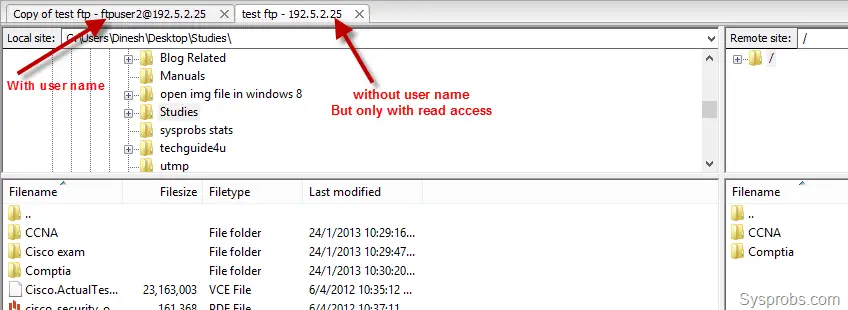
Use any of the FTP clients to connect with the user name and password which has write access and the anonymous user with read-only access.
I hope these steps are helpful to a setup FTP server on Windows 10 or Windows 8.1.
Similar steps are applicable to configure FTP server service on Windows Server version that is mentioned here.


This was very helpful, Thanks.
Quite easy too.
Moron!
There is NO SUCH THING as ‘Internet Information Services (IIS) Manager’ in ‘Administrative Tools’ – Control Panel”
And that picture makes no sense at all.
You should complete the step-1 (installing IIS), then you will get the option.
Learn to read first. The moron’s really you here.
Thanks, your tutorial is easy to follow. My only problem is , I don’t know how to allow FTP inbound and outbound traffic in Windows Firewall. I have allowed FTP server in Windows Firewall settings, but it seems Windows Firewall still block the FTP connection, so in the end I disable the firewall which is not very recommended.