Undoubtedly, Track Changes (or revision tracking) in Microsoft Word is one of the best features. If you work in a multi-user environment where many users edit a single Word file, then track changes in Word 2016/2019 or Office365 is a helpful tool to track the changes/modifications done by particular users. Here we will show how to enable track changes in Microsoft Word and disable them correctly.
The track changes feature on Microsoft Office products may vary with different versions, as improvements are made with each iteration. Therefore, what is mentioned in this guide may not be the same as what you see in your version. Earlier, we mentioned removing the line breaker on the Word document here. If you need to change the system time format that reflects in Word editing, you can follow this step.
How to Enable Track Changes in Word 2016/2019/Office 365
Quick Steps:
Follow the quick steps to enable and disable Track Changes in Microsoft Word for Office 365 or any version.
1) Open Your Document
First, open the Word document you want to edit with Track Changes enabled.
2) Go to the Review tab.
Once your document is open, navigate to the “Review” tab at the top of your screen.
3) Click “Track Changes”
On the left side of the Review Ribbon, there will be an icon labeled “Track Changes” – click this button to turn on Track Changes permanently for all future edits within your document (unless turned off again).
4) Accept/Reject Edits As Needed
Now that Track Changes is enabled, any edits made by yourself or collaborators will appear clearly with revision marks on either side depending on whether it was accepted or rejected by its author(s). To accept or reject an edit from another user, go through each one by clicking “Accept” or “Reject” next to them when needed. Alternatively, you can also choose either option for all made changes within a selected block of text at once if desired as well.
5) Disabling Track Changes When Necessary
When needed for whatever reason, disabling Track Changes is just as easy as enabling it was initially; return to the Review tab at the top of your screen and uncheck the “Track Changes” option currently active to stop tracking edits within your document- Easy!
Here are detailed steps with screenshots:
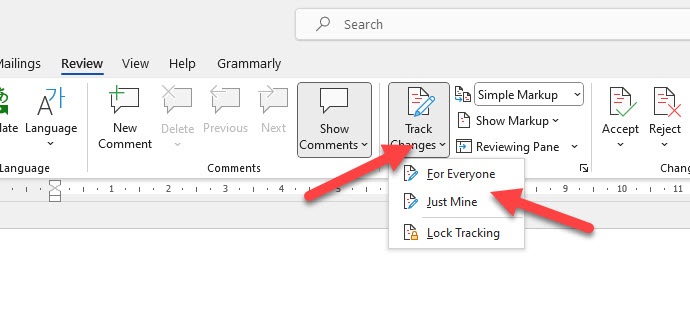
1) When there is some content to edit in MS Word, click on ‘Review’ and ‘Track Changes’ as shown below.
Select the ‘For everyone’ or ‘Just mine’ option to enable this feature. Once enabled, the changes made by single or multiple users will be recorded.
2) Even though the track changes in Word are activated, you still can’t see the changes done by other users until you enable the ‘Reviewing Pane.’ After enabling it, you can see what other authors are doing or what changes they have already made to the particular document.
 3) More options.
You can find more markup options to see the original or the changes in the document. Clicking on the ‘All Markup’ drop-down button will give the option. ‘All Markup’ is selected by default, and you can see all changes in the word document.
Remember- the changes are still not saved to the original document. The owner of the document can accept or reject the changes.

4) You can accept the changes one by one or all simultaneously in the document. Also, you can block authors from editing the document.

Another great feature is ‘Compare.’ You can compare the original document against the modified document by various authors in one view for better understanding before accepting the changes. Clicking on the ‘Compare’ button will bring the options to compare.
Read Also- How to change centimeters to inches in Word.
5) Comments area in track changes is useful when more than one user edits the document. It allows you to leave comments for each change or paragraph and show them in the review panel. Justifications and recommendations for modifying the particular content can be shared online through this comments field.

To disable the track changes, disable this option in Word’s ‘Review’ tab.
Here is a useful video explaining the steps:
I hope this guide provides a helpful overview of the track changes feature in Microsoft Word. With it, you can learn to use this feature effectively when sharing documents over OneDrive, SharePoint, or even by email.


![[Fixed] Outlook Password Pop Up Screen is Blank/White – Disappears](https://www.sysprobs.com/wp-content/uploads/2019/11/MS-Outlook-211x150.jpg)

How do I manage author colors in 2016 track changes. How do I copy a track changes document and retain the markings.
I used Google for tracking changes in MS Word 2013.
The changes are simply pathetic as MS Word previously enabled companies to use the margin change bar but also show regulatory bodies and staff what had changed (but actually hiding the deleted/reformatting text etc. etc.).
This functionality has now been lost.
The best change would have been to lock the changes to the sender document but allow the receiver/reviewer to switch on the capability to also see what has actually been added or deleted. However the final issued document should be able to be locked.
The Microsoft programmers have once again made some incorrect assumptions regarding document governance.