This guide explains how to do VirtualBox P2V in Windows host OS. By this method, you can convert a physical computer which could be local or on the network (remote computer) to a virtual environment. The method is not straightforward since there are no tools available for P2V (Physical to Virtual) in VirtualBox.
We can use some of the free tools to convert most of the Windows Operating Systems starting from Windows 7 to 10/11 and Server versions of Windows 2008 to the latest Windows 2019/2022 server.
Methods to Do VirtualBox P2V on Windows 11/10
Here are the solid working methods if you want to convert a working physical computer to VirtualBox virtual machine environment.
- Using Disk2vhd: This Mircosoft tool can convert a working Windows computer to VHD file format which is supported by Oracle VirtualBox.
- VMware vCenter Converter: Even though the actual purpose of this tool is to P2V a machine to a VMware environment, we can still use this converter to P2V VirtualBox.
- Third-Party P2V/V2V Converters: StarWind is one of the best options in the market. It allows converting working physical or virtual machines to desired virtual hard disk format.
- Third-party backup tools: AOMEI (and similar) backup tools can export a working physical computer to a virtual hard disk format.
Since VirtualBox supports most of the hard disk formats including VMDK & VHD, any output from different tools will work in this example.
You select the correct tool based on your scenario.
1) P2V with Disk2vhd in VirtualBox
It is a free tool from Microsoft to convert a local physical computer to a virtual format. This tool should be running on the local computer to convert its physical disks to virtual disk format VHD. We can’t use it to connect a remote computer to do the conversion. The output virtual disk format is VHD which is used by Microsoft Hyper-V and Azure cloud.
Since we already mentioned how to use disk2vhd for Physical to Virtual (P2V), please refer to the below links.
- Potential disk2vhd errors when you convert a working computer and how to fix them.
- How to use Disk2vhd to convert a physical server to Hyper-V
2) Physical to Virtual in VirtualBox by VMware vCenter Converter
This tool is from VMware to convert physical or virtual computers to their VMware virtualization software such as Workstations and ESXi (or vSphere). The output will be in VMDK virtual disk format, and VirtualBox will read it well.
The advantage of the vCenter converter over Disk2vhd is it can convert a computer (or servers) from the network. If you have administrative credentials of a remote computer, it will work perfectly over the network for P2V.
1) Download VMware Converter here
2) Convert your physical computer to virtual using the free VMware vCentre converter as mentioned here. Make sure that you select the correct physical partitions, processors and memory size for the new virtual machine. Don’t split the virtual disks during the conversion.
3) Once successfully created, locate the VMX and VMDK files. Don’t bother about VMX files.
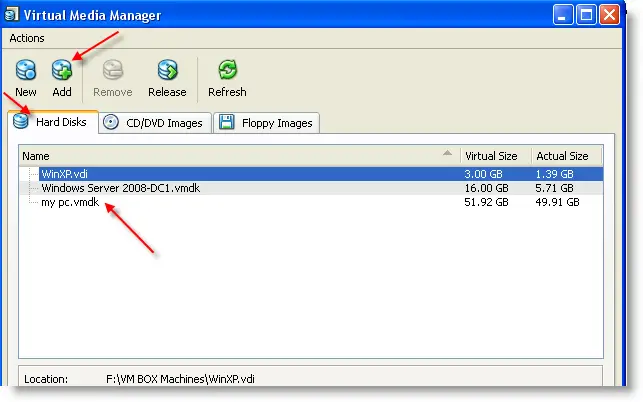
4) Now add the newly created vmdk file to the VirtualBox media manager as shown below.
5) You can refer to this guide about adding and accessing the VMDK files in Oracle VirtualBox.
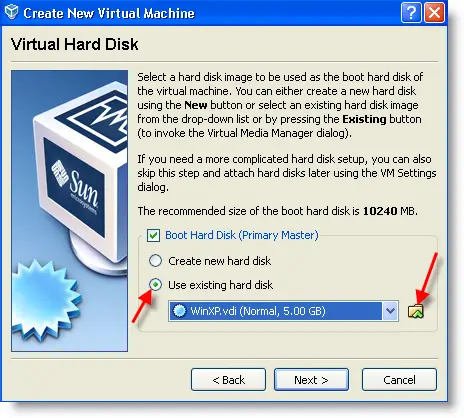
6) After successfully adding the VMDK disk file, create a new virtual machine in VirtualBox.
Select the correct guest OS, processor type and memory size. In the virtual hard disk option, select ‘Use existing Hard Disk’ and browse the VMDK disk file generated from the vCenter converter. So your new virtual machine will boot from the vmdk disk which we converted from physical to virtual.
7) Switch on the virtual machine now. It should boot normally. Sometimes it may install additional required drivers for the VirtualBox hardware platform.
Install VirtualBox guest additions to get better display performance with additional features inside the virtual machine.
8) You must see your physical computer on VirtualBox as a virtual machine now.
If you want you can convert the newly created VMDK file to VDI format with a free tool. After creating the VDI file, add it to the correct virtual machine and boot it.
3) Using StarWind Converter
This is another great GUI tool to use for P2V conversion. Download the latest version from the official website. Free registration is required to download the tool.
Install the product on the physical converter and select the correct virtual hard disk format.
We already mentioned the way of using the StarWind tool to convert a physical machine to the virtual one.
4) Third-Party backup tools
Most of the recent backup tools can export your physical Windows 10 or Windows 11 computers to virtual hard disk formats. You can easily convert them to the desired disk output format. AOMEI and Acronis can do this job easily. If you have paid version of these tools, you can use them for VirtualBox P2V. Sometimes the trial and free versions also can do the required job swiftly.
Once these tools exported the physical computer to a virtual hard disk, we need to create a new virtual machine in VirtualBox with the proper Operating System and then attach the existing disk to make it work.


Hi, great article and simple. All was going well until I booted and then it simply blue screens for a few seconds and goes back to the boot page.
Any ideas?
Alan
No way around a BSOD, you can’t boot that. You have to SysPrep it first, but it’s ok for me because I only need the data on the disk as VMDK anyway…
Go to VM’s Settings, Click the System button and check the “Enable IO APIC” option. Click OK to save the settings.Try.
Let me know. Sorry for delay reply
The converter seems to require VMWare to be installed and working. Is there any way around this requirement? I really do NOT want to have to install an entire VMWare system just to convert stuff.
@Karl,
VMware converter tool does not require entire package. Anyhow, here is the tool from Microsoft disk2vhd which will convert your physical disk to VHD ( Virtual Hard Disk) format. Then attach it to VirtualBox.
Download disk2vhd
Thanks Dinesh.
I’m using the Linux standalone converter. I don’t use Windows of any variety, so cannot run the Microsoft utility, but thanks anyway 😉
When I run the converter, there is no problem accessing the remote host and obtaining disk information etc. The second stage is to define a destination. That dialogue appears to require an existing VMWare host. If not, could you tell me what I should put into the dialogue? It asks for a server name, user name and password…
@Karl, then no use by disk2vhd.
Are you trying to convert local machine or remote computer?
Make sure to follow the settings here.
https://www.sysprobs.com/physical-virtual-machine-vmware-vcenter-converter
Check step 4. It should not be an issue.
Hi
first thank you for your work.
I made the .vmdk successfully, but when I run it with “Enable IO APIC” checked, i have a Blue screen with 0x0000007B error. When it’s unchecked the screen remains black with a fixed cursor on the top left corner.
Have you got any idea ?
Thank’s in advance
Molive
@Molive,
Try to attach the vmdk disk file to SATA port as mentioned here
https://www.sysprobs.com/add-sata-hard-disk-virtual-machine-virtualbox
Or while booting, press F8 and Go to safe mode ( if you are using Windows OS), then remove all drivers and try.
Thank you, Dinesh, for your reply.
– I’ve tried the safe mode with no success (same BSOD)
– not tried with SATA port because physical install is on IDE
– Tried this method too : http://www.virtualbox.org/wiki/Migrate_Windows (this link is very interesting) which did not work for me
– Finally what worked for me is the disk2vhd tool from Sysinternals (see http://technet.microsoft.com/en-us/sysinternals/ee656415.aspx) without anymore manipulation, as virtualbox recognizes vhd files
Thank you again and I hope my contribution will be helpful for somebody.
Molive
Thanks for this post. I tried using this on a Vista Business edition, but when I try to boot the VM in VirtualBox I get a black screen. I did try enabling the IO APIC, but that didn’t help.
Any ideas?
Hi Carlton,
Have you tried with disk2vhd (http://technet.microsoft.com/en-us/sysinternals/ee656415.aspx) ? it worked for me at first shot.
good luck
Molive
Molive,
I got it working. I had previously using the disk2vhd, but that didn’t work either. Turns out upgrading my VirtualBox fixed the issue.
thanks again for your post. Very nice to have both systems while I migrate everything to Windows 7.
@Carlton, @molive,
Thanks for your comments and suggestion. One more user also reported same black screen error while booting converted VMDK. I suggested to use Windows installation CD to repair the disk.
I had the same issue once and this method helped me.
Anyhow, disk2vhd is a good solution for P2V for two reasons.
Its from Microsoft ( so OS related boot sectors and architecture will be take care)
VHD is supported by VirtualBox.
Great article. Had to enable IO APIC when it failed to boot first. Now it wants me to activate windows? I see this on the web in my searches, but nobody here mentioned it. So, I was wondering if this is normal or if I did something wrong.
Be aware that disk2vhd will not take an image from an OEM Windows install and let you run it on any other machine – at least this is what the disk2vhd site says. I didn’t try it, as this kind of silliness from MS doesn’t surprise me. The whole idea of virtualizing a machine is to run the virtual image from anywhere isn’t it?????
I have no success.
I need an 1:1 copy of my external IDE USB drive. This Systernal tool only converts the used blocks but that is for not enough. My case is sort of a forensic one.
Since I am no techi and do not know about Linux or DD raw images (I might have to learn) I tried Symantec’s Ghost 15 Sp1 (it can convert its own images / recovery points into VMDK and has a boot cd!) and Pragon’s Hard Drive Backup Tools that do the same and have a boot cd, too. Moreover Paragon can copy directly into SUN VirtualBox image container.
However, I can not boot those images into VirtualBox. Tried with and without IO. May be I try the IDE / Sata think since my HDD is years old.
Can you give me some other tips how to manage that? Boot from CD and find a way to get an 1:1 copy clone that loads in VirtualBox?
PS:
I noticed that the VMware Converter can also make use of Symantec Restore Points (but it did not load mine?!?!) and also Acronis TrueImage TIB files. Might be interesting.
So, the thing that finally worked for me, was to put the HD on a SCSI controller in virtualbox…
I also had done some registry hacking, but this was what finally worked and caused windows not to 7b
Thanks Josh,
Putting the HD on a SCSI controller is what ended up working for me as well.
Awesome article!
Are there any Unix tools that I could use to convert an old SCO partition into a VMDK/VDI/VHD?
I used this method to P2V an HP server running a Windows Server 2008 R2 domain controller to my desktop. At first it refused to boot in VirtualBox, blue screen central. So out of curiosity I installed VMware Player 4.0.3. I was able to boot my VM image fine with VMware Player. After that I ran it for a while and let it run all the hardware detects and everything, even installed the VMware tools. Everything was running great.
So then I decided to give it another run in VirtualBox. No dice. Blue screen central yet again. I fiddled with all sorts of settings. What finally got it running was going into the settings of the VM in the VirtualBox console and detatching the disk from the SATA controller and attaching it to a SCSI controller set to LsiLogic. Now it’s booting in VirtualBox and I am very happy because all my other VMs are in VirtualBox.
I have a network adapter on my desktop that does VLANs, and I was thinking if I had to, I would create a private VLAN and attach both the VMware Player and VirtualBox VMs to that same private VLAN, but I’m glad that I don’t have to now. 🙂 🙂
Thanks for getting me going in the right direction, and I’m glad that I was able to get myself the rest of the way there! Hope maybe this will help someone else 🙂