This guide will teach us how to enable ping response in Windows 2019/2016 and 2012 R2 servers. Though the original post was written with the screenshots from Windows 2012 R2 server, the same steps apply to any recent Windows servers, including version 2022.
Enabling ping will help you to monitor and troubleshoot network issues on your network. The ping request will work according to your domain environment policies and settings. If it works by default, we will also show you how to disable the ping in Windows servers. We have mentioned the Powershell commands if you want to work on a remote system or Core edition of Windows OS.
Read Also: How to enable ping on Windows 10/11 client PC
Enable Ping in Windows Server 2019/2022/2016 – GUI
1) Go to the control panel and open ‘Windows Firewall’. There are plenty of ways to reach the control panel on a Windows server.

2) Click on ‘Advanced Settings.’

Additionally, you can search for ‘Firewall’ in Windows search to reach the advanced Firewall settings as below.
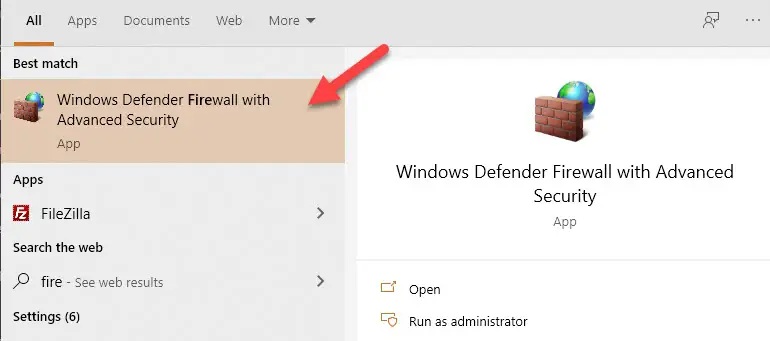
3) In the earlier Operating Systems, we need to create a firewall rule to allow ICMP echo packets. Luckily the rule is already there, and we just need to enable it.
To enable the inbound rule allowing ICMP packets, select ‘Inbound Rules.’
Locate the ‘File and Printer Sharing (Echo Request –ICMPv4-In’), right-click on it and select Enable Rule.

That will allow incoming ping requests and respond to them without completely disabling the Windows firewall service. As we enabled this rule only for IPv4 packets, we need to enable a separate similar rule for ICMPv6-In for the IPv6 network.
The below screenshot shows a Windows server started responding to ping requests once the above rule was enabled.

In a similar scenario, if a server is responding to ping/ICMP requests but needs to stop it for tight security, you can simply disable the same rule.
Visit the Windows firewall advances settings and disable the ‘File and Printer Sharing (Echo Request –ICMPv4-In’) rule.
Enable Ping by PowerShell Commands in Windows Servers
Geeks like command lines, especially the Windows OS admins love PowerShell. We can use the below commands to enable/disable ping on Windows Server and Client Operating Systems. Especially if you work on remote systems via PowerShell or have the Server Core OS without GUI.
Make sure to run the below commands ‘as administrator’ on the command prompt or PowerShell.
Enable IPv4 – This will create an exception in the default Windows firewall rule.
netsh advfirewall firewall add rule name="ICMP Allow incoming V4 echo request" protocol="icmpv4:8,any" dir=in action=allow
For IPv6:
netsh advfirewall firewall add rule name="ICMP Allow incoming V6 echo request" protocol="icmpv6:8,any" dir=in action=allow
To disable ping on IPv4:
netsh advfirewall firewall add rule name="ICMP Allow incoming V4 echo request" protocol=icmpv4:8,any dir=in action=block
For IPv6:
netsh advfirewall firewall add rule name="ICMP Allow incoming V6 echo request" protocol=icmpv6:8,any dir=in action=block
As ping is a useful utility to troubleshoot and find the presence of a network device, it completely depends on the network security policies of your environment to enable or disable it. We mentioned the easy steps you can do by GUI and command prompt in this guide.
![[Fixed] Windows Update Stuck at 0% on Server 2016/2019/2022](https://www.sysprobs.com/wp-content/uploads/2019/04/Downloading-update-stuck-211x150.png)


Very good article. Thanks for your help.
What about IPv6?
Excellent reference! Simple, clear and straightforward. Thanks a lot.
Thanks, Issue resolved.