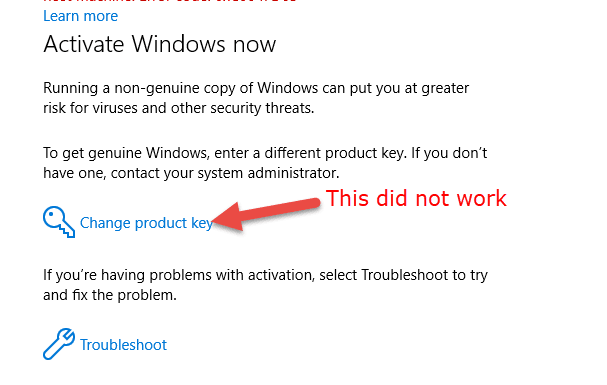
I encountered a strange issue while activating Windows 2016 server which was running on Hyper-V as a virtual machine. As usual, I tried the licence key activation from the control panel. To enter the new key, I clicked the ‘Change Product Key’ but nothing happened. It did not pop up to enter the license key. After doing research, I found out that this is a random issue with Windows 2016 and 2019/2022 servers, even sometimes in Windows 10 too.
Few solutions were suggested in several places. Rebooting the Operating System, doing Windows updates, and checking and fixing OS corruption were some of the proposed solutions. But doing these activities may not be possible all the time in a production environment.
Here is the simple and easy method to activate Windows 2016 or 2019/2022 servers when you are unable to change/update the Windows license key in GUI.
Change Product Key Not Working? Try in Command Prompt or PowerShell
Yes, that worked. Command prompt can do many administrative tasks when the GUI does not work.
In two ways, we can solve this issue. The first one will simply initiate the activation process via the GUI interface. The second method is to completely activate Windows via the command prompt.
Method 1
Open the command prompt as administrator and enter the below command.
slui 3

This will bring up the product key input dialogue box where you can change the key in Windows 2016/2019 and Windows 10. With the availability of an Internet connection, you should be able to activate the Windows now.
More useful slui keys
SLUI 1 – Will show the activation status window
SLUI 2 – Will show the activation window
SLUI 4 – Will call (Telephone) Microsoft to activate manually.
Each output may vary based on the Windows edition you have, whether it is a home, business or enterprise edition and the type of activations such as the online or KMS (Key Management Service) in-office network.
Method 2
If the earlier method doesn’t work and you want to activate Windows by the command prompt (which is the ideal way in a few cases if you’re going to activate a Windows server/PC remotely), then follow these steps.
Open the command prompt as administrator.
Let’s assume that the system is already having a trial or a wrong license key. So, remove the existing key by the below command.
slmgr.vbs /upk
Type the below command to make sure that the old key is removed from everywhere from Windows OS including the registry.
slmgr.vbs /cpky
Now type the correct activation key as below.
slmgr.vbs /ipk xxxxx-xxxxx-xxxxx-xxxxx
We just entered the key, not activated yet.
Type the below command to activate the Windows. Obviously, your computer should have a working internet for activation.
slmgr.vbs /ato
Now your Windows is activated.
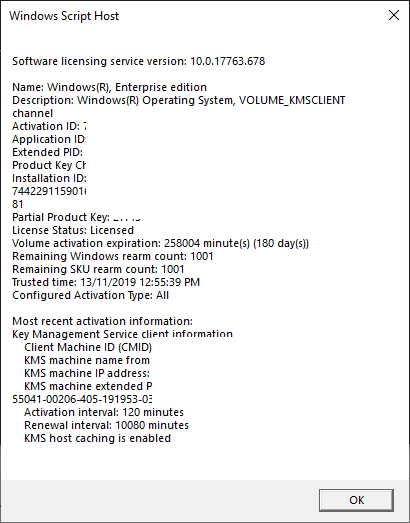
To verify the activation, try this command. This will give basic information about Windows activation.
slmgr.vbs /dli
If you need more details, try this.
slmgr.vbs /dlv
Remember, we are calling a specific Visual Basic (VB) script by slmgr.vbs. A dialogue box will pop up every time you enter the command.
The above commands are useful in overcoming the issue when the change product key option doesn’t work in the latest Windows Operating Systems.
![[Fixed] Windows Update Stuck at 0% on Server 2016/2019/2022](https://www.sysprobs.com/wp-content/uploads/2019/04/Downloading-update-stuck-211x150.png)


I ran into this issue on Server 2019 using our MAK. Two options worked for me: slmgr.vbs /ipk OR using the Change Product Key method (via GUI) AFTER applying all Windows Updates.
hello!
actually I’m from Pakistan and I’m using windows10 and I’m trying to activate windows since 2 days so when I saw your method then I tried this it was going fine but when I tried to enter the product key same as given by you it couldn’t worked. may I know the reason please?
U have tu use ur own key – a key that belongs to version U installed
have success and stay health