There are times when we need to transfer our data from one e-commerce platform to another. The reasons why we want to do that are manifold. Any business owner wants to try different options to figure out which solution can best meet their specific business needs. No wonder you also may find yourself eager to leave your tried-and-trusted platform and explore other options available on the market.

Just like many other users, you may realize that your previous platform wasn’t flexible or user-friendly enough. Or you may simply want to tap into the most recent achievements of shopping cart techs and shift your products to a new, more promising platform.
BigCommerce and Shopify are some of the most popular cloud-based platforms used for launching online businesses. And whether you’ve already resolved to migrate from BigCommerce to Shopify or just to wonder if it’s actually possible, you’ll find today’s post particularly helpful.
Pre-Migration Steps
1. First things first, you want to make sure that you need the data you’re planning to transfer to another platform. If there are some items you can do without, don’t hesitate to remove them. That will spare you the bother of migrating them.
2. Just like you may have some junk data you’ll want to dispose of in the migration process, you may have super important files you cannot afford to lose during re-platforming. Therefore, you would be well-advised to back up important data before performing the database transfer.
3. Another important step involves creating a Shopify account. For this, go to their official website, fill out the signup form, and select the ‘Start Free Trial’ option.
4. Current algorithms responsible for transferring your business data between platforms won’t allow you to migrate your store design from BigCommerce. But this fact shouldn’t upset you since Shopify has a rich selection of great themes for your store. There are both free and paid options available.
5. Last but not least, you’ll need to calculate the cloud migrating cost.
You already know that every user who wants to perform an inter-platform migration operation must pay for that. But how much exactly will you need to fork out to transfer your current online business to Shopify? Well, there is no fixed price. So, you’ll need to calculate it for your individual business based on its size and amount of imported data.

Migration Process
Once you’ve taken all the pre-migration steps, you’re all set to get down to transferring your data.
First, you need to choose a SaaS migration tool like MigrationWiz in order to perform the migration in a hassle-free and safe manner. Still, today, the market is overflowing with other SaaS migration solutions that can help you effectively transfer your online business data between platforms. So, it’s up to you to decide which one to use.
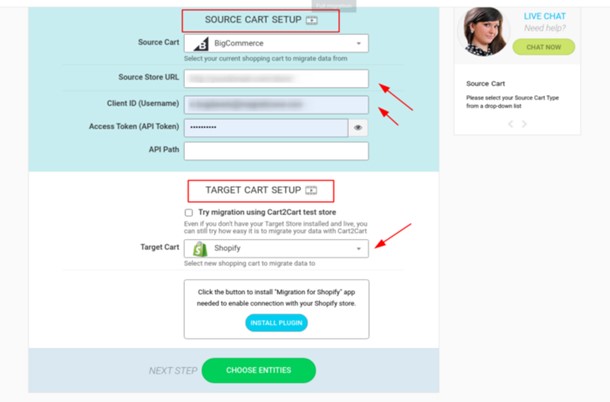
In the corresponding fields, enter your BigCommerce and Shopify platform details.
- To do this quickly, select the platforms from the dropdown menu and type your stores’ URLs into the corresponding fields. Make sure to provide other credentials, like your API token, client ID, and API path. Double-check everything to avoid any errors.
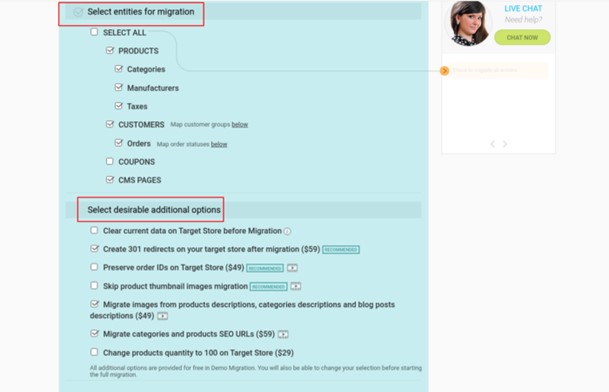
Once you’re done, go on to transfer your current data, including products, customer database, blog pages, CMS pages, reviews, discount coupons, orders, and additional options to Shopify.
Should you need to remove irrelevant data, just tick the corresponding boxes. If need be, check additional migration options.
You can avail yourself of the free demo migration option. This handy option will help you figure out the data transfer algorithm and the way your Wizard exports specified data. Moreover, you’ll be able to check out the design of your new Shopify store.
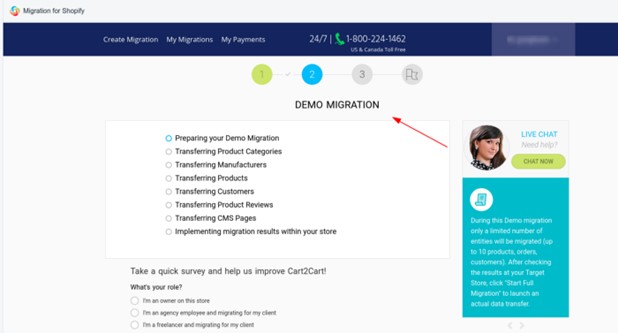
If you’re fully satisfied with the demo results, go ahead and perform the full migration procedure.
Make sure you’ve exported all the required data from BigCommerce into CSV files. After that, you can import them into Shopify.
Post-Migration Tips
Once you’re finished importing your data into Shopify and make sure your new store looks and operates as intended, you want to finalize your success by following some simple steps outlined below.
1. The first thing you want to do is make sure that your domain name is available and specified correctly.
2. Try and put your newly imported online store to the test. Assume the role of a customer and navigate through your store. Your customers shouldn’t experience any problems when looking for specific products, adding them to their carts, adjusting their type and quantity, sorting items, and much more. So, make sure that all options are available and work as intended. Also, check menus and links on your page thoroughly.
3. Make sure your offers are visible to your customers and properly categorized.
4. To enhance your store productivity and make it stand out from your competition, you want to use dedicated Shopify applications, either paid or free.
5. You’ve probably heard of tons of notifications Shopify tends to bombard their users with every time they transfer their old orders from other platforms. To avoid needless distractions and stay focused on the importing process, consider temporarily disabling notifications. To do this, go to the admin panel, navigate to ‘Notifications’ from the ‘Settings’ section, and select ‘Disable.’
Hope your successful migration will help you grow your online business and boost revenues in the shortest possible time.