By default Windows 8.1/7 and Vista come with a built-in firewall enabled. In that case, it is not going to respond to ping commands (ICMP requests) from other computers/servers on the network. Even though you can access network shares from other Windows desktops or laptops but still it will not respond to ping requests by saying ‘Request Timed Out’ message. The below article shows how to enable ping response/reply in Windows 7, 8.1 and even the older version of Windows Vista.
If an ICMP echo request/packet (which is used in the ping command) comes from the internal or external network, your PC will not respond to those requests. It is one of the primary security features on most Windows Operating Systems. But in some cases, it needs to be enabled to verify the connectivity and other tests (mostly in the networked environment). Windows 7 and Vista have similar steps whereas Windows 8.1 has a bit different way of enabling ping reply. We have covered all of them in the below guide.
Indication: ‘Request Time Out’ message comes from Windows 8.1/7 Computer and it doesn’t respond to ICMP echo requests from other network devices.
All network shares are working but ping reply is not working.
Reasons: The ping command uses ICMP (packets) echo requests which are blocked in the Windows OS firewall by default.
Solutions to Enable Ping Response in Windows 7 & Vista
If you are still using Windows Vista, you can follow the same steps shown below for Windows 7.
We have two options to do:
1) Disable the firewall entirely in Windows 7, which is not recommended.
2) Create an exception rule for ICMP echo requests to reply to ping commands in the existing firewall without disabling it completely.
Modify ICMP Rule in Windows 7/Vista Firewall
Follow these steps to create a rule in the firewall policy to allow ping response. Though it looks slightly complicated, anyone with Administrative rights can do the steps easily by following the steps.
Read Also: Funny Wi-Fi names you can give for your home wireless network
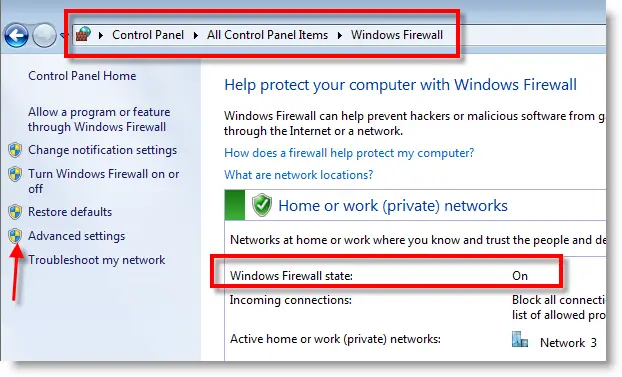
1) Go to Windows Firewall in Control Panel
You can see that the Windows Firewall status is On here. Click on Advanced Settings.
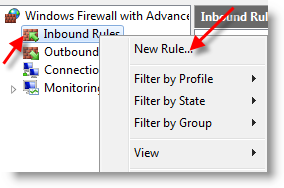
2) Select Inbound Rule, right-click on it and select New Rule.
3) Choose Custom (Custom Rule) at last and press Next.
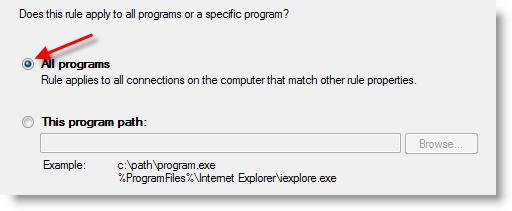
4) Leave All programs option and go to the next step.
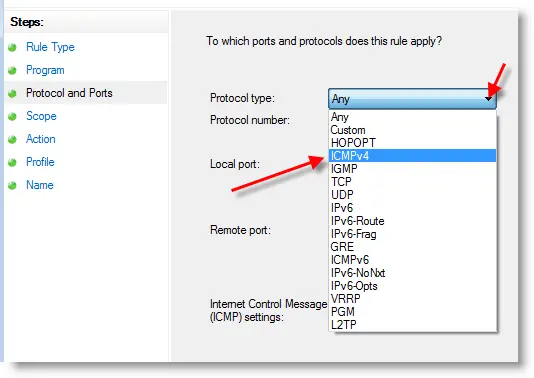
5) Click on the Protocol type and select ICMP4 as shown below. ICMP4 is the protocol used in ping commands when your network is communicating via IPv4.
6) We will apply this rule for all IPs, so it will respond to any IP addresses coming with an echo request. Select ‘Any IP addresses’ on the next screen.
You can add specific IP addresses also if you want your computer to respond to only these IPs for ICMP echo requests (ping).
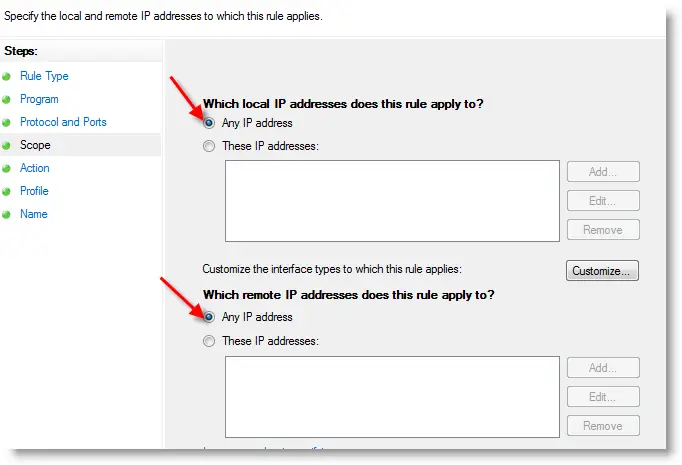
7) Allow the connection on the next screen and press Next.
8) Keep all three checkboxes checked on the next screen to apply this rule to any network you are connected to.
9) Give a name for this rule. This name will be shown under Inbound Rules in Windows Firewall. In future, you can delete or disable the rule by this name.
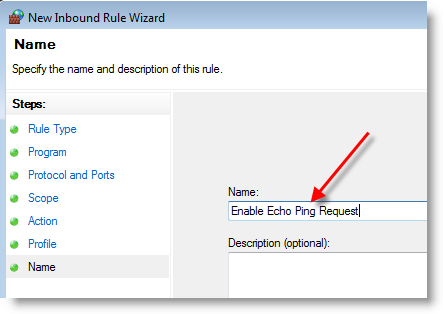
Click Finish.
10) That’s it; these are easy steps to enable ping reply in Windows 7 or Visa. The rule will be immediately applied and appeared in inbound rules. Now, Windows 7 computers will be responding to ICMP echo ping requests.
How to Disable Ping Reply in Windows 7 or Vista?
As mentioned earlier, ping reply is disabled by default in the Windows firewall. If you have created an exception rule as above, you have to simply turn off the above rule to block/disable ping reply in Windows 7. Make sure that the firewall service is up and running. Even after turning off the above rule if the Firewall service is not running, it will still reply to ping commands.
Enable Only ICMP Echo Requests in Windows 8/8.1 to Respond Ping commands
In Windows 7 we had to create a rule to enable ping reply, but Windows 8.1 got a built-in rule that needs to be activated. Disabling the firewall entirely also will respond to ping requests, but it’s not recommended considering the network and computer security.
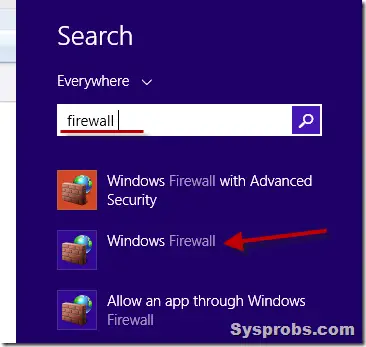
1) Open Windows firewall settings. Search for ‘firewall’ in search (from charm bar) and click Windows firewall. It can be accessed from the Control Panel also.
2) Here you can completely turn off the firewall, so ping reply will work but we are not going to do it.
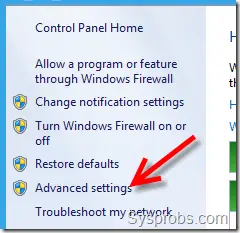
Select Advanced Settings to open more advanced Windows firewall settings.
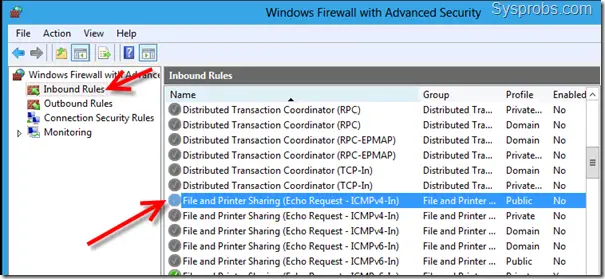
3) There are pre-made ICMP Echo rules available in Inbound Rules, and we just need to enable them.
You must consider two factors while enabling the rule,
a) Network protocol type ( Is it IPv4 or IPv6?)
b) Network location type ( Is it a Private, Public or Domain network?)
Mostly we may need to enable ping reply on Private or Domain networks only, not for the Public network. Please select the correct rule matching your scenario and enable it by right-clicking and selecting Enable Rule.
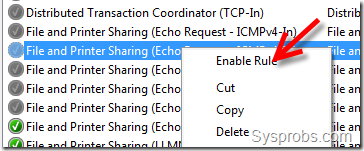
That’s it, we have just enabled the ping response in Windows 8.1 without disabling the full Windows firewall.
If you like to disable it again and do not want your computer to respond to ping (ICMP Echo Requests), then right-click on the same rule and disable it.
Though you enabled the ping response in Windows firewall by the above steps, if you have a third-party firewall software such as Comodo or ZoneAlarm, you must enable ping reply in this security software also if they are working as the first firewall protection on your computer.

![[Fixed] Windows Vista Not Detecting Wireless Networks](https://www.sysprobs.com/wp-content/uploads/2009/12/wireless-network-issue-211x150.jpg)
![[6 Fixes] Can’t Connect Remote Desktop to Windows 10 or Windows 8.1/7](https://www.sysprobs.com/wp-content/uploads/2010/02/Remote-desktop-issue-Windows-10-211x150.png)


My Pc has 2 gb ram and 5000gb hard disk, i was using my canon printer and its start showing
canon mp470 wireless setup any idea to resolve it.
I’m Getting AOL Error Code 554 while sending or receiving new mails.
I am getting Error 5b00 on my Canon Printer? How can I fix it