There is very little chance that you are still using the Virtual PC on your Windows OS. In case you use it, here is a simple guide that shows how to mount ISO File on a Virtual PC to boot and install OS on a virtual machine. Microsoft Virtual PC is a pretty old desktop virtualization software that supports up to Windows 7 host and guest only. That indicates you can install this software on Windows 7 computer and use it to create Windows 7 virtual machines (or previous MS Operating Systems).
Since Microsoft has shifted their focus on Hyper-V, there is no update for Virtual PC. As you must be aware that you can install the Hyper-V virtualization feature on the latest Windows OS computers, the importance of Virtual PC reduced a lot. As an alternate solution, the free Oracle VirtualBox can work better with an excellent range of supported guest virtual machines.
If you have the ISO files of Windows 7 or earlier Operating Systems (like XP or Windows 98), this guide would be useful to mount the ISO file to install guest OS.
How to Install ISO File on Virtual PC?
Unfortunately while creating the new virtual machine you will not get the option to attach the ISO file. Even after creating the VM, it is not available in settings. Usually, this option is available on other virtualization software platforms like VirtualBox or VMware workstation, but it is different on MS Virtual PC.

Steps to mount ISO files to new virtual machine’s CD drive in Virtual PC;
- Power on the VM, make sure CD or DVD drive is attached (Check box should be ticked as shown in the previous screenshot)
- As we expected, the new OS will be waiting or trying for bootable media. Click on CD and select Capture ISO Image as shown below.
 Here you can browse the ISO file and click open. Wait for some time to start the installation, if not, go to the ‘Action’ menu and click reset to restart Virtual Machine. This time it will boot with the ISO file you selected the continue the installation
Related: Access IMG files in Windows OS without burning to DVD
Mount ISO file in Hyper-V (Windows 11/10 Host computers)
As mentioned earlier, if you are using the latest Windows Operating Systems, you do not need to use the Virtual PC software. Instead, use the built-in Hyper-V feature. You can mount the ISO files as shown below.
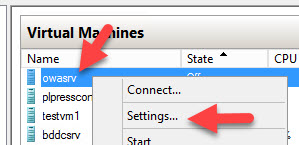
1) Right-click on the virtual machine you want to attach ISO and select settings (There are some other ways available to open the VM’s settings in Hyper-V)

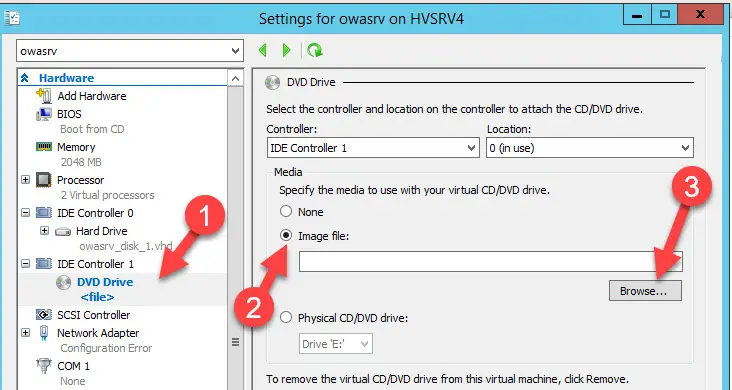
2) Under the IDE controller (or SCSI Controller) wherever the DVD drive is attached to VM, open it and browse the ISO file.

If the virtual machine doesn’t have any Operating Systems installed, it will boot from the ISO file (DVD drive) in the next boot. If there is OS installed, you may need to change the boot order to boot from a DVD drive instead of the hard disk.


![[Fixed] Hyper-V Failed to Change State – Code 32788](https://www.sysprobs.com/wp-content/uploads/2017/05/errorcode32788-1-211x150.jpg)
