Cloning an existing working virtual machine is the ideal way to deploy identical virtual machines quickly in any virtualization platform. It can greatly save time while deploying VMs for testing and production purpose. The Oracle VirtualBox has several tools to clone a virtual machine. We will be discussing all possible ways in this guide.
What is cloning? It is a process of creating a new virtual machine by copying the existing VM. It will copy the virtual hard disk (VDI) and configuration files to the new location. This process helps in reducing time and disk space for creating similar virtual machines.
Here is an example,
Let’s assume that you have installed Windows 2019 server OS on VirtualBox and completed all updates and required application installation. Now, you need to have another two similar Windows server virtual machines to have an Active Directory domain setup.
Also, the existing original Windows 2019 server VM would have consumed 8GB of disk space on the host computer and spent 2 hours completing the entire setup. If you do not have the clone feature in virtualization software then you need to spend another 16GB of host disk space (8GB x 2) and 4 hours to prepare similar two virtual machines. But, by using the cloning technique we can save time and disk space tremendously.

Methods of Cloning a Virtual Machine in VirtualBox
We will be discussing the following VirtualBox cloning methods in this guide.
- Clone in VirtualBox Console
- Clone by CloneVDI tool
- Clone by the CLI (Command-line interface – Command prompt)
1) Clone Virtual Machine in VirtualBox in Console
There is an easy and simple option available to clone a particular VM from the console screen. There are two types of cloning available here;
a) Full Clone
b) Linked Clone
The full clone simply creates an independent VDI file that is the exact size of the original VM. In the above example, if we clone the Windows 2019 server VM, the cloned VM will have the exact same size as the new VDI file (8GB). Also, the new cloned VM will not have any relation to the original VM. This process takes more time compared to the next type of cloning called, linked clone.
The Linked clone creates the VM with a small VDI file which is linked to the original VM VDI file. So, the VirtualBox can create a VM faster with less disk space. Because it creates a separate small-sized ‘linked’ virtual hard disk compared to the original 8GB VDI file in this example.
The new cloned virtual machines will be working with the ‘linked’ virtual hard disk and all new changes will be saved in a newly created disk. But, the original source VDI file must remain at the same place. In the end, you save a huge amount of disk space and time by linked clone.
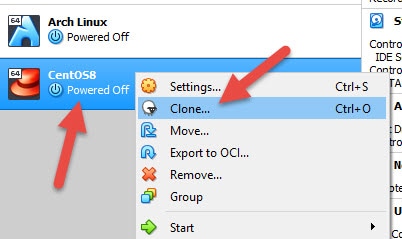
1) To create a clone of VM, shut down the VM first.
2) Right-click on VM and select ‘Clone’
3) In the next screen, give a name for the virtual machine. It is always better to keep a different name for hard disk and hardware UUID for the new VM which will be cloned from the existing VM. This will avoid future conflicts between VMs when we connect through the network or add to a domain environment. Hence, do not select the below options while creating the clone.

4) Select the type of clone on the next screen.
Remember, a full clone takes time and more disk space, but works independently from the original VM. Also, it is portable. You can move the VM to different hosts or locations since it doesn’t have any links to the base VM.
On the other hand, Linked clone creates the new VM faster with less disk space on the host computer, but it will be depended on the source VM. You can’t move the original or linked clone VMs to different locations or computers since they are linked together. But this is the ideal solution to use on a single computer if you need to have similar multiple VMs.
Once you created the clone successfully, you can see an additional notification in the original virtual machine stating that this machine is a Linked Base for another VM. Therefore, if you delete or move the original virtual machine then the linked-clone virtual machine will not work.

Also, you could see a snapshot created for the original VM automatically. In fact, this snapshot will be the base for the cloned virtual machine, because the new changes you make in the original virtual machine should not affect the other linked cloned virtual machines. This particular snapshot should be protected from accidental deletion and merging.

That was the simple and easy method to create a clone of a Virtual machine in Oracle VirtualBox. We can create both types of clones from the console easily as explained above. For some reason, if you are looking for other options, then check the below two methods.
2) Steps to Clone Virtual Machine in VirtualBox with CloneVDI Tool
CloneVDI is a GUI tool from VirtualBox to clone most of the virtual hard disk formats such as VDI, VHD, VHDX, VMDK, Parallels HDD, RAW files and physical drives.
Download the latest CloneVDI tool from the official site here.
1) Extract the downloaded zip file. Installation is not required.
2) Before starting the process, let me explain how it is going to work.
This tool will clone the hard disk file only. So you have to create a new VM with a similar configuration to the original VM and attach the cloned VDI file to get a working new virtual machine. This tool does not clone VM configuration XML files.
Snapshots must be merged with the original VDI file before using the CloneVDI Tool. Why? Because if a Virtual machine has several snapshots, the current state of VM will be working from the snapshot file, not from the original VDI file. So, cloning the first original VDI file will not give the current state VM.
Here is an example, I’m going to clone Fedora Virtual machine which is having several snapshots. You can see the hard disk details as shown below.
 1– is the original disk VDI file which is having the original system state before any snapshots are taken.
2 – this is the disk file currently the virtual machine is working.
We can’t clone the 2nd file, because it is not a complete disk (it is just a snapshot hard disk file). Also, if we clone the 1st VDI, then we will not get all changes done after the first snapshot on this particular virtual machine.
Then, how to proceed?
3) If you do not want the latest state of VM, then you are free to clone the original VDI file. But if you want to clone the current state, then delete all snapshots. Deleting snapshots will merge the machine’s current state to the original VDI file.
4) After removing snapshots, open CloneVDI.exe from extracted location and browse for the VDI file you want to clone.
Here is the new version of the tool.

Since not many changes in GUI, I’m keeping the older version for this demonstration.

Make sure that the validation result shows OK for the disk. Each disk in VirtualBox Virtual media manager should have a different UUID, so keep the ‘Generate new UUID’ ticked. Increasing virtual disk size possible with the CloneVDI tool.
Press Proceed button to start the cloning.
5) Once successfully completed, create a new virtual machine with the exact OS type and version. Other settings can be slightly different, such as memory size, processor cores and network type. Select the existing disk option while creating the hard disk step and attach the converted disk.
It’s better to attach the disk to the same storage controller mode/type in the new virtual machine to avoid booting issues.
3) Clone by CLI (Command Prompt)
Most probably you do not need to use this method after seeing the above two methods with the graphic user interface. Still, if you are an expert in CLI and like to use the command prompt, here are the steps to clone a virtual machine by VirtualBox commands.
We can use two built-in VirtualBox commands to clone a VDI file. Remember, this method will clone the entire hard disk. There is no option to make a full or linked clone to save space or time. Also, the snapshots should be merged into a single original file to get the current state of the virtual machine.
1) Remove the virtual disk (which you want to clone) from the Virtual Media Manager.
Go to media manager, select the disk you want to clone, if the ‘Remove’ option is disabled, first press Release then Remove. Make sure that you are NOT DELETING the disk file.

2) If you execute the clonehd command without removing the disk from the media manager, you may get this error message: “already exists in the media registry”.

3) Run the following command. In this example, I’m trying to clone Windows2008R2.VDI disk into the same location. I set the Windows Operating System Path to C:\Program Files\Oracle\VirtualBox\ already. If you have not set the path in Windows variables, then you need to execute the command from this location (But enter the correct path of the origin and destination of VDI files),
C:\Program Files\Oracle\VirtualBox
So, my command is below.
C:\Users\Dinesh\.VirtualBox\HardDisks>vboxmanage clonehd Windows2008R2.vdi Windows2008R2_Clone.vdi

Windows2008R2.VDI – is the original Windows 2008 R2 server installation disk
Windows2008R2_Clone.VDI – is the new cloning disk I’m creating.
4) The successful virtual machine hard disk cloning will return a 100% completed message and the same size as the VDI file.

5) We successfully cloned the hard disk only, not the complete virtual machine. So we need to create a new virtual machine and attach this converted VDI file to make it bootable.
We can use clonevdi command as we used clonehd above.
C:\Program Files\Oracle\VirtualBox\VBoxManage.exe" clonevdi "Ubuntu 19.vdi" "Ubuntu 19 clone.vdi"
We have shown all possible ways to make full and linked clones of an existing virtual machine in VirtualBox. Each method involves different steps and outputs. Depending on your scenario and requirement, you can use the preferable method. The Linked Clone is something interesting and useful to create multiple identical virtual machines on a single host to save time and disk space. Other commands and CloneVDI tools can play a major role depending on your requirement.


Copying works nicely both with Ubuntu 10.0.4 and Fedora 13. However, there is problem of shutting down or logout in Fedora 13 when the copied Fedora13.vdi is used. The system hang and VB was not responding after trying to shut down or logout fedora 13.
I forgot to mention that I was running win7 (64bit) with virtualbox 3.2.6 on a laptop with SU3500 cpu.
@biotek8,
I don’t think this will be an issue with VDI cloning. Are you running both machines in same time when network connected? May be some issues with same machine name or ID something?….. I have no idea.
Yes, I was testing the copied VB on the same computer as original VB was running. After reading your commnets, I did it on separate computer and it worked flawlessly.
For your information, I also installed OpenSUSE 11.3 on VB under Win7. Installation of Guestaddition is not needed and “Seamless mode” runs right after linux installation.
Thanks for your great input.
Thank you, I successfully cloned a 20GB VDI containing Windows 7 in under 13 min. quickly created a new VM then used this new drive.
Great article.
When using VirtualBox’s full clone or linked clone is it just a matter of following the steps in your example and then after cloning both VMs can run independently from each other and simultaneously ?
For example, don’t we need to sysprep ?
Kr,
EDH