If you want your Surface Pro boot from USB, this guide will show the steps to follow on all models. Most of the time, you do not need to change or disable the Secure Boot on Surface Pro or any other latest Windows OS devices.
Secure Boot is one of the security features introduced by Microsoft to protect your device from threats which can impact the boot loaders. But in special cases, you may need to disable the Secure Boot.
I had to disable the Secure Boot on the Surface Pro 6 laptop to reinstall Windows 10 by booting from USB. In another situation, I had to disable it because the Antivirus software was creating an issue (Windows 10 was not booting) by active Secure Boot.
The steps below apply to most of the latest Surface Pro models like Pro 7 and 8 to reinstall Windows 11 and 10.
Steps to Disable Secure Boot on Surface Pro
- Power off the Surface Pro
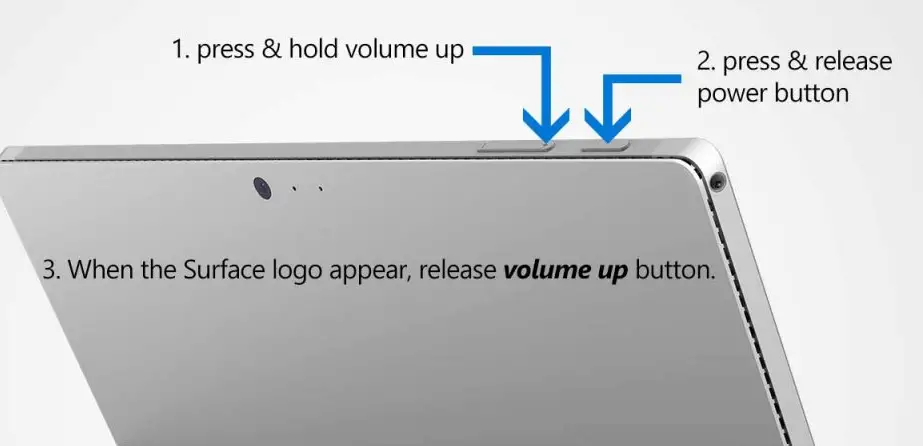
- Press and hold the volume up button; now press (and release) the power button. Keep holding the volume up button.
- Your device will boot up now. Once you see the ‘Surface Logo’, release the volume up button.

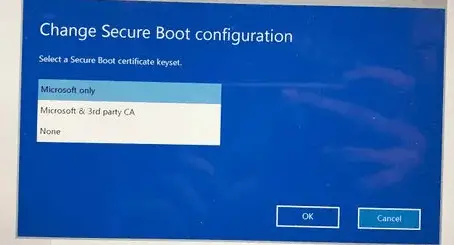
- In the next options, select ‘Security’ then the ‘Secure Boot.’ Press Change Configuration.
- Select the ‘Microsoft and 3rd Party’ option first. This is almost like disabling the secure boot feature locked for Windows 10/11 boot loader only.

Once you select this option, you should be able to boot the Surface Pro from USB and reinstall the OS.
If this change is not helping you, then select ‘None’ from the same menu to completely disable the secure boot feature.
Exit the setup. You may need to confirm while saving and rebooting the device.
When the secure Boot is disabled, you notice a lock icon with a red line on the Surface Pro 6/7/8 device.
As we did this change to boot the OS from USB or fix some other issues related to the device, once the required actions are taken, it is highly recommended to enable the Secure Boot again.
Boot Surface Pro from USB to Reinstall Windows 10/11
The OS USB you have should be UEFI compatible and formatted in FAT32. The tool you used to create a bootable Windows 10/11 USB should do that job. If the USB is in NTFS format with Windows 10 bootable OS, we must disable Secure Boot to boot in Surface Pro.
- Connect the USB disk when the device is turned off.
- Hold the volume down button and press (and release) the power button.
- When you see the Surface logo, release the volume down button.
- Surface Pro should boot from USB now.
Remember: We press volume up to get firmware settings, volume down to Boot from USB.
Troubleshoot If Surface Pro is Not Booting from a USB
a) Make sure that that booting order is set properly.
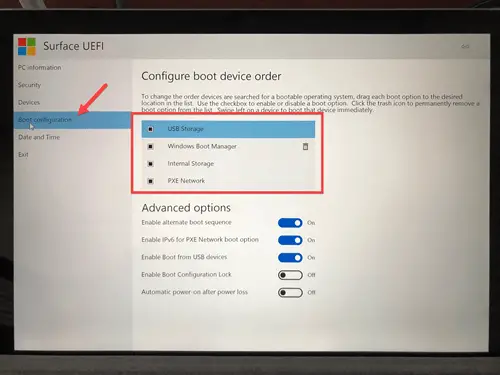
You need to access the UEFI settings (like mentioned earlier to disable the Secure Boot).
Power off the device, press and hold the volume up button, then power on the device. After seeing the surface logo, release the volume up button, which will take you to the settings.
Access the boot configuration options and enable or reorder the USB storage boot.

b) Check the file system of the USB
The USB disk should be FAT32 and UEFI compatible; if not, disable the secure boot option as we did in step 1 and change the boot order.
With the above steps, if the bootable OS image you have on the USB is intact, you should be able to boot the Surface Pro from USB and install Windows 10/11 OS.


Hello there….
I’ve followed the steps above and my Surface Pro 6 upon restart takes me straight to the Surface UEFI page and not to my original Ubuntu OS or my bootable Windows USB