If you are trying to convert a physical computer to a virtual machine that should be used in a VMware Workstation, Oracle VirtualBox, or VMware vSphere, continue reading this article. We can use the free version of VMware vCenter Converter to convert any local or remote physical machine/server to a virtual environment.
Note: Disk2vhd is another free tool to convert a local physical computer to a virtual environment. But it can’t be used for a remote computer running on the network.
Requirement and Output File format
Regarding P2V (Physical to Virtual), we need to see where we will host the virtual machine. It can be a local hypervisor software or a cloud platform. Each vendor uses their proprietary virtual hard disk format and configuration files.
Here is the summary:
- Oracle VirtualBox uses VDI disk file format. But they support VMDK and VHD also.
- VMware Workstation, VM Player, and ESXi only use their VMDK disk files.
- Hyper-V on Windows host, Servers, and even Azure cloud support VHD and VHDX disk files.
So, when you use a P2V converter, you must see the output file format and compatibility of the virtualization software you will use.
As you can see, the Oracle VirtualBox supports most disk file formats since it is open-source virtualization software. Also, few tools are available to convert the virtual disk file formats. For example, you can convert a VDI file to VMDK or VDI to VHD. Knowing these file formats, compatibility, and converters will help do the P2V correctly or troubleshoot later.
Physical to Virtual by VMware Converter in Windows 10
Follow the steps to create VMDK files by converting physical to virtual (P2V) in VMware vCenter Converter.
1) Download VMware vCenter Convert for Physical to Virtual (it’s free, but registration is required)
2) Complete the installation.
3) Open the converter, and select ‘This local machine.’ You can select a remote computer that can be any physical server. You must have administrative privileges on the remote computer to complete this.
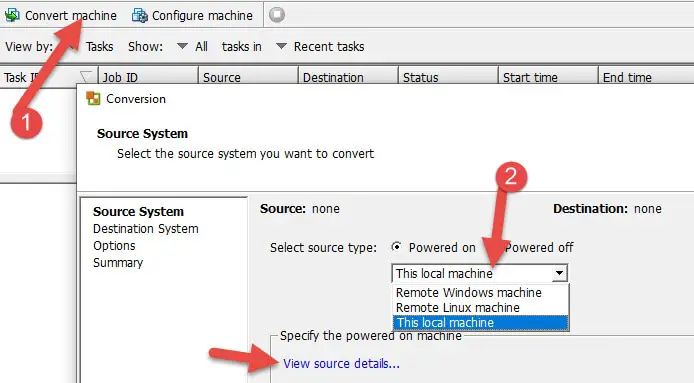
Click ‘View source details’ to ensure the converter reads the physical computer resources correctly.
If you use a remote (network computer) based on the user name/password, the converter will take the inventory of the remote PC and list the details. This step will ensure that the user and the converter have proper access to the computer.
4) Click next. Select the destination type.
I selected a VMware workstation as the type. If you select VMware hypervisor, you must have the details to upload the VM directly to the ESXi server.
Select the version, the name of the VM, and the location where you need to save the converted VMDK and other VM files. Make sure the location has enough disk space. It depends on the physical disk size and what disks you selected to convert.
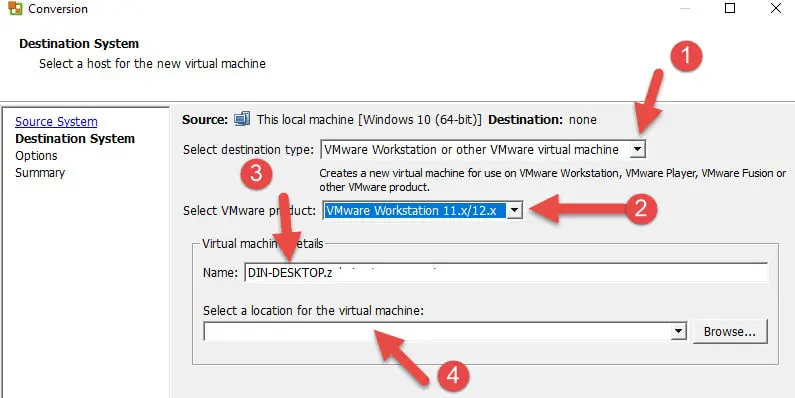
5) The next screen will offer more advanced options once you click Next.
Click on ‘Data to copy’ to choose the physical partitions to be included in the conversion. You can’t remove system or boot partitions from the list, which will cause virtual machine booting problems later. The target disk size in the virtual machine is editable on this screen.
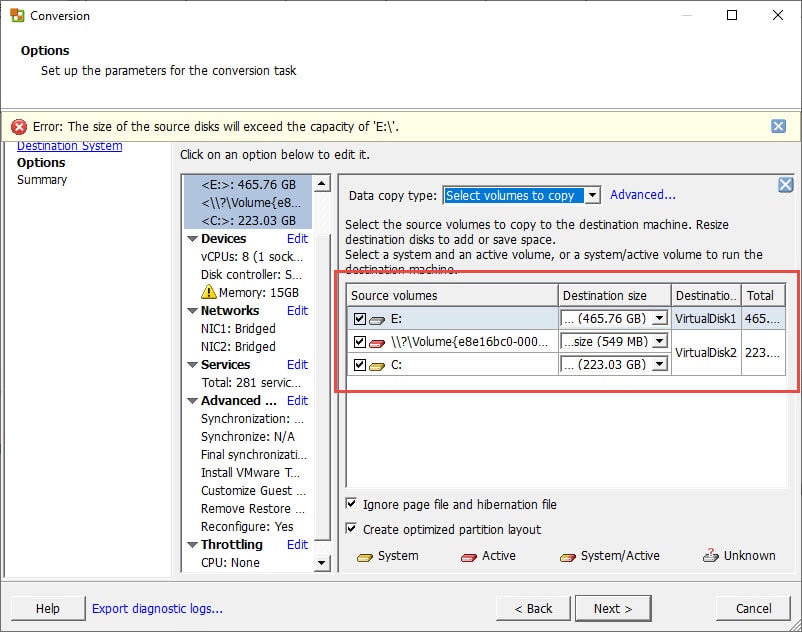
6) Other options such as processors, disk types, memory size, network type, and Windows services can be customized.
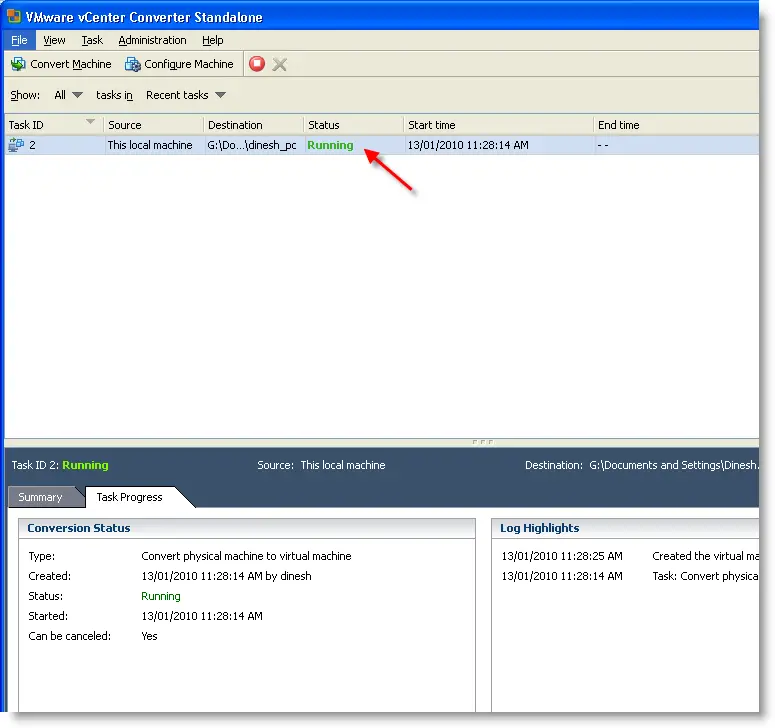
7) Click Next and check the summary list as per your selection. Press Finish to start the P2V migration by VMware vCenter Converter. The conversion task can be viewed below.
8) Once the process ends, you will get the virtual hard disk in VMDK format.
As mentioned, this VMDK file can be directly attached to VMware products and VirtualBox.
In VirtualBox, create a virtual machine with the appropriate hardware and OS version; instead of creating a new hard disk, attach this converted VMDK.
If you need to use this converted VMDK in Hyper-V, it must be converted to VHD format. We have already published a guide VMDK to VHD here.
What are P2V and V2V migrations in VMware?
P2V (Physical to Virtual) and V2V (Virtual to Virtual) migration are two methods of migrating a physical or virtual server to a virtual environment using VMware.
P2V migration involves converting a physical server to a virtual machine, while V2V migration involves transferring a virtual machine from one host to another. Both methods require careful planning and execution to ensure a successful migration without data loss or downtime. P2V and V2V migration can provide many benefits, including improved flexibility, scalability, and cost savings.
What are the two options to convert physical to VM?
The two options to convert physical to VM (virtual machine) are using a physical-to-virtual (P2V) migration tool or manually creating a new virtual machine and installing the operating system and applications from scratch.
The P2V migration tool automates converting a physical machine to a virtual machine. At the same time, the manual method requires more time and effort but allows for greater customization and control over the virtual machine configuration.
How do I clone a physical server to a virtual machine?
To clone a physical server to a virtual machine, you must use a software tool to convert the physical server’s data and Operating System into a virtual format. Some popular tools for this task include:
- VMware vCenter Converter
- Microsoft Virtual Machine Converter
- Acronis Backup.
Once the tool is installed, you can follow the instructions to select the physical server and create a virtual copy on your virtual machine host.
It is important to note that the process may take some time, depending on the size of the physical server and the speed of your hardware.
Additionally, you should ensure that the virtual machine has enough resources and storage to run the cloned server effectively.

![[Guide] How to Merge Snapshots in VMware Workstation?](https://www.sysprobs.com/wp-content/uploads/2010/09/p2v-in-virtualbox-by-disk2vhd-211x150.png)


I followed the steps and a few minutes after I fired-off the conversion it FAILED
with the following Error Message:
FAILED: Unable to create a VSS snapshot of the source volume(s). Error code:
2147754776 (0x80042318).
Any ideas?
@vess, Check this post http://communities.vmware.com/thread/199512.
It may help you.
Hi,
The link: http://communities.vmware.com/thread/199512 it´s not working. I have the same problem. Can you help me please?
Thank you
What version of VMware Converter did you use? The ones I have been able to download (3.0.3 and 4.0.1) don’t match your screen captures. I am trying to do a P2V conversion of Linux to run on a Windows environment. Have not been successful either with converter installed on the linux machine (local) or installed on the Windows machine (remote). They fail when entering the destination.
@Gregg,
Earlier also one user reported similar problem on Linux host. I used version 4 on Windows host, but I found this below sentence in VMware converter site for linux users.
*Linux P2V support is available for Standalone version only
I think something is different in Linux version than I showed here.
Try this method, it may help your requirement http://www.petri.co.il/physical-to-virtual-conversion-of-linux-servers-with-vmware-converter-bootcd.htm
I am able to create the Virtual image from Physical M/C , But when I am trying to run it through Vmplayer . I am not able to run .While creation the image i choose Vmplayer only.
But while booting the VM Machine through vmplayer . It got crashed. Let me know if anyone have encountered this sisue.
link https://www.sysprobs.com/desktop-virtualizationphysical-machine-virtual-machine (“Read here for more information” at step 8)) is not working (Page not found (404)).