When you have multiple bootable Windows Operating Systems across different physical hard disks, it is likely that your system partition would be on the first disk. Let’s say for example you installed Windows 8.1 on the first hard disk. Then you attach a new SSD disk to the second slot and install Windows 10 or Windows 11 on it. Things will work smoothly if you keep both hard disks connected without formatting always. But, if you remove the first hard disk or try to format it, you may face issues in booting the Windows 10/11 that installed lately.
In this guide let me show the simple methods to change/move the System partition to a different hard disk in Windows 11 or 10. We will not use any free or paid disk management tools for this. Let’s use the in-built Windows utility, provided you have the bootable medium of the OS (Windows 10/11) with you.
My Scenario:
In my case, I switched to Windows 10 from Windows 8.1. I was having my first hard disk with Windows 8.1. I added a new SSD hard drive for Windows 10 and it worked great. Later, I wanted to get rid of Windows 8.1 and disk space for other purposes. But I could not format the old Windows 8.1 hard disk. Even though I booted my computer from Windows 10 (from the newly added hard disk), I could not format a particular partition that was created earlier while installing Windows 8.1. Because that was the ‘System’ partition on my computer.
NOTE: If you want to move the System partition to a different hard disk in Windows 11, you can follow the same below steps. They are valid even though screenshots were taken on Windows 10.
What is System Partition?
The system partition is where all of the necessary information to start up Windows lies. This means that if you want your computer, laptop or tablet ready for use right when it’s turned on then this folder must be present and correct! The contents can get pretty tricky so let me break them down piecemeal:
First, there’s bootmgr – sometimes called pmbr (power management Boot Record), its an operating system file that contains instructions about what should happen during each stage in a typical startup procedure.; next comes winload.exe -known formally as NTLDR. You can find more information about types of partition on the Microsoft site here.
In my case even though I connected the new hard disk to SATA 0 port (that’s why the disk became Disk 0) but Disk 1 was having the system partition. I missed taking the screenshot before the changes, but I’m sure the below screenshot will give an idea of how it was before.

I found several suggestions on the Internet to change the system partition to a different disk, but they did not work. Sometimes, you need to use paid/free disk utility programs to move the partition. We can avoid them by using the Windows bootable medium either DVD or USB. Here is the easy way I found to change the system partition to a different disk on Windows 10/8.1 and even the latest Windows 11.
Change The System Partition to Different Disk in Windows 10/11
1) Restart the Windows 10 computer and log in to BIOS.
2) Change the hard disk boot priority. Make the hard disk where you want to have a system partition as the first boot hard disk.
In my example, the SSD Disk 1 (SATA Port 1) was set as the first boot disk, so I had to change Disk 0 (SATA port 0) as the first boot hard disk.
In another case, you can disconnect the other hard disks from the computer and connect the only hard disk where you need to move the system partition. In my example, it is the SSD that has Windows 10 on it.
Save the changes on the BIOS and reboot the machine.
3) Mostly Windows 10/11 will not boot now. Because there is no system partition (or information) on the first boot hard drive. You need to have Windows 10 or Windows 11 bootable DVD/USB to boot the computer.
4) Boot the machine with relevant Windows DVD/USB and select ‘Advanced options’ under Troubleshoot.
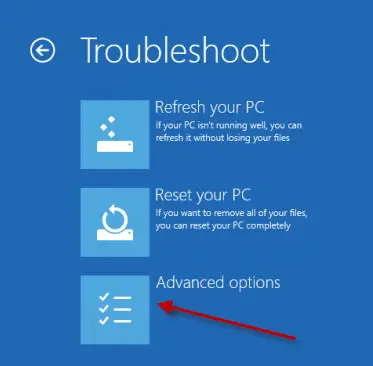
Here you need to select ‘Automatic Repair’.

Windows 11 will automatically detect and repair the startup issues. I assume during this process it makes the first partition of the first hard disk as ‘System partition’.
Read Also: How to change date format in Windows 10/11
5) Once the repair is completed and rebooted successfully, you can use Windows 10/11 without any issues. Now if you go to disk manager, you can see that the System partition is moved to a different disk where you wanted.
You can connect back the other physical hard disks once this change is completed successfully.
Now you should be able to format or delete the partition which was the system partition earlier. In this way, I successfully managed to move the system partition in Windows 10 to a different hard disk/partition without using any third-party tools/software.

I hope this guide is helpful for the users who migrate to Windows 10 (or Windows 11) from different hard disks on the same computer.


Have exactly the same problem, but I’m using Windows 7.
The ‘System’ Partition was ridiculously placed on different harddrive other than the one with the OS.
And I just aware about it now, after my PC failed to boot every time the drive (The one with the ‘system’ partition) is removed. It keep showing ..blabla MBR is missing.. or something..
The problem is, those damned drive is now corrupted, so I have to send it for RMA..
There’s no ‘Automatic Repair’ when booting using OS DVD.
Only ‘Startup repair’ is found, which is doesn’t work…
Any suggestion is appreciated
Rgds,
Yuuna