Laptops are portable devices with many problems when they get old; the primary reason is their compactness. They have significantly less room to breathe and work efficiently; the same goes for touchpad/trackpad issues on laptops manufactured by different OEMs like HP, Lenovo, Dell, etc. In this article, we will talk in more detail about how to resolve the Lenovo touchpad not working issue and offer the best solutions to resolve this issue. Catch us after the jump!
- The touchpad on laptops is an alternative to the full-size mouse we use on desktop PCs or other hardware.
- The functioning of a touchpad is vital as it is the main component of such a portable device to access anything or to make changes to any file.
- There are alternatives available to manage stuff around, but we need to find a way to fix this problem permanently.
- The easiest way to resolve this problem is by using the Fn or Function key on the Keyboard in combination with F8 or F4 ( the key combination will depend upon the Lenovo laptop model number).
If holding Fn+F8 or Fn+F4 resolves the problem, then you are all set to go else; we have a few basic to advanced-level step-by-step guides to help solve the problem.
Please be informed to perform the below touchpad troubleshooting step; having an external mouse connected would be nice, as it will help the user navigate various options much more quickly and easily.
How to Fix the Lenovo Touchpad Not Working Issue in Windows 10/11?
You can try the below 8 steps when encountering the issue of the Lenovo ThinkPad touchpad not working on your Windows 10 or 11 laptop/IdeaPad, as it is most likely related to the driver.
1) Windows Troubleshooter
In Windows 10 and Windows 11 PC, an inbuilt troubleshooter finds and fixes problems as and when they arise. To fix the Lenovo touchpad not working issue, we can use a keyboard troubleshooter to find and fix the touchpad malfunctioning.
To start the Windows troubleshooter, users are requested to follow the below steps:
- Go to start -> type -> control panel -> enter; this will open the control panel window on the screen
- In the second step, go to the System and Security settings option
- Under System and Security -> Security and Maintenance option, select Troubleshoot common computer problems; this step will open Troubleshoot window.
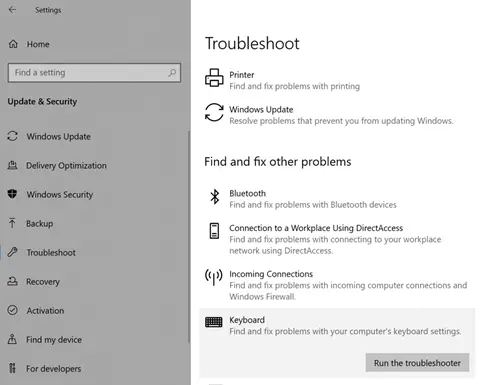
- In the Troubleshoot window, scroll down. Under Find and Fix other problems -> select Keyboard -> click on Run the troubleshooter.
- After clicking on the keyboard option, it will open the keyboard troubleshooter and try to find and fix the problem with the touchpad.
If the inbuilt troubleshooter cannot fix the problem, move to the next troubleshooting step.
2) Enable the Touchpad from the Control Panel
One common issue that users may encounter is the Lenovo ThinkPad touchpad not working due to a disabled touchpad/trackpad in the control panel. Due to any system updates or third-party application installation process, there are instances where it disables the touchpad feature altogether from Windows.
In Windows 10/11, there is an easier way to enable this option under the control panel.
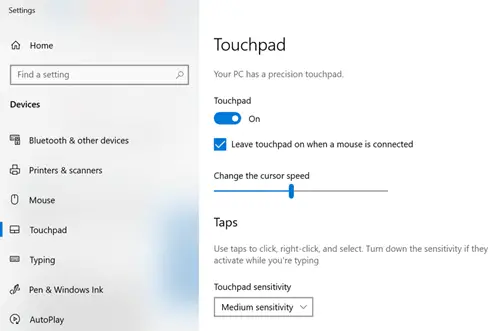
- To enable the touchpad from the control panel, go to Start -> type “touchpad settings” -> enter
- In the touchpad window, toggle the touchpad option to enable and test the touchpad
3) Restore Default Touchpad settings
The third option to resolve the Lenovo touchpad not working issue is restoring the touchpad settings to default. Restoring the touchpad will remove any presets for the touchpad/trackpad configured.

To restore the default touchpad, kindly follow the below steps:
- Go to Start and type “touchpad settings” and hit enter
- It will open the touchpad settings window
- In the touchpad settings Window, scroll down, and at the end, there is an option to reset the touchpad under “Reset your touchpad.”
- Click on the Reset button, which will wipe out any preset for the touchpad and remove any blockages impacting the touchpad’s functioning.
Related: Best laptop for white hacking and IT Security
This step solved the Lenovo touchpad not working issue in most cases where I worked.
4) Update Touchpad drivers
There are instances where Windows 10/11 is updated to the latest version; however, the touchpad driver version is not updated on time and may start creating problems. In such a scenario, it is essential to get the newest version of drivers for the touchpad and install them for compatible Windows versions.
To update touchpad drivers, please follow the below steps:
- Go to start -> type “device manager” ->enter
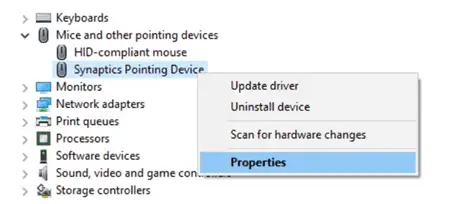
- In the Device Manager window, go to Mice and other pointing device option
- Select “Synaptic Pointing Device” -> right-click -> update drivers
- In the next window, select “Browse my computer for driver software” -> “Let me pick from a list of device drivers on my computer” -> select the latest driver from the list -> next.
- Wait for Windows to perform a driver update; once the update process is completed, it will show “device updated successfully” and ask to restart
- Please restart the laptop and check for any possible issues
- Also, in case the issue is not resolved after installing the latest compatible driver, it is always recommended to install the generic drivers after the “Let me pick from a list of device drivers on my computer” window -> install and test
Also, visiting the Lenovo support page is recommended to download the correct touchpad driver for your Lenovo laptop/Ideapad. Installing the drivers from the manufacturer’s website fixes the issues better than updating drivers from the Windows device manager.
5) Rollback Device Drivers
There are instances when, after installing the latest driver or even trying the generic drivers, the touchpad still does not work. In that case, we need to remove the driver we installed and restore it to its previous state.
- To start this process, go to start -> type “device manager” ->enter
- In the Device Manager window, go to Mice and other pointing devices option
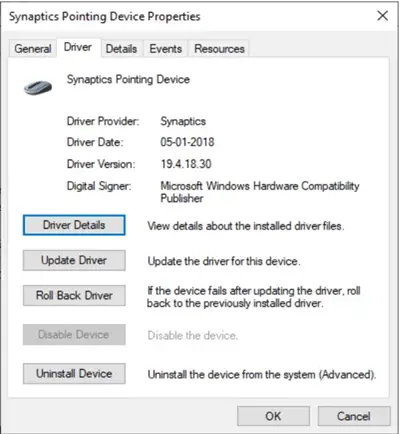
- Select “Synaptic Pointing Device” -> right-click -> properties
- Select the “Driver” tab and “Roll Back Drivers.”
- Once done, restart the laptop and check
6) Rollback Windows Update
If a complete patch of Windows update caused the Lenovo touchpad not to work, then we have to roll back the latest Windows update from the control panel.
- To roll back Windows update, go to start -> Update and Security -> enter
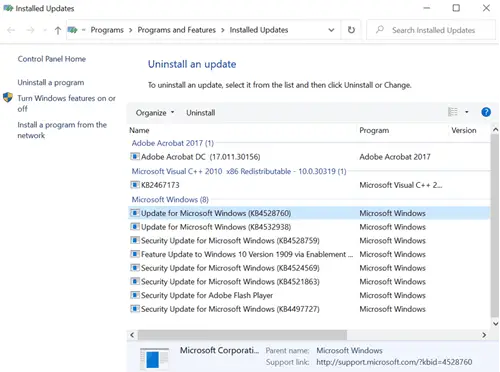
- In the next window, click View update history -> and select “uninstall updates.”
- A new window will pop up with a list of recent Windows updates with a date stamp.
- Select recently installed updates and uninstall them one by one.
- Once the process is complete, restart the computer and check the touchpad performance.
Read Also: How to charge laptop battery externally
7) Change Power Management settings
There are instances where certain specific power management settings have also caused the touchpad to stop working.
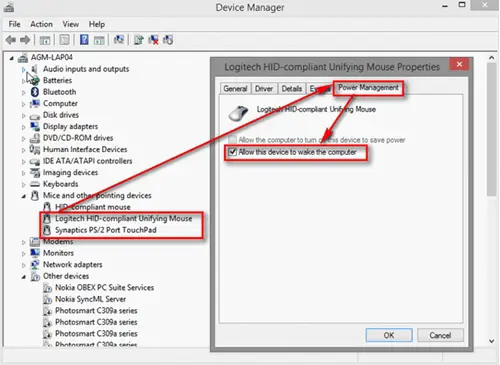
- To fix this problem, go to start -> type “device manager” ->enter
- In the Device Manager window, go to Mice and other pointing devices option
- Select “Synaptic Pointing Device” -> right-click -> properties
- Go to the “Power Management” tab -> uncheck the option for “Allow the computer to turn off this device to save power” -> ok
- Close the device manager window and restart the computer
8) Disconnect External Connected Devices
Externally connected peripherals also sometimes cause such issues. To resolve this problem, unplug all connected devices to the laptop, restart the computer to clear the cache, and check the touchpad performance.
These are all the options for the Lenovo trackpad not working issue that can be resolved on Windows 10. Try the steps mentioned above and let us know if you have any problems in your comment section below.

![[Fixed] You Require Permission From System in Windows 10/11](https://www.sysprobs.com/wp-content/uploads/2023/03/The-error-message-you-require-permission-from-system-211x150.png)


![[Fixed] Printer Settings Could Not Be Saved Access is Denied](https://www.sysprobs.com/wp-content/uploads/2017/07/best-printers-under-100-dollars-in-2017-211x150.jpg)