On a bright fine morning, you open your Windows PC or laptop only to get interrupted by a black screen with the Windows logo. Instead of seeing the welcome screen, you see a message saying something like “Fixing C: stage 2(or 1)” with some percentage and time estimation.
Surprised?
A lot of us panicked when we first saw this error in our Windows machine. So what is this error? Why does it occur? And most importantly, how to get rid of it?
That’s all we cover in this comprehensive guide. Stay till the end so that you don’t miss anything.
Let’s get your PC fixed!
What is the ‘Fixing C: Stage 2’ Issue in Windows?
This situation is more of a troubleshooting process itself than an error. It’s when the system checks your disks for any bad sectors using a tool called CHKDSK prior to Windows boot. But the real problem occurs when this checking gets stuck for hours and days in the worst cases.
Usually, the full message that’s displayed on your screen goes something like this:
Fixing (C:) Stage 2: n% (a of b); Total x%, ETA hh:mm:ss
This is just a basic form with placeholders used. You will see numbers instead of a,b x, or n. So let’s break down this message first.
C: refers to the C drive. Stage 2 means it’s currently in the second stage. There are 3 main stages of the scan, with 2 more optional stages. The percentages indicate how much of the scanning process has been done. ETA refers to a rough estimation of how much time is needed for the scanning to be complete.
Reasons Why You May Face This Problem
There are a couple of reasons, the most common being defects in your hard drives. Other reasons include the following:
- Improper shutdown of your computer
- Junk files on the hard drive
- Corrupted or old hard drive
- Power failure
Fixing C Stage 2 Issue in Windows
Now that you have some clear ideas about this problem and why it might happen, let’s learn how to fix it quickly.
Fix #1: Let it Continue
Since this process is normal and it’s fixing problems in your hard disk, the easiest thing to do is wait for it to finish. It can take roughly 20 minutes to about an hour in most cases. After the scan is finished, your PC will start normally.
But if it’s taking a ridiculous amount of time, for example, 24+ hours, or it’s stuck at the same percentage for several hours, then this is not normal. In such cases, proceed to the next methods.
Before the scanning started, you were given 8 seconds to press any button to skip the scanning and start your PC. However, you will see that same screen again the next time you reboot your device. So in that 8 seconds, press a button to skip the scanning, and then when your PC starts in normal mode, try any of the below fixes.
Fix #2: Turn off Disk Fixing From Registry
From the search menu, type ‘run’ and open it. Alternatively, press the Windows button + R. Now type in ‘regedit’ and press OK.
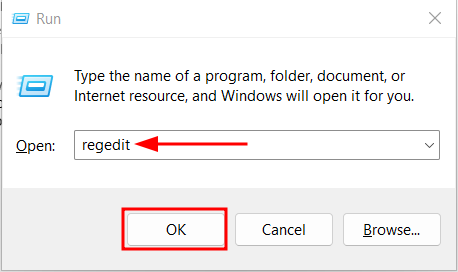
You may get a prompt first; Press ‘Yes’. Then the registry editor window will pop up.
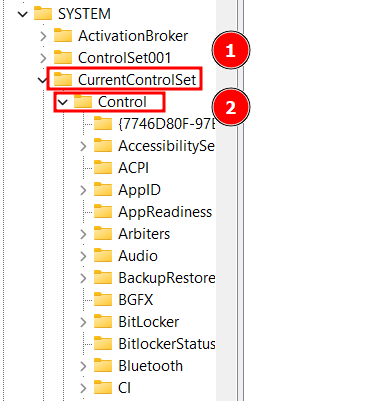
Go to Computer → HKEY_LOCAL_MACHINE → SYSTEM. To expand each folder, left-click on each one.
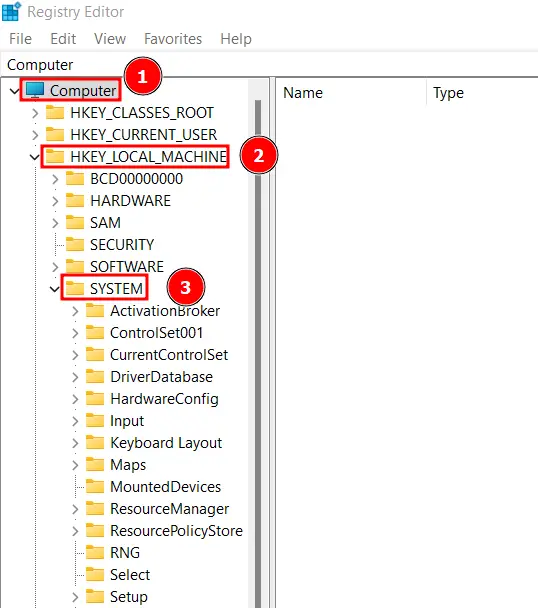
Inside SYSTEM, open ‘CurrentControlSet’. Then expand ‘Control’. It’s the first option.
After that, start scrolling until you find ‘Session Manager.’ Double-click on it.
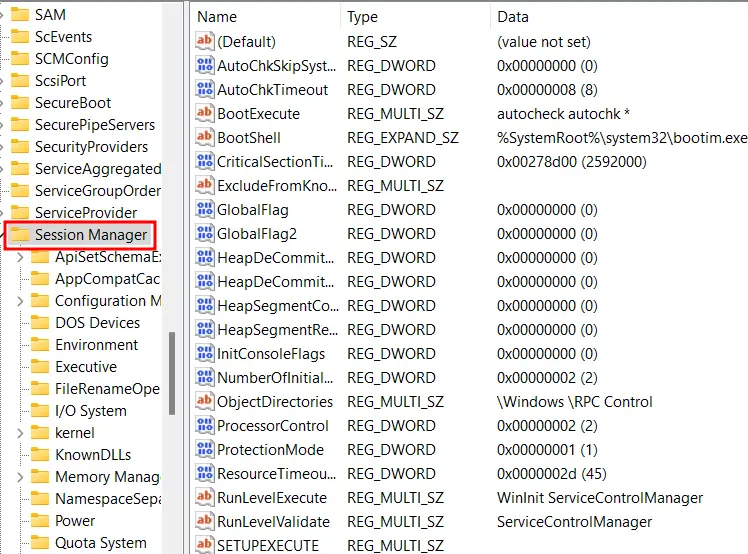
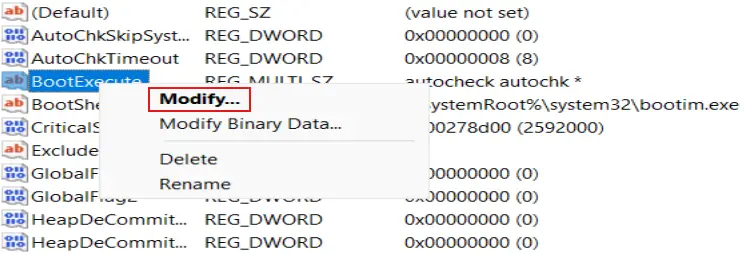
Notice all the options appearing in the right window. From there, right-click on ‘BootExecute’. Then press ‘Modify’.
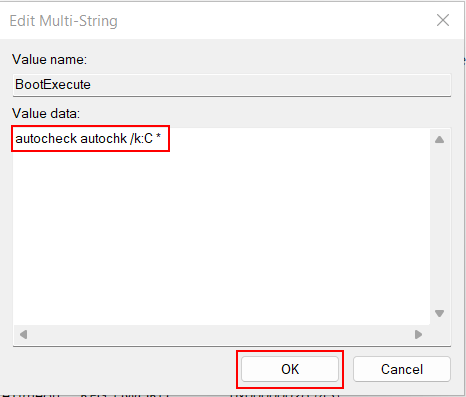
You can see a value data ‘autocheck autochk *’. We need to edit this. Change the value to this exact value below:
| autocheck autochk /k:C * |
When done, press ‘OK.’
Now restart your PC and see if the problem persists.
Fix #3: Run CHKDSK from the Command Prompt
So instead of letting the system run this utility, you can run it yourself from the command prompt.
Search for the command prompt in the search bar by typing ‘command prompt’. Right-click on it and press ‘Run as Administrator’.
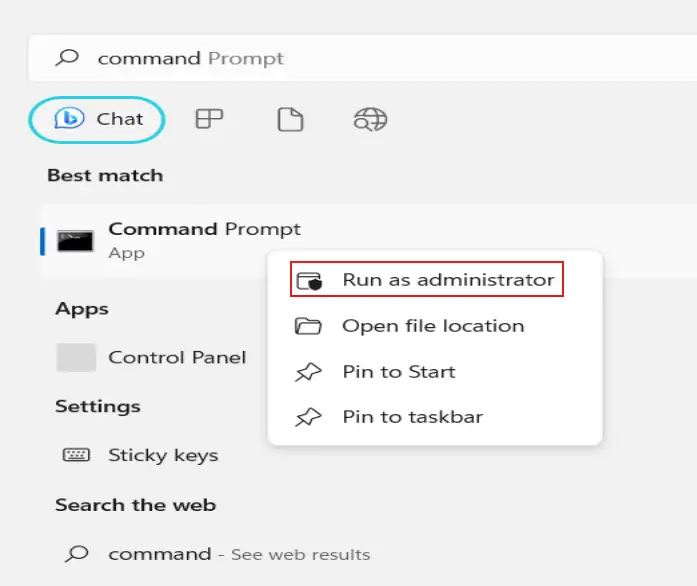
If you get a prompt about making changes to the device, just tap ‘Yes’.
Enter this command into the prompt:
chkdsk c: /rAdding /r with the command means that it will only find bad sectors in the disk and try to recover readable information.
Now hit Enter. You should see the following output:
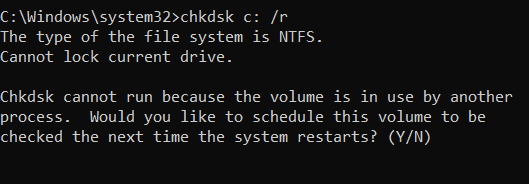
Since we are currently using this volume, we can’t scan it now. But it will scan it later.
You can enter ‘Y’ to schedule your PC scanning. So now, if you restart your PC, your disk will get scanned like before. But since we are manually checking the disk, there’s a chance that it won’t get stuck anymore.
Fix #4: Run an SFC Scan
SFC scan can help remove many disk errors by doing a scan.
- First, get the Windows Installation Media from Microsoft. Boot your PC from it. Choose ‘Repair your computer.’ Optionally, you can do this in Safe Mode as well.
- You will appear on a blue screen. Pick ‘Troubleshoot’.
- Then choose ‘Advanced options’.
- Tap on ‘Command Prompt’.
- Run the command sfc /scannow
- After the scanning completes, reboot your device.
You can learn more about SFC scan in our scanning and repairing article.
Fix #5: Run Startup Repair
This method uses the Startup Repair tools of the Windows OS. This tool can be used to troubleshoot many booting errors.
- Hard shut down your PC. To do that, hold down the power button for a few seconds.
- Reboot your PC.
- Wait for the manufacturer(Asus, Lenovo, Dell) logo to appear. When you see it, quickly hold down the power button for 10 seconds. You should see a blue screen with many options.
- Press ‘Troubleshoot’.
- Go to ‘Advanced options’.
- Choose ‘Startup Repair’.
After this process finishes, see if you still see the fixing C: stage error.
Fix #6: Replace Your Hard Drive
This would be a last resort if none of the above methods fixed the issue for you. Perhaps your hard drive is too faulty and went beyond any repair. In such cases, it’s a good idea to replace the hard drive completely instead of continuing to tweak your hardware.
Although a bit more costly, we recommend getting a good Solid State Drive(SSD). It will boost your PC performance and speed drastically. They also last long without facing so many issues as hard drives face.
Final Thoughts
This guide shows you different methods of how to fix the ‘Fixing (C:) stage 2 issue in Windows 10 and Windows 11. You can choose any of the methods you feel comfortable with. And if none of them works, consider taking your PC to a local repair shop. You may also need to change your hard drive.
When dealing with booting problems, it’s generally not recommended to force shut down your PC with the power button. Worst case, you may find a Blue Screen of Death(BSOD). So unless it’s urgent, don’t do it.
If you have any questions about this article, feel free to let us know in the comments below.


