Auto shutdown in Windows 10 is one of the hidden features available by default. It allows the end-user to perform auto shutdown at a scheduled time. In this we post are going to cover five ways to auto shutdown Windows PC or laptop.
Before we begin various ways to achieve the task, let’s first understand how and why should you do it.

How Auto Shutdown in Windows 10 works?
The automatic shutdown process helps the end-user to shut down the computer (any Windows PC) by setting a time.
If a system is running and is scheduled to go on auto shutdown at a set time, it will automatically shut down by closing any open or running programs.
By doing auto-shutdown, it not only saves electricity but also keeps the computer performance optimum.
Why we need this?
Let’s imagine you want to download a big file from the internet and then shut down the PC, but you cannot wait that long for the download to complete. Hence, in this case, the auto-shutdown feature in Windows 10 comes handy.
Users can set a timeline by checking how much time the file download shows to complete and can set the auto-shutdown timer accordingly.
This feature also comes in handy when we want to restrict PC usage by children. In this, we can set a time frame for the children to enjoy using the PC and let the PC automatically shut down once the time is up. This not only helps to keep a check on PC usage by kids but also makes a habit.
As we covered explaining how and why about the auto-shutdown usages, now let’s talk about all different ways to do it.
Five Ways to Auto Shutdown Windows 10 Computer:
1) From Run command prompt
Creating a shutdown script using Run window is the easiest and most popular option to achieve this
In this method, we first have to decide the duration after which we want the system to shut down automatically.
Once done, let’s begin with the steps, as shown below:
- Go to search bar near Start button -> Type “Run” -> enter
- In the Run window type below command to start the automatic shutdown timer
Shutdown -s -t 900
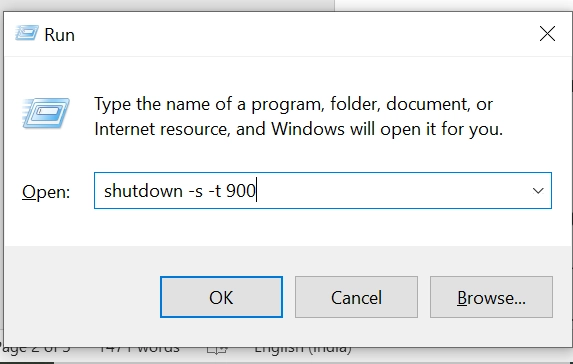
- In the above command, we have taken 15 minutes as a reference so 15*60s = 900s (User can change the value after -t based on their requirement)
- Once the above command is typed in the Run window, hit Enter key on your keyboard.
- Now your system is scheduled to shut down after 15minutes from now automatically.
2) From command prompt
This method will be liked by all those people who love working in Terminals.
In this method, we are going to use the command prompt feature on Windows to perform an auto-shutdown.
As usual, decide the system shutdown time. [ for our example, we’ll take it as 15 min= 900s]
- Go to search bar near Start button -> Type “cmd” -> enter
- A black window will appear on your screen, type in the same command mentioned above:
Shutdown -s -t 900
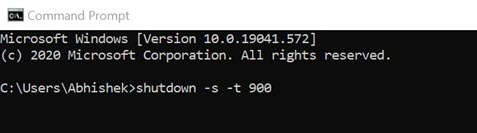
- After entering the above command, press enters to start the shutdown script. The system will auto shutdown after 15 minutes
3) Using Power Shell:
Power shell is an advanced version of the command prompt and comes with many powerful features.
To create an auto-shutdown timer in Power shell, please follow below steps:
- Go to Start -> In the search bar, type “Windows PowerShell” -> enter
- A blue window will pop up, waiting for commands to be executed
Keep in below command in the PowerShell window and hit enter
Shutdown -s -t 900
The system will add 900s of shutdown instruction in its memory and will shut down the computer after exact 900s.
4) Using Task Scheduler:
As the name suggests, Task Scheduler is used to schedule a task that the user wants to execute on the computer.
Be it creating a simple shutdown screenshot or setting things like launch a program on system start, or starting a specific event. Task Scheduler can do it with ease.
Now let’s talk about the steps that we need to follow to perform auto shutdown in Windows 10.
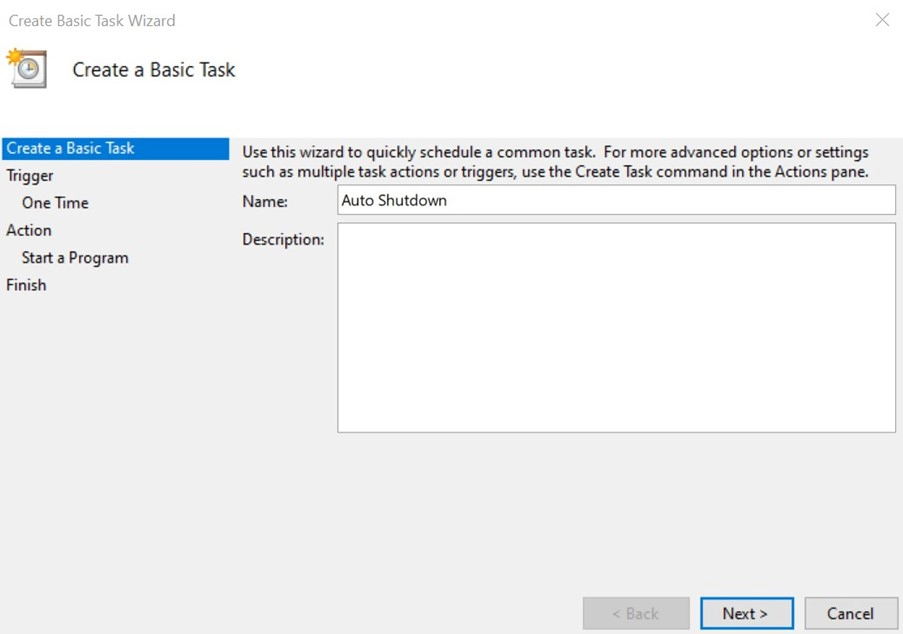
- Go to start -> Type in the search box -> “Task Scheduler” -> enter

- A task scheduler window will pop up as shown below
- From the right-hand side of the screen in Task Scheduler, look for “Create Basic Task.”
- A new window will appear asking to enter a name of the Basic Task -> key in the required information and hit the “Next” button
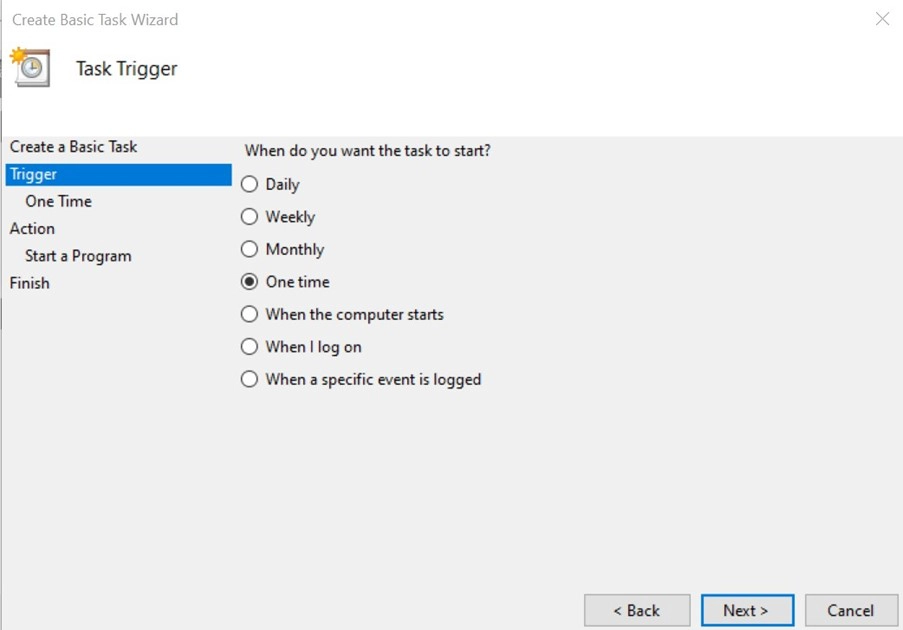
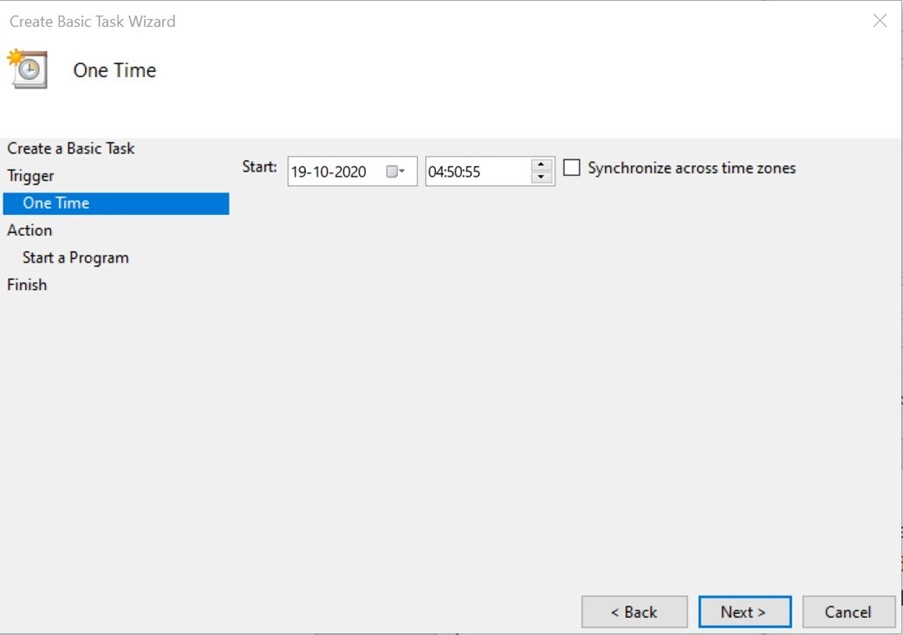
- Now in the “Trigger” section select when you want to start the task. For this step, we will go with the “One-time” option, which means it will execute only once. However, users are free to select the number of times they want a specific task to perform throughout the week or month.
- Now, after selecting the “One-time” option on the next screen, it will ask you to enter the start time: Type in the time when you want the system to perform the task. We will select 15 minutes from the current time and move to the next step.
- In this step, it will ask to select from options listed: we will go for “Start a program” -> Next
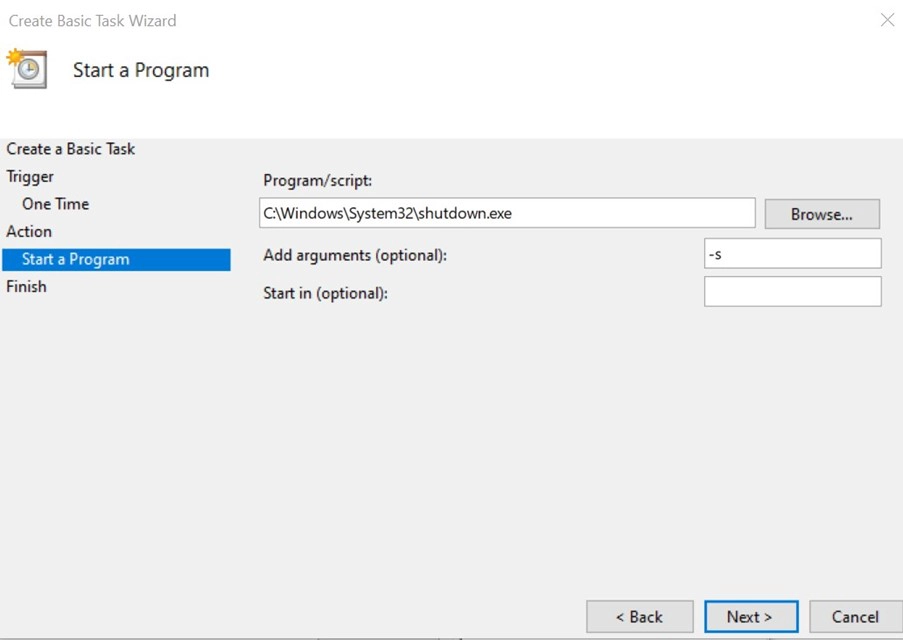
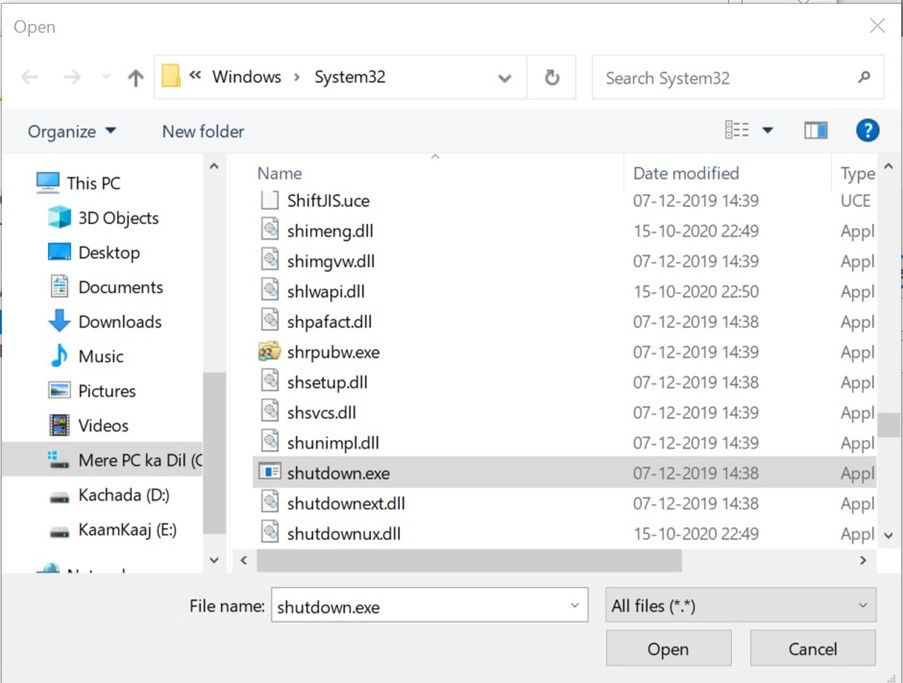
- Now its time to set an action item for the Start Program. We will hit browse option and will locate the shutdown executable file at C:\ Windows\System32\Shutdown.exe and in the Add argument section add “-s” so that system will close all program before performing the restart operations.
In the next screen check the summary and click on the “Finish” button
Now the system will auto shutdown if “One Time” option is selected, for all other shutdown options like Weekly or Monthly plan will perform the required steps at the scheduled time if the computer is running.
5) Using Third-Party Application:
This is the last method to perform auto shutdown on Windows. There are many free as well as paid applications available for PC that can help you achieve this task.
These applications offer many other useful features like a restart after shutdown, pause the shutdown timer and restart when required and many more.
All these options are not available by default in Windows but can be achieved using freeware like Sleep Timer.
This tool offers an elegant interface that helps end-user to shut down PC as and when required. It comes in handy for people who fall asleep while listening to music or Miners who want to set the auto-shutdown and restart option after the device is rebooted for periodic maintenance.
To being with the Sleep Timer application for Windows PC:
- Go to their website download and install the application
- Once the application is installed, launch the application
- In the Sleep Timer user interface, under the Action section select “Shutdown” and Mode = “Timer.”

- Now select the time when you want to perform the action and click on the Start button.
- As soon the Start button is clicked, it will start showing the time which is left before the system will restart. In case the user wants to cancel or pause the timer, then they can do that using the stop and pause button.
FAQ’s on Auto Shutdown:
How can I shut down my computer automatically?
A computer can be automatically shut down by using Windows Run feature, Command prompt or even by using third-party tools.
How can I shut down my laptop automatically Windows 10?
The laptop or PC can be automatically shut down using Task Scheduler feature by scheduling the timer accordingly.
It can be shut down for a week or month or quarter using Task Scheduler and also by using third-party applications.
Why does Windows shut down unexpectedly?
Windows can shut down unexpectedly because of many reasons; some of the causes can be a power failure, hardware, or software error.
This kind of issue can be rectified by analysing Windows logs and performing troubleshooting as per issue diagnosis.
Does force shutdown damage the computer?
Yes, it does. It affects hardware and software both. It can damage important and highly sensitive components on the PC and also makes the system go into a no-boot situation.
Should I turn off my power supply when I turn off my computer?
Yes absolutely, you should do that, it not only helps saving electricity but it also keeps the device from any damage caused due to earthing or thundering.
How do I turn off sleep mode on Windows?
Sleep mode can be disabled by going to the Power option under the Windows control panel. Sleep mode is preferred by users who want to keep the device running at a bare minimum power consumption level.
Conclusion:
We tried to cover all methods to auto shutdown Windows 10 in 5 ways. Do let us know which one is your favourite option in the comments section below.