What do you know about the Office? Do you know it has the process called MS Office SDX Helper (sdxhelper.exe)? Are you worried about its process and high CPU usage? In today’s post, we will look for an answer for all these questions, so without wasting any time, let us check out what is SDX helper and how it helps your system?
There was a report stating that MS Office SDX Helper uses 70% of the CPU. We all know that our system’s central processing unit or CPU is its most important part. When your computer’s CPU usage goes very high, your workstation will heat up physically when it tries to do any further tasks, and it will result in your computer getting crash.
MS office is one of the most reliable and highly used programs and helps in creating documents and any other computing work at a quick rate. Many companies and even individual users make use of this setup program to achieve any tasks regularly. But, some issues are reported against the use of SDX helper that it stops working automatically. Below are given a few detailed instructions that will help you to fix your MS office SDX helper effectively.
What is sdxhelper.exe in Windows 10?
MS Office SDX Helper is an essential part of your system and is directly connected to the Secure Download Manager or SDM that you utilize to download or update Office. Most of the time, you can find in \program files\microsoft office\ and generally used when Office versions get installed with its earlier version to coexist in the right way.
While using Task Manager to check the usage, you will see that MS Office SDX Helper takes high CPU usage mysteriously. What to do if you are stuck in such a situation and how to solve it? Let us go ahead and find the solutions.
Ways to Disable sdxhelper.exe When Higher CPU Usage
First of all, make sure you check these methods slowly and try one that you find right and convenient for your situation.
- In your Task Manager, end SDXHelper.exe
- Then disable MS Office Feature Updates
- Repair office through any Office Repair Tool
- Change the name to sdxhelper.exe
- Reinstall MS Office Application
Let us look at all these steps in detail and learn how it works:
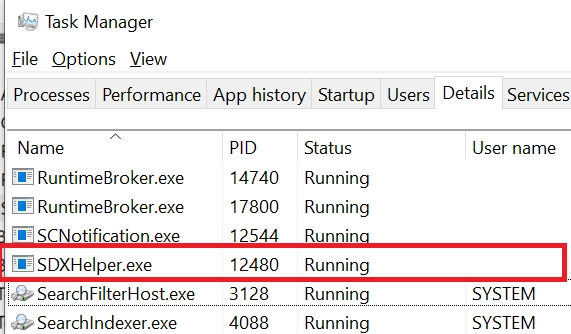
Method 1: With the Help of Task Manager
SDXHelper.exe is an executable file of Office SDX Helper. When you come to know that Office SDX Helper has started using high CPU, open your task manager, and end the SDXHelper.exe process.
In the same way, if you see MS Office click to run using high CPU, and end it too.
When you click on end SDXHelper.exe, you will make MS Office SDX stop running further, and prevent such an event from happening again.
Method 2: Disable Feature Updates of Office
In your next step, MS Office Feature Updates ensures your Office features install only the new updates, but you do not know that it calls “SDXHelper.exe” in its background. So, when you disable Feature Updates of Office, you are also ending Office SDX Helper. Here are a few steps on how to do it successfully:
Option 1: Disable Microsoft Office Feature Updates with the Help of Task Scheduler
1. Go to start menu and type in compmgmt.msc to search Computer Management, and then open it.
2. When coming on Computer Management, click on Task Scheduler Library and Microsoft and Office on its left panel.
3. Disable Office Updates & Feature Updates Logon with a right-click.

Option 2: Disable with the Help of PowerShell
If you want to disable MS Office Feature Update, you can do it with the help of PowerShell, and it is the cross-platform configuration management framework that will make your task easier.
1. Go to start menu and type powershell to find Windows PowerShell. Double click to open Powershell as an Administrator.
2. Run both the given commands:
Schtasks /change /s $_ /tn ‘\Microsoft\Office\Office Feature Updates’ /disable
Schtasks /change /s $_ /tn ‘\Microsoft\Office\Office Feature Updates Logon’ /disable
Follow the steps correctly, and again open Task Manager and check if the Office SDX Helper has vanished, if not done, use the next option available.
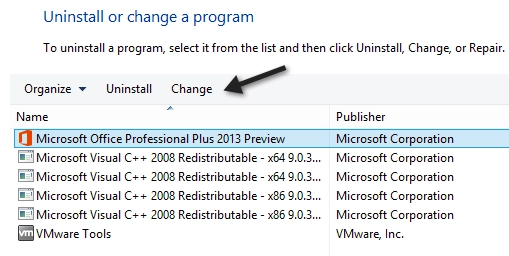
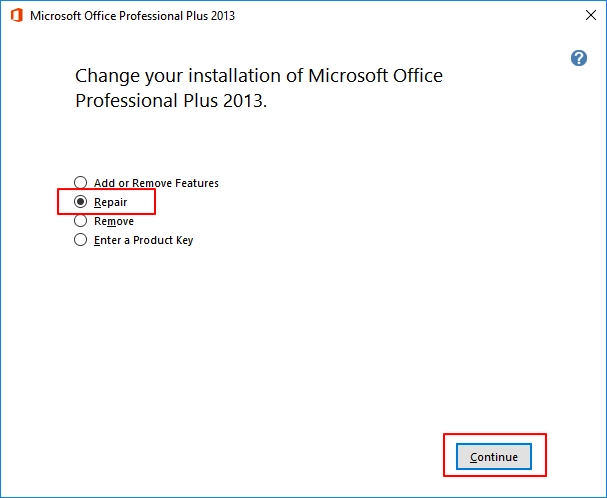
Method 3: Repair Office Through Office Repair Tool
When you come to know that MS Office SDX Helper has started using high CPU, it a clear indication that sdxhelper.exe isn’t working in the right way, this is the time you must repair it with the help of the Office Repair Tool.
It is a simple process to work; you have to open Programs & Features in Control Panel and choose MS Office 2013 (or any versions installed including Office 365), select the Change button & wait for the repair wizard to start.
It is a normal technique used for any MS Office issue; hence, this method can be used to solve other MS Office problems too. For instance, when you are working in MS Office, you get an error message many times: MS Office SDX Helper has completely stopped working, and your application quits.
After the complete Repair process is complete, you have to restart the computer. If again the same issue of high CPU usage continues to happen and hinders your work, you may try our next solution.
Method 4: Try to Rename the sdxhelper.exe
If you want to end the running of sdxhelper.exe, follow the given steps ad rename your application file.
Step 1: On the Task Manager, End SDXHelper.exe.
Step 2: Go to Windows Explorer to
c:\program files\microsoft office\root\vfs\programfilescommonx64\microsoft shared\office16\
Step 3: Find sdxhelper.exe & rename the sdxhelper-renamed.old file.
Now, sdxhelper won’t be found, but it will return after you do any upgradation, but nothing to worry about, as there are other alternative solutions to solve this issue.
Method 5: Uninstall & Reinstall Office Application
If you find that sdxhelper.exe renaming has not worked out, you may uninstall Office and reinstall it again. When you do that, you have to check and verify if the high CPU usage problem has been resolved completely.
Final Words
One essential requirement to avoid any issues with the sdxhelper is to have a clean and tidy PC. It involves running a scan for viruses, cleaning the hard drive regularly, uninstalling any programs you do not want, checking Autostart programs, and allow Windows Update. It is very important to perform these periodic backups and set the restore points.