We can use the haneWIN NFS tool to make any physical or virtual Windows computer as an NFS share. This guide shows how to configure and set up NFS share on Windows 7 and connect it to VMware ESX server as storage. Here I explain the steps I followed in my test lab to create and connect storage to the VMware ESXi server. Network File System (NFS) developed by Sun Microsystems (Solaris) to use in UNIX based systems.
To set up NFS share on earlier Microsoft Operating systems, you need a component called ‘Windows Services for UNIX (WSFU)’ which can be downloaded from the Microsoft website. But WSFU is not available for Windows 7. So, creating an NFS share on Windows 7 and allowing other UNIX based Operating Systems to access the share is not straightforward without third-party utilities. As mentioned earlier, this case is applicable for Windows 10/11 and 8.1 Operating Systems also.
haneWIN NFS Server works nicely with Windows 7 to create and share Network File Systems. Download 30 days trial version of hanWIN NFS here. If you are happy with the product, get the registered version for permanent use.
Steps to Configure NFS Share on Windows 7/10/11
1) Download and install the haneWIN product.
2) I suggest switching off the Windows firewall in the Windows client.
3) Right Click and Run as administrator to open it.
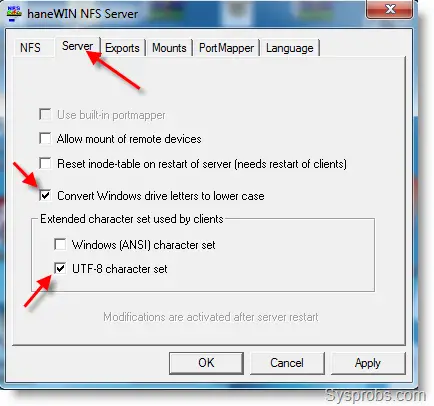
 4) Go to the Server tab and make sure below both checkboxes are ticked.
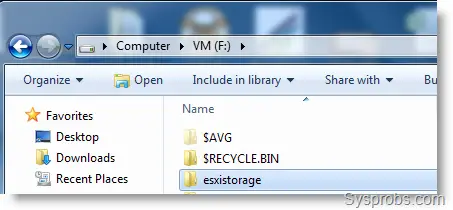
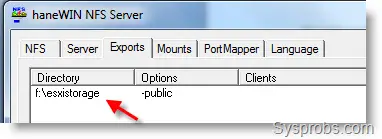
 5) Navigate to the Exports tab; here we can define which drive or folder will be shared. The best part is, that it doesn’t require any Windows permissions to configure. I’m going to share a folder created for ESXi storage at this location.
 Click on the ‘Edit exports file’ button, remove the example shares and add your share location. I added the following line in the opened text file.
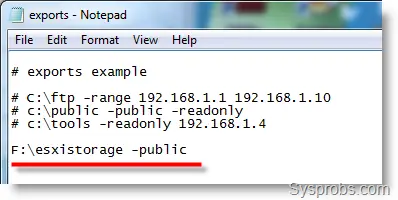 -public to enable web-based NFS share access. More details are available under help.
Note – You can’t save this file if you started the program without selecting the run as administrator option.
See Also
Configure iSCSI disks on Windows computer with VMware
How to connect FreeNAS iSCSI disks to VMware ESX Server
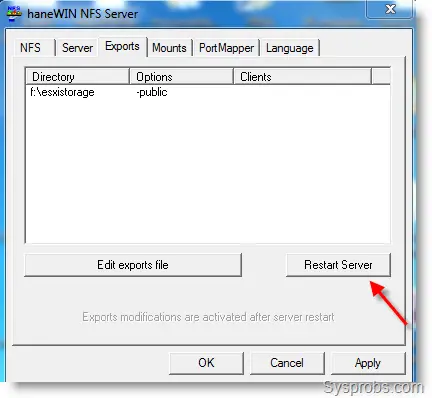
6) Press Restart Server to take effect from the changes in the export file.
7) That’s it. Now we set up the Windows 7 as an NFS server with a share that can be accessed by UNIX based Operating systems and programs.
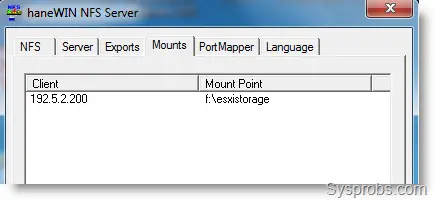
To view connected clients and mount points, click on the Mounts tab. I managed to connect this share from the VMware ESXi server. Here is the IP address of the connected client.
Connect Windows Share with haneWIN NFS to VMware ESXi Server Storage
As described earlier, you can easily use Windows OS partitions and folders with haneWIN NFS as network storage for VMware ESX or ESXi servers without any hardware devices. It is a very simple and easy way to extend data store with Windows shares in a testing environment or for home use.
Before continuing further steps in connecting the NFS share with VMware vSphere, make sure to meet the following requirements.
a) Network connectivity between VMware ESXi server and Windows host
b) Windows firewall is switched off or an exception is given for NFS/storage services.
Here is the recap of the NFS share setup for VMware storage in this example.
My F drive properties as shown below.

1) Open the vSphere client, go to the Configuration tab and click Storage.

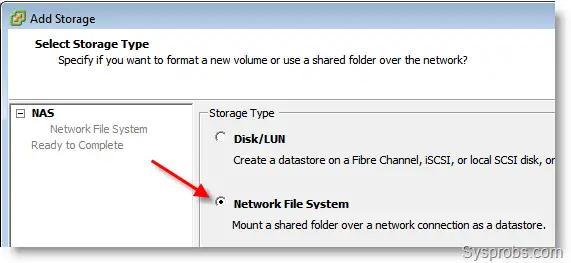
2) Click on ‘Add storage’ at the top right. Select the second option Network File System.
3) My Windows 7 host computer which has a haneWIN NFS server IP is 192.5.2.100.
So, type the IP address in the server location.
The folder name (Shared directory) should be typed as shown below.
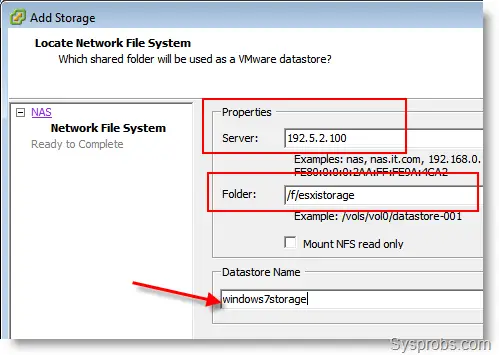
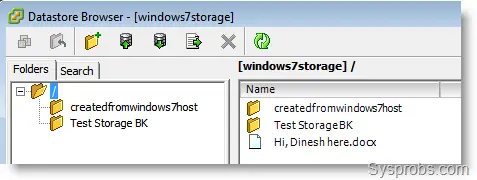
4) Click Next and OK. That’s it. The added Windows OS NFS will appear under VMware ESXi storage. It will detect the Windows partition capacity and free space.
If you don’t mount this storage as ‘Read only’, then you can use this as a full-fledged disk to install Operating Systems and save files.
The good thing is, that the same storage (Windows folder) can be accessed in Windows explorer like a normal folder too. So, it’s easy to transfer data.
I hope this guide is useful in setting up and using the Windows OS folder/partition as storage for VMware vSphere by using the haneWIN NFS utility.








Just registered to say one thing . . . .OMG thank you so much for this simple tutorial.
How do I mount the directory to Ubutnu
It worked great until this morning. Then it stopped working and now I can’t see my mounts anymore. It is not mounting my exports. What to do from here?
Thanks for your great tuturial, I managed to setup the NFS server successfully for sharing my media from PC to Boxee Box.
One question: how do I add the server to the startup folder for Windows to start it up automatically? I tried to do it but I don’t know how to configure in such a way that the program is executed in administrator mode automatically.
Hope you can help
best regards
Rogier
First, create a shortcut in the startup folder of your all users/public in the start menu folder.
To run as administrator, get the properties of the shortcut, click the Advanced Tab, click the Run as administrator checkbox.
I keep getting an error when adding the share to config file. “Line 8 ignored ,expected drive”.
Jody — did u find out about this, i am seeing the same problem
Anton – How do I get the information into the Mounts screen/tab? In this post, it was said by DINESH at step (7)that to view the connected clients and mount points, go to the Mounts tab. He managed to connect this share from VMware ESXi server.
Under the Edit Exports file I type in the following C:\downloads -public -name:downloads
but it is then displayed as /downloads under the Directory column and -public under the Options column.I have downloaded VMware ESXi serverbut do not have a clue of how to install this because there are so many zip files.
Please help!