If you are still using an older version of Mac OS X on Intel or AMD Computers by any of the desktop virtualization software like VMware or VirtualBox, this guide will be helpful to increase the screen resolution size of Snow Leopard. Adjusting screen size including widescreen on VMware is easy since VMware tools (with VGA driver) are available, but setting up screen resolution in VirtualBox is slightly different for each installation method.
VMware users
Most of the latest macOS versions can work without any issues on VMware with multiple screen resolutions. If you are still using the older version of Mac OS X and VMware, then you can follow the steps to install the VMware VGA driver to get proper screen resolutions.
1) Download the Mac VGA driver for VMware here.
2) Install the package on Mac OS X virtual machine.

3) Restart the Mac Virtual machine. That’s it. Now you can see multiple screen resolution options inside the VM.
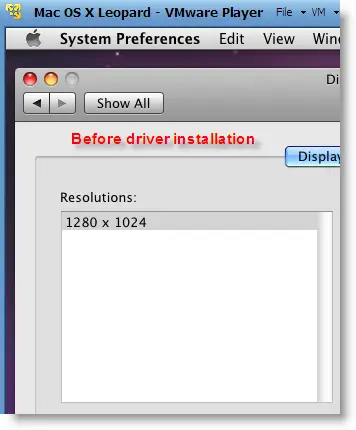
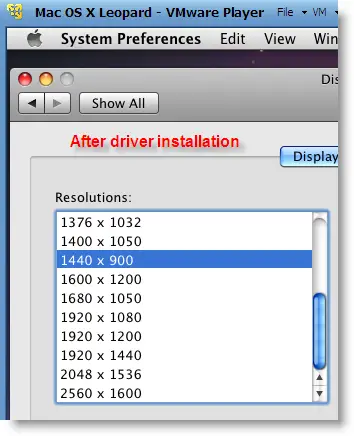
This VGA driver worked well in VMware workstation and VMware Player for Mac virtual machines Leopard and Snow Leopard. We have not tested on the latest macOS versions.
VirtualBox Users
We mentioned several ways to use Mac OS X as a virtual machine on VirtualBox, if you are using any of the methods, the following tricks will be helpful.
Method -1
If you installed Mac OS X by any of the hackintosh ISO files, then do this method first. Also, it can work on vanilla installation from the original DVD or ISO file.
Increase Mac OS X Virtual Machine Screen Resolution in VirtualBox
1) Start the Virtual Machine.
2) Open /Library/Preferences/SystemConfiguration/com.apple.Boot.plist in text editor.
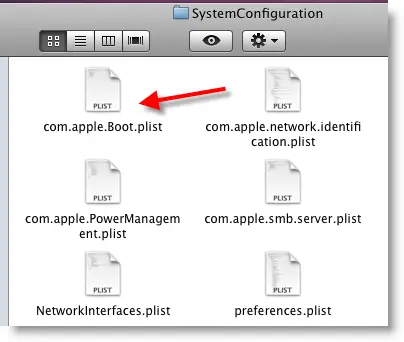
3) Input the below entries.
<key>Graphics Mode</key>
<string>1280x1024x32</string>
1280x1024x32 – is your option. Type the correct screen resolution which matches your monitor resolution.
Here is the screenshot of my file.

4) Select Save As in the Text editor file menu and save it on the desktop or somewhere else.
Make sure to save with the same .plist file extension. (Remove the tick as mentioned below)
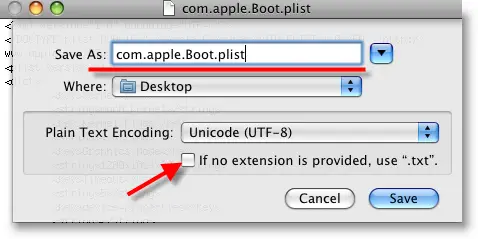
5) Now, copy or drag com.apple.Boot.plist file from desktop to /Library/Preferences/SystemConfiguration/ or /Extra location where ever it needs to be replaced.
Enter the Mac root (admin) password to authenticate replacing the file.
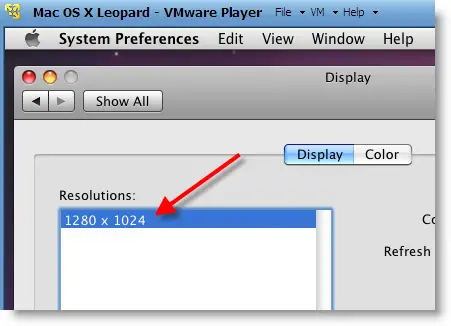
6) Restart the Mac virtual machine now. By default, the Mac OS X will start in the screen resolution inserted in com.apple.Boot.plist. We can confirm it by checking in ‘Display’ under ‘System preferences’.
Method -2
Try this method if method 1 fails.
We will modify the VirtualBox settings of the Mac VM in this method.
a) Close VirtualBox completely and execute the following command,
VBoxManage setextradata “VM name” “CustomVideoMode1″ “1280×800×32”
“VM name” – Exact virtual machine name of Mac OS X, execute this command with quotes.
Make sure the VBoxManage command is added to the Windows path, if not, execute this command from the VirtualBox installed folder.
b) The above command will modify the XML file of the Virtual machine. Boot the virtual machine and see whether it’s working.
c) If it doesn’t work, type the below command while booting at the EFI boot loader screen;
“Graphics Mode”=”1280x800x32” and press Enter.
Always better to give the same screen resolution size mentioned in com.apple.Boot.plist file.
Method -3
This is similar to method 2 but slightly different.
Execute this command from the VirtualBox folder:
VBoxManage setextradata “VM name” VBoxInternal2/EfiGopMode 3
“VM name” – Exact virtual machine name of Mac OS X, execute it with quotes.
No 3 – this is the number of video modes. Only 5 resolutions are supported:
0 – 640×480
1 – 800×600
2 – 1024×768
3 – 1280×1024
4 – 1440×900
In another way, you can add a string to the Virtual machine’s XML file to apply every time the virtual machine boots up.
<ExtraDataItem name=”VBoxInternal2/EfiGopMode” value=”3″>
Warning – If you are copying any of the commands from this article, make sure the opening and closing quotes are correct!!
I’m sure one of these will work with VirtualBox to increase Snow Leopard screen resolution. Have fun.




hai again Dinesh
thx for posting this tutorial
got prob after i use your method
my mac stuck at apple logo
i use oracle VM virtualbox 3.2
and tried to use sun VM virtualbox 3.1.6
same result
okay now it can bootup
but the resolution still the same 1024×768
nothing change
hmm
if use use fullscreen resolution like 1280×1024,resolution will change
but if i use widescreen resolution like 1280×720,resolution will automatic become 800×600
and after i change the resolution to 1280×1024, the color from millions before now become thousands only,i can see many noise on my mac
i didn’t get the resolution to work.i edited the file to 1280×1024, but it remains on 1024X768 after reboot.
my screen resolution also remains on 1024×768.
I as well am having this issue, if anyone has a solution can they post it.
Not work 🙁
did not work
hi there,
I have the same issue: i am stuck with the 1024*768 screen size !
i tried the 1680*1050 and 1280*1024
Running updated 10.6.3 on VB 3.2.0 r61806
Other issue: Quartz Extreme not working, preventing me to launch iMovie
If anybody is using Mac OS X as guest in VMware workstation or VMplayer then try this method https://www.sysprobs.com/increase-screen-resolution-wide-screen-support-mac-os-virtual-machine-vmware-player-workstation
This Mac VGA driver for VMware works well and gives wide screen resolution support also.
For VirtualBox,
Add following string in XML file
ExtraDataItem name=”CustomVideoMode1″ value=”1600×1200×32″/
I will find out other solutions and update here. But the method mentioned here worked for me.
Update: after reboot of the PC and VB, the resolution is good !
All in all, great tutos…
Thank you very much, just need to fix the Quartz Extreme issue and then Snow Powaaaaa !
Thanks for all the tutorials. I got 10.6.3 working on VB 3.2.2 under Win7 64-bit, but none of the above change my resolution, which stays fixed at 1024×768.
My monitor’s resolution is 1920×1080.
For those who want a custom resolution size:
First off the res problem is because of VB not OS X. To fix open up your OS’s terminal (or cmd in WIndows). Next navigate to the VB Folder (Windows) Drive:\Program Files\Oracle\VirtualBox. Once there type in the commands;
VBoxManage setextradata global GUI/MaxGuestResolution any
(this removes any restrictions in place for the res)
VBoxManage setextradata “VM name” “CustomVideoMode1” “Widthxheigthxdepth”
(VM Name = your VM Name, Widthxheightxdepth would like 1600x900x32 as example aslso that command is all one line not two)
Too check to see if it works open up you virtual machine and press F8, next type in ?video.
Your new res should show up. If it doesn’t try again
Anyways now you can correctly set your res in OS X by editing the com.apple.Boot.plist as described earlier
I have tried this fix on 12800x800x32, 1600x900x32, and 1154x862x32
Anyways best of luck
-ts
http://www.ts-solutions.net76.net
Fixed!
@Tom S.:
I followed your advice but it still didn’t work.
My problem was that I was still booting off the Empire EFI iso. So I installed the “myHack Installer” (from the Empire EFI iso) and booted off the HD, and now I can change the resolution.
Seems like the 1024×768 resolution is fixed when you boot with the with Empire EFI CD.
Thanks Dinesh & Tom for your help
That’s cool. My res would not change even after the efi install. I was looking for a res that is not allowed by VBox. So I guess if you type in ?video at the boot loader and your res is not there then you will probably have to do what I said. If your res is listed there than you are all set.
That right res makes all the difference in the world, Other than not having complete video support (which I am sure someone will figure out soon) my Snow Leo is great and on my pc (i7 920 16Gb DDR3) it runs faster than a Mac pro and for ummmm a quarter the money… though it would be nice to use my SLI
@Tom, just curious to know, which host OS your are using in 16GB?
7 ultimate 64 ASUS MOBO. MOBO has cool i7/Windows XMP support. Its like RAM on steroids. MOBO also has really cool Hyper-V settings as well which is awesome for making VM that I can run anywhere in on my network.
10.5.8 is also installed on external firewire drive but the VM way to do this is way better. Although I will give Snow Leopard a try to see how the install goes with no VM. But Virtualbox boots faster then my Macbook.
This is generally true for VBox VMs. I like their kernel, it is fast.
I also run Ubuntu studio 9.10 64, Solaris 10(just added) as well. I have 4x 1tb drives set at Raid 10 and 2 1.5 tb mirrored for games.
I created this system for a little over 2 grand not including monitors. The build process took about two hours. Pretty much all plugin play (i7’s are ridiculously easy to install) The age of the IT repair person is limited. The real money will be doing what people in this blog are doing……software support/integration 😉 Sorry for the length of my posts…long time listener first time caller
Wowww thats too cool as a data centre.
Thanks for the howto and the posts – I’ve got SL up and running now, although I’m still struggling with sound and screen resolution.
I have got as far as setting the global and local extradata values in VB, and have checked the video modes available at boot and 1280x800x24 is the last option in the list, titled “Mode 160”, however when I modify the com.apple.boot.plist to 1280x800x24 and restart, I’m stuck with the default resolution.
If i try 1280×1024 then that works but my laptop is widescreen so I have to scroll down the page to get around.
Any ideas?
My default res is set to 1600x900x32 by default in Windows, so this is what I set SL screen res for. If at boot you typed in ?video and at the very end then new res showed up…good that means VB will forward that res to it VM. Just as a question did you remove all the restriction placed on your VM’s? The command is:
VBoxManage setextradata global GUI/MaxGuestResolution any
Even if set the res right, if the restrictions are still in place then no luck. Also use 1280x800x32 not x24. I tried 24 but no luck. But I can set any res now. 1280×800 works great too. So try running that command one more time, then Run the:
VBoxManage setextradata “VM name” “CustomVideoMode1″ “1280x800x32”
Now try setting the res. Another try too (I was trying all sorts of thing before I figured it out, I did also do this) find a copy of OSx86 tools. Most of this will not work on SL but the enable Quartz/Open Gl button from inside OSx86Tools.
But removing the restrictions, then re-running your second command with 32 bit not 24 and finally editing the com.apple.Boot.plist file.
I will periodically checking back here to help out people. I am pretty good with Mac’s I have been an Mac admin for 5 years, that is why I am pretty darn sure that this problem is the VB not SL.
Hope this helps
-ts
http://ts-solutions.net76.net
Yay, finally got it to work! Decided to do a fresh install and start over completely.
I did a few things differently – updated SL to the latest version right after installing, then installed just those two kexts and got it booting using VB EFI (as opposed to using EmpireEFI). Then modified the VM XML and added 1280x800x32. I also changed the com.apple.boot.plist, adding the same resolution spec for good measure and finally installed chameleon bootloader via myHack installer, and voila when I rebooted it worked!
I pretty much did those things before but in a different order, so i’d say if anyone’s still stuck just have patience and keep fiddling!
Thanks for all the tips and comments on here though, would be totally clueless otherwise! Just got to get sound working now – I’ve installed the AC97 driver via that handy kext installer package, and it is being recognised as a lineout in the sound dialog, but still not a peep!
OK, so VB is definitely reporting my custom res to the VM, com.apple.Boot.plist is set correctly, and I enabled Quartz with OSx86 Tools. But the screen resolution is still stuck at 1024×768. Any more suggestions?
So when you type in ?video you have your res listed? OK
Now at EFI bootloader(Efi should be installed on OS X Drive not run of cd) try typing in “Graphics Mode”=”Your Res” This should work, if not well…. try editing your VM’s XML file.
Yeah, thanks, that worked! But I’d rather not have to type that every time I start the VM. Is there any way to make it permanent? (Editing the Boot.plist didn’t do it for me.)
Typing in that command just tests to see if that res will work….. To guess(not to say you are wrong) but you boot plist file is not right. A cool thing about OS X is that is always creates a ~.file. Essentially a back up file. So if a new plist or whatever is wrong it will use that last known good config of that file.. So that is why I would think that your boot file is messed up. Could be permissions as well. Go to the terminal and enter in this command:
sudo /Applications/TextEdit.app/Contents/MacOS/TextEdit /Library/Preferences/SystemConfiguration/com.apple.Boot.plist
Edit it again from here. VB sends the display size to VM cause it works when you type in the command at the bootloader. So it has to be you plist..
Give that a try
Yes Tom, it can be an issue with permissions too.
I added the following to my plist file in the section:
Graphics Mode
1440x900x32
That is all I changed.