If you are still using an older version of Mac OS X on Intel or AMD Computers by any of the desktop virtualization software like VMware or VirtualBox, this guide will be helpful to increase the screen resolution size of Snow Leopard. Adjusting screen size including widescreen on VMware is easy since VMware tools (with VGA driver) are available, but setting up screen resolution in VirtualBox is slightly different for each installation method.
VMware users
Most of the latest macOS versions can work without any issues on VMware with multiple screen resolutions. If you are still using the older version of Mac OS X and VMware, then you can follow the steps to install the VMware VGA driver to get proper screen resolutions.
1) Download the Mac VGA driver for VMware here.
2) Install the package on Mac OS X virtual machine.

3) Restart the Mac Virtual machine. That’s it. Now you can see multiple screen resolution options inside the VM.
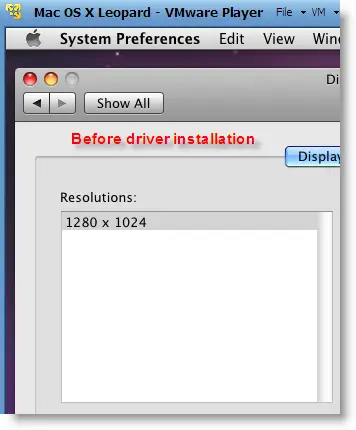
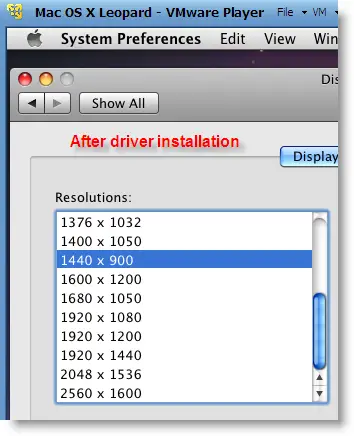
This VGA driver worked well in VMware workstation and VMware Player for Mac virtual machines Leopard and Snow Leopard. We have not tested on the latest macOS versions.
VirtualBox Users
We mentioned several ways to use Mac OS X as a virtual machine on VirtualBox, if you are using any of the methods, the following tricks will be helpful.
Method -1
If you installed Mac OS X by any of the hackintosh ISO files, then do this method first. Also, it can work on vanilla installation from the original DVD or ISO file.
Increase Mac OS X Virtual Machine Screen Resolution in VirtualBox
1) Start the Virtual Machine.
2) Open /Library/Preferences/SystemConfiguration/com.apple.Boot.plist in text editor.
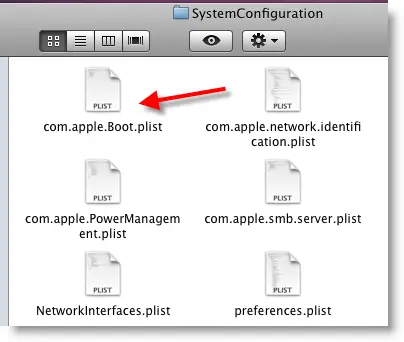
3) Input the below entries.
<key>Graphics Mode</key>
<string>1280x1024x32</string>
1280x1024x32 – is your option. Type the correct screen resolution which matches your monitor resolution.
Here is the screenshot of my file.

4) Select Save As in the Text editor file menu and save it on the desktop or somewhere else.
Make sure to save with the same .plist file extension. (Remove the tick as mentioned below)
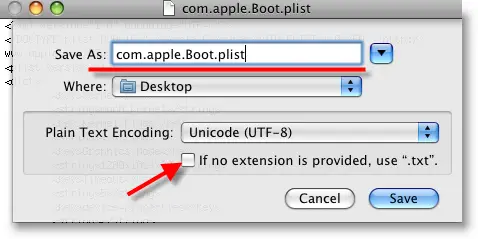
5) Now, copy or drag com.apple.Boot.plist file from desktop to /Library/Preferences/SystemConfiguration/ or /Extra location where ever it needs to be replaced.
Enter the Mac root (admin) password to authenticate replacing the file.
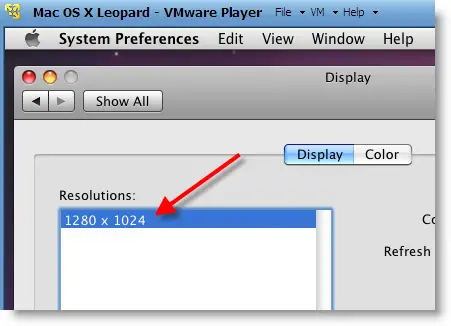
6) Restart the Mac virtual machine now. By default, the Mac OS X will start in the screen resolution inserted in com.apple.Boot.plist. We can confirm it by checking in ‘Display’ under ‘System preferences’.
Method -2
Try this method if method 1 fails.
We will modify the VirtualBox settings of the Mac VM in this method.
a) Close VirtualBox completely and execute the following command,
VBoxManage setextradata “VM name” “CustomVideoMode1″ “1280×800×32”
“VM name” – Exact virtual machine name of Mac OS X, execute this command with quotes.
Make sure the VBoxManage command is added to the Windows path, if not, execute this command from the VirtualBox installed folder.
b) The above command will modify the XML file of the Virtual machine. Boot the virtual machine and see whether it’s working.
c) If it doesn’t work, type the below command while booting at the EFI boot loader screen;
“Graphics Mode”=”1280x800x32” and press Enter.
Always better to give the same screen resolution size mentioned in com.apple.Boot.plist file.
Method -3
This is similar to method 2 but slightly different.
Execute this command from the VirtualBox folder:
VBoxManage setextradata “VM name” VBoxInternal2/EfiGopMode 3
“VM name” – Exact virtual machine name of Mac OS X, execute it with quotes.
No 3 – this is the number of video modes. Only 5 resolutions are supported:
0 – 640×480
1 – 800×600
2 – 1024×768
3 – 1280×1024
4 – 1440×900
In another way, you can add a string to the Virtual machine’s XML file to apply every time the virtual machine boots up.
<ExtraDataItem name=”VBoxInternal2/EfiGopMode” value=”3″>
Warning – If you are copying any of the commands from this article, make sure the opening and closing quotes are correct!!
I’m sure one of these will work with VirtualBox to increase Snow Leopard screen resolution. Have fun.




Last try *
Repost:
FIX 😀 . If you want to get the max resolution for full screen what I did it may be redundant (but it was suggested from another post that “Graphics Mode” does not work), but I added both key lists to my com.apple.Boot.plist in /Extra as such:
Kernel Flag
Graphics Mode = 1600x900x32
Graphics Mode
1600x900x32
Ok another side note how do I show commands like when posting comments…
<>
Here is how
FIX . If you want to get the max resolution for full screen what I did it may be redundant (but it was suggested from another post that “Graphics Mode” does not work), but I added both key lists to my com.apple.Boot.plist in /Extra as such:
Kernel Flag
Graphics Mode = 1600x900x32
Graphics Mode
1600x900x32
put <<>> around it
FIX . If you want to get the max resolution for full screen what I did it may be redundant (but it was suggested from another post that “<Graphics Mode>” does not work), but I added both key lists to my com.apple.Boot.plist in /Extra as such:
<Kernel Flag>
<Graphics Mode = 1600x900x32>
<Graphics Mode>
<1600x900x32>
put <<>> around it
FIX . If you want to get the max resolution for full screen what I did it may be redundant (but it was suggested from another post that “<>Graphics Mode<>” does not work), but I added both key lists to my com.apple.Boot.plist in /Extra as such:
<>Kernel Flag<>
<>Graphics Mode = 1600x900x32<>
<>Graphics Mode<>
<>1600x900x32<>
<string>
NickB you have to initate html and then comment it like so for your post
[html]
[/html]
<
FIX . If you want to get the max resolution for full screen what I did it may be redundant (but it was suggested from another post that "Graphics Mode” does not work), but I added both key lists to my com.apple.Boot.plist in /Extra as such:
Kernel Flag
Graphics Mode = 1600x900x32
>Graphics Mode
1600x900x32
>
@NickB, @jack and @Yao,
Thanks for your contribution. Your comments looked like spam from my blogging software, but when I read, all good and useful for readers and me too. Good work 😉
<string>
yo
NickB, when you say, “Obviously you save either in vi with sudo, or copy .plist to desktop edit with text editor and replace in /Extra with Authenticate and root.”…. Where is that /Extra folder? I am running 10.6.4 and I do not have a /Extra off the root. The only place I can find the com.apple.Boot.plist is in the System Configuration folder.
Thanks!
awesome! thanks for the tips! I could not get this to work with 1680x1050x32 by changing the com.apple.Boot.plist files alone, however when I tried the
VBoxManage setextradata “OS X” “CustomVideoMode1″ “1680x1050x32”
it worked like a charm! thank you so much!
@gabe,
Thanks for coming back and confirming.
i dont get what you mean by “run the command” VBoxManage setextradata “VM name” “CustomVideoMode1″ “1280×800×32” where am i supposed to run it? vbox is closed. am i supposed to do this in the command promt? it just doesnt make any sense to me. im pretty good with computers i just cant understand your directions
@Spencer Newton,
The ‘VBoxManage setextradata’ command with virtual machine’s name will insert the parameters to particular VM’s settings ( normally to XML) file.
Yes, you have to run it in command prompt of host computer, but make sure VirtualBox working directory is set in paths ( in Windows) or you are running this command from VB’s working directory ( Normally installation location, where you will find VBoxmanage.exe file)
I think you would have understand now. Feel free to drop a comment if it works or not. I will try my best.
@ Spencer Newton
in the windows command line on the host machine, migrate to the Oracle/VirtualBox folder (cd C\Program Files\Oracle\VirtualBox.
In that folder resides the vbox manage executable rerun the command now
What about changing resolution when:
Ubuntu host and OSX guest
Thanls for any help
@Villatorente
None of the methods are related to Windows host commands or application. Only VirtualBox commands and file editing inside SL virtual machine involved. So, same procedures applicable for Ubuntu host also.
@nick
I tried the above methods to get resolution 1600x900x32 and i cant seem to get them. the command
VBoxManage setextradata vmname “CustomVideoMode1″ “1600x900x32″ worked
but nothing happend. I’ve tried to correct the plist and overwrite many times. how exactly is it suppose to look? where am i suppose to put the code?
thanks!
Thanks, but when i run: sudo VBoxManage setextradata “OSX” “CustomVideoMode1″ “1280x800x32”, i keep receiving the message: Could not find a registered machine named ‘“OSX’ – But “OSX” is the name of the VM, which otherwise works normally, except the resolution. By the way, ¿ what is the normal VirtualBox working directory in Ubuntu ? Thank for your patience, I am new to that.
of course “OSX” – without ” ” in the command line.
.Vitualbox in your home folder.
All the commands I typed into the terminal in Ubuntu Lucid. here is what i typed into the boot.plist.
[key]Kernel Flag[/key]
[string]Graphics Mode = 1600x900x32[/string]
[key]Graphics Mode[/key]
[string]1600x900x32[/string]
replace the [] with <>
I was just wondering if anybody has been successful running at 1920x1080p because all i can seem to get is 1280×1024 and i have tried methods 1 and 2
Thanks for your help. Anyways, all failed:
This method failed:
* When OSX is booting, tap F8 to get to the boot prompt
* Type in “Graphics Mode”=”1280x1024x32”
This failed:
adding: Graphics Mode
1280x1024x32
in com.apple.Boot.plist
under extas and/or under /Library/Preferences / system configuration and after that running
VBoxManage setextradata osx “CustomVideoMode1″ “1280×800×32”
“which the system accepts).
I have got the impression that the screen definition is determined when iBoot stars. ¿Am I wrong?
Maybe I will have to wait until there is guest-additions for mac guest. Thanks a lot and again, thanks for your patience.
@Villatorente,
if you are using iBoot, did you install multibeast as mentioned here?
https://www.sysprobs.com/iboot-loader-virtualbox-install-snow-leopard
Then edit plist file where ever you find. Good luck.
@nickb, thanks for the information on Ubuntu.
Hey, thanks for writing the guide and everything. I managed all the way until the resolution part. I tried Method 1 but it didn’t work. I tried Method 2 as well, but I got the following error –
C:\Program Files\Oracle\VirtualBox>VBoxManage setextradata “OSX” “CustomVideoMod
e1? “1280x800x32”
Oracle VM VirtualBox Command Line Management Interface Version 3.2.8
(C) 2005-2010 Oracle Corporation
All rights reserved.
ERROR: Could not find a registered machine named ‘ΓÇ£OSXΓÇ¥’
Details: code VBOX_E_OBJECT_NOT_FOUND (0x80bb0001), component VirtualBox, interf
ace IVirtualBox, callee IUnknown
Context: “FindMachine(Bstr(a->argv[0]), machine.asOutParam())” at line 583 of fi
le VBoxManageMisc.cpp
Method 3 had the same error.
I installed the Sound package but it didn’t work as well. I’ll appreciate it if you help. Thanks.
@Kenneth,
Something wrong with virtual machine’s name.
Do one thing, modify the XML file with your option as mentioned in step 3. Make sure you changed the same screen size on all com.apple.Boot.plist files inside VM.
I prooved the second method and it worked for me.
I did: VBoxManage setextradata Mac CustomVideoMode1 1360x768x32.
As you see this is a wide resolution that is not supported by the BootLoader installed (Multibeast).
I have Mac OSX 10.5 and The Multibeats as boot loader.
Thanks a lot. now i’ll work on my mac on virtualbox.
PD: Sorry for my english (i’m from Chile).
@Matias, Thanks for your confirmation from Chilie.
Hey Matias, thanks.
I’ve tried various methods and none of them worked for me.
My laptop is 1366X768.
Tired using 1360×768 as stated in your post and it works !
Thanks again