If you are still using an older version of Mac OS X on Intel or AMD Computers by any of the desktop virtualization software like VMware or VirtualBox, this guide will be helpful to increase the screen resolution size of Snow Leopard. Adjusting screen size including widescreen on VMware is easy since VMware tools (with VGA driver) are available, but setting up screen resolution in VirtualBox is slightly different for each installation method.
VMware users
Most of the latest macOS versions can work without any issues on VMware with multiple screen resolutions. If you are still using the older version of Mac OS X and VMware, then you can follow the steps to install the VMware VGA driver to get proper screen resolutions.
1) Download the Mac VGA driver for VMware here.
2) Install the package on Mac OS X virtual machine.

3) Restart the Mac Virtual machine. That’s it. Now you can see multiple screen resolution options inside the VM.
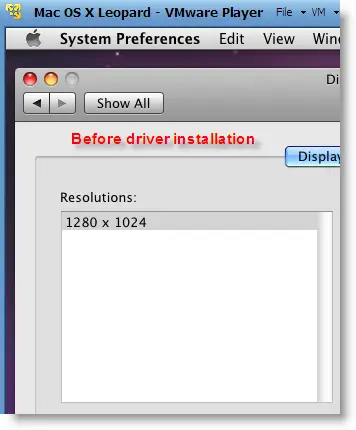
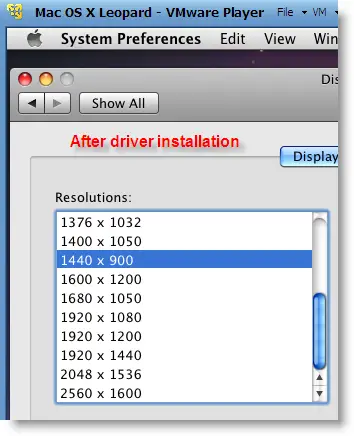
This VGA driver worked well in VMware workstation and VMware Player for Mac virtual machines Leopard and Snow Leopard. We have not tested on the latest macOS versions.
VirtualBox Users
We mentioned several ways to use Mac OS X as a virtual machine on VirtualBox, if you are using any of the methods, the following tricks will be helpful.
Method -1
If you installed Mac OS X by any of the hackintosh ISO files, then do this method first. Also, it can work on vanilla installation from the original DVD or ISO file.
Increase Mac OS X Virtual Machine Screen Resolution in VirtualBox
1) Start the Virtual Machine.
2) Open /Library/Preferences/SystemConfiguration/com.apple.Boot.plist in text editor.
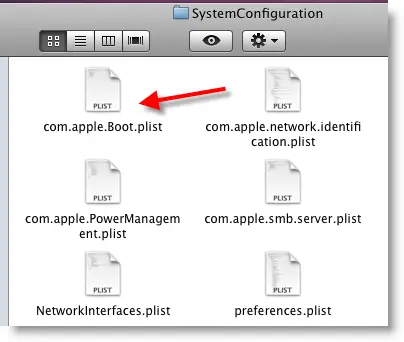
3) Input the below entries.
<key>Graphics Mode</key>
<string>1280x1024x32</string>
1280x1024x32 – is your option. Type the correct screen resolution which matches your monitor resolution.
Here is the screenshot of my file.

4) Select Save As in the Text editor file menu and save it on the desktop or somewhere else.
Make sure to save with the same .plist file extension. (Remove the tick as mentioned below)
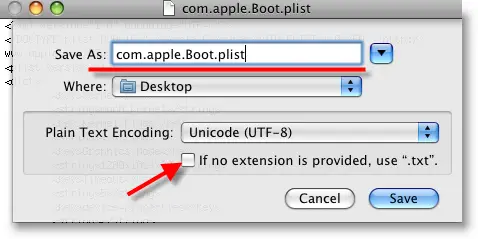
5) Now, copy or drag com.apple.Boot.plist file from desktop to /Library/Preferences/SystemConfiguration/ or /Extra location where ever it needs to be replaced.
Enter the Mac root (admin) password to authenticate replacing the file.
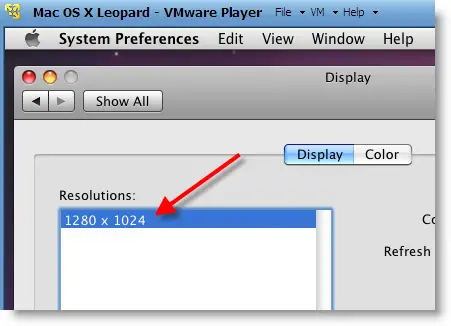
6) Restart the Mac virtual machine now. By default, the Mac OS X will start in the screen resolution inserted in com.apple.Boot.plist. We can confirm it by checking in ‘Display’ under ‘System preferences’.
Method -2
Try this method if method 1 fails.
We will modify the VirtualBox settings of the Mac VM in this method.
a) Close VirtualBox completely and execute the following command,
VBoxManage setextradata “VM name” “CustomVideoMode1″ “1280×800×32”
“VM name” – Exact virtual machine name of Mac OS X, execute this command with quotes.
Make sure the VBoxManage command is added to the Windows path, if not, execute this command from the VirtualBox installed folder.
b) The above command will modify the XML file of the Virtual machine. Boot the virtual machine and see whether it’s working.
c) If it doesn’t work, type the below command while booting at the EFI boot loader screen;
“Graphics Mode”=”1280x800x32” and press Enter.
Always better to give the same screen resolution size mentioned in com.apple.Boot.plist file.
Method -3
This is similar to method 2 but slightly different.
Execute this command from the VirtualBox folder:
VBoxManage setextradata “VM name” VBoxInternal2/EfiGopMode 3
“VM name” – Exact virtual machine name of Mac OS X, execute it with quotes.
No 3 – this is the number of video modes. Only 5 resolutions are supported:
0 – 640×480
1 – 800×600
2 – 1024×768
3 – 1280×1024
4 – 1440×900
In another way, you can add a string to the Virtual machine’s XML file to apply every time the virtual machine boots up.
<ExtraDataItem name=”VBoxInternal2/EfiGopMode” value=”3″>
Warning – If you are copying any of the commands from this article, make sure the opening and closing quotes are correct!!
I’m sure one of these will work with VirtualBox to increase Snow Leopard screen resolution. Have fun.




Hi Dinesh,
Nothing was wrong with the VM’s name, it’s called “OSX”, which I clearly typed. However, for some strange reason, it’s thinking that I typed ‘ΓÇ£OSXΓÇ¥’.
Where and how do I change to the same screen size on all com.apple.Boot.plist files inside the VM? I thought there was only one, located under the folder “Extras”? I changed that already.
used the first idea, now hoever I get a small rectangle and some flashing after it loads Darwin, using the chamileon v2 bootloader with leopard, my screen resolution is 1600×900. Some help would be nice so i can continue working on making this distro better.
Hey!
Thanks to all of you! No method worked directly for my native resolution 1680x1050x32, so I tried both approaches together:
– Change the com.apple.Boot.plist file
– And: VBoxManage setextradata “OSX” “CustomVideoMod
e1” “1680x1050x32”
Neither worked standalone; I had to do both to get this fixed, so worth sharing this for other “rare” resolutions out there.
Thanks again!
Yeah, I had to do both to get it working on my 1366×768 as well
These methods wouldn’t work under EmpireEFI, used because the native VB efi doesn’t finish booting, as shown in step 3 under https://www.sysprobs.com/mac-os-guest-virtualbox-326-snow-leopard-1064-windows-7-32-bit
The method of adding
works great to give 1280×1024 after properly enabling the VB efi & not using Empire.
To use VB 3.2.8 efi instead of Empire (working for SL 10.6.4), add
Also, the examples here show 1280×800, which is not one of the supported resolutions, they should all say 1280×1024
Thanks for the help!
2nd method works with 1280×768 & 1280×800, but fails at 1366×768 (running iPc 10.5.6 in VB3.2.10).
method 3 worked for me:
Win7 x64
vbox v3.2.10 – EFI boot
snowleopard 10.6.3 – 32bit mode
So Goober, you are also using the EFI option? I am using the Empire EFI to boot to CD image then from there to OSX 10.6.4
Is it just me? I don’t have a com.apple.boot.plist file in my /Extra folder. The folder is there, but no files at all, just another empty folder that says “Extensions”. I can’t find anybody else with this problem. Am I missing some simple step?
I am running 10.6.3 on a Dell Vostro Core 2 Duo res. 1366x768x32, currently stuck at 1024×768. I did the command prompt work, as well as editing the plist file in the other location, but still nothing.
@Jeffro,
Can you see the mentioned file under /Library/Preferences folder.
Or you may have to install the boot loader package on hard disk, which will enable you to boot from hard disk directly. During the installation select com.apple.boot.plist file. This installation will add the file under /Extra folder.
DO NOT forget to take snapshot before do anything.
Let me know the result.
Forgot to mention- Running 10.6.3 in VBox. using Chameleon EFI.
@Dinesh,
Thanks, yes I am booting from the hard disk directly, and yes, the file is located in /Library/Preferences. I did change the plist there, but to no avail. As soon as the boot loader (Chameleon) loads, I can tell it’s gonna be the wrong resolution b/c I get the black bars on the sides of the screen. One thing you mentioned was “selecting the com.apple.boot.plist during installation.” That I have not done. Is that during the OsX install process? If so, is it during the selection of options? Thanks for your help.
Jeff
@Jeffro,
It was during the ‘Myhack’ or boot loader installation after OS X installed. After this only you can boot directly from hard disk without boot loader.
Have you tried the all methods mentioned under VirtualBox.
In boot loader screen itself, you can press any key and insert desired screen resolution while booting.
I have tried every which way described in this post and in the comments. Tried editing the com.apple.Boot.plist file, no avail. Tried the CustomVideoMode1 method, no avail. Tried editing the XML file by hand, no avail.
The only thing that works is the VBoxInternal2/EfiGopMode 4 method, but 1440×900 is still not enough for my screen. I would like a resolution is 1920×1200.
@Nik,
You are lucky to get 1440×900 while other don’t get that.
I think thats the maximum resolutions VirtualBox can pass to guest OS.
How about buying a new monitor with less res? 😉 just kidding.
I see, well 1440×900 it is then!
So I have been using this for the day, trying to use it as “normally” I would any regular day. The results are pretty good, no bugs to report of really. I would say though that there is just a slight performance decrease which I am not so sure I will get over as time goes on.
For instance, screen redraws are pretty slow when surfing the web or using heavier applications. Sometimes it takes a second to activate a menu, or move a window and so forth. Overall, UI performance just seems a little choppy, but enough to be rather annoying. Maybe it is due to the 64MB allocated for video memory? I can’t allocate much more than that or VirtualBox will not boot.
@Nik,
These problems due to non availability of VMware tools or VirtualBox additions for Mac OS X guest. Even I’m not sure that setting up more or less video memory than 64MB is properly detected by guest OS.
Anyhow we can wait till somebody releases VirtualBox guest additions for Mac OS X guest.
Thanks for your comment.
Thanks. 2nd method worked for me since my resolution is not into the 5 supported (1280×800).
Thank you! It cost me some time to make it work on Oracle VM Virtualbox but it’s awesome. My PC is: AMD quad core, 4 GB ram, Nvidia chipset running Windows 7 – 64 bits.
THE TRICK WAS: After setting up and rebooting I installed myHack 1.0 (from the DVD) customizing it by adding the CHOCOLATE KERNEL option. I made a couple of previous unsuccesful attempts and this one was the great one.
Have vbox 3.2.10, win7 x64 host, OSX 10.6.5 retail guest. Running on Dell Lattitude D830 with Core 2 Duo. I can get OSX to boot and run fine with 1 CPU. With 2 cpu I get a kernel panic cpu 0 caller 0x22213E06 Monitor feature not present in … pmYonahProcessor.c
Any workarounds?
I have successfully installedd snow leopard 10.6.0 in VMware on my Windows 7 laptop using darwin iso files. When i open it in fullscreen it is displayed only in the centre of my laptop screen leaving approx 15% black space each on both the sides of the VMware screen. Can anyone help me??
Thanks in advance
You can also put inside the KernelFlags key the value… i mean:
Kernel Flags
“Graphics Mode”=”1280x1024x32”
It’s important to use the TextEdit and not the preferences list editor cause the second one will replace the quotes with " and it will not work. You can also put things like
Kernel Flags
“Graphics Mode”=”1280x1024x32” EthernetBultIn=Yes
or even the -x flag to get the safe mode boot incluided with the display resolution and the other flags… some IAKTOS flags like -pci1 can be added.
You can also put inside the KernelFlags key the value… i mean:
>Kernel Flags<
>“Graphics Mode”=”1280x1024x32″<
It’s important to use the TextEdit and not the preferences list editor cause the second one will replace the quotes with "e; and it will not work. You can also put things like
>Kernel Flags<
>“Graphics Mode”=”1280x1024x32″ EthernetBultIn=Yes<
or even the -x flag to get the safe mode boot incluided with the display resolution and the other flags… some IAKTOS flags like -pci1 can be added.
This needs a preview before post… i hope the les than, quotes and more than signs displays correctly now.
Thank you very much for this help, I made my Snow Leopard running under Dell Vostro 3700, 4 core ( I am using all) with 3072 Virtual RAM in VirtualBox 3.2 under Ubuntu 10.4
What a great help.
Very helpful, thank you. Here’s what worked for me in VirtualBox 3.2.12
1. Use iBoot to install Retail 10.6.3 DVD (use ImgBurn to create an ISO from the retail DVD).
2. Follow instructions on tonymacx86 blog to use iBoot and then update to 10.6.5 in the VM, before rebooting use MultiBeast to create the boot loader. Use method 1 to add resolution of 1680x1050x32 to /Extras/com.apple.Boot.plist.
4. Shut down the VM.
5. Shut down VirtualBox completely.
6. Execute vboxmanage setextradata “VM” “CustomVideoMode1” “1680x1050x32”
7. Restart VirtualBox, start the VM, and you’re all set.
Some notes: I didn’t have to remove the AppleIntelCPUPowerManagement.kext – running Windows 7 Ultimate 64-bit things just “worked” and I don’t see a 100% CPU utilization.
The sound isn’t working yet – I’m going to try the available driver and see if that works …
Thanks for the great info. It was just what I needed to get me where I wanted to go. Well, almost.
Though I specified a resolution of 1680x1050x32, what I got was 1280x1024x32. That’s much, much better than what I was getting before, but it’s still not full screen. It’s like it doesn’t like wide screen, so it picked the highest resolution for a 4×3 monitor that would fit the numbers I gave.
How do I go that one last step to get to full (wide) screen?
I’m running Snow Leopard 10.6.5 in VirtualBox 4.0.0.
This worked quite well on VirtualBox 4 on a 64 bit Linux host. The only issue, which was minor, was sound. On my machine, sound was set to Intel, and I overlooked that, so after installing the AC97 drivers, I still had no sound–checked my settings again, changed the hardware to AC97 and it worked like a charm. Thank you.
For some reason “vboxmanage setextradata …” is not working for me. It just completes without errors but nothing is changed.
So, I have modified xml configuration file in “C:\users\your_name\.VirtualBox\Machines\your_machine_name” and after
(I have changed “1280,1024” to “1680,1050”)
added the line
Everything is working in 1680×1050 (full screen) on my second monitor.
I am running iAtkos 10.6.3 upgraded to 10.6.4 (not sure if 10.6.5 would work since it breaks the wifi network on my hackintoshed hp laptop so I am sticking with 10.6.4)
I mean, after:
ExtraDataItem name=”GUI/LastGuestSizeHint” value=”1680,1050″/
Added the line
ExtraDataItem name=”CustomVideoMode1″ value=”1680x1050x32″/
Do not forget angle brackets
Sasha,
Thanks for the great input.
Sorry about brackets 🙂
hi Guys,
I got 1280x800x32 working on my new Lenovo X201 laptop, but after run it for a while(surfing, chatting for about 20mins), it will crash the host windows 7(blue screen)… anybody had this problem?
thanks!
Hi,
I was able to get correct full screen resolutions working on both my Linux Box (Fedora 14 – 64bit; 1680×1050) and, on my Windows 7 laptop (I3 – 64bit; 1366×768) by using a combination of 2 of the methods mentioned above:
1. In the host environment, I set up a custom video mode. e.g.:
VBoxManage setextradata “VM name” “CustomVideoMode1″ “1680×1050×32”
2. In the Mac OSX (10.6.5) virtualized environment, I used method 1 above to create the preferred screen resolution.
I had no problems following your instructions for either method. The trick for me though, was combining them. Neither by itself was effective.
Best Regards,
Jerry Lumpkins