This guide shows you how to edit hosts file in Windows 10 and Windows 11 easily without any additional system tools. The hosts file is an important system file that maps the host/website names with its IP addresses. Basically, it translates the hostname to IP and vice versa. So browsing and accessing network websites and shares by the name becomes easy by avoiding DNS server requests or remembering the relevant IP addresses.
We can manually edit DNS names and IP addresses for specific websites in the hosts file which will be helpful in several ways. The hosts file is a simple text file without any file extensions.
We used to modify this file by ‘edit’ DOS command in earlier Windows operating systems, but the edit DOS command is not included in Windows 11 and 10/8.1 anymore. You will get the following error message when you try the edit command in recent Operating Systems.
“ ‘edit’ is not recognized as an internal or external command, operable program or batch file.”
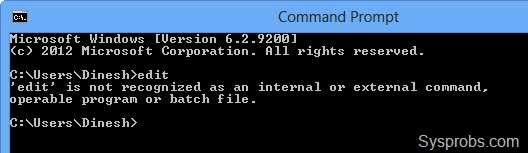
This is because of edit DOS command requires 16-bit QBASIC.EXE which will not work on the 64 Bit versions of Windows Operating Systems. So how to edit the hosts file here? we can use the built-in Notepad program for this purpose.
Two Methods to Edit Hosts File in Windows 11/10
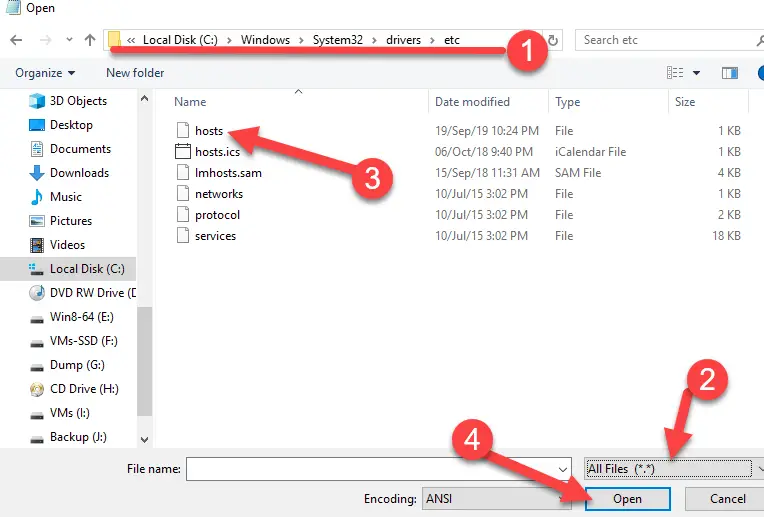
In Windows Operating Systems, the hosts file is located here,
C:\Windows\System32\Drivers\etc
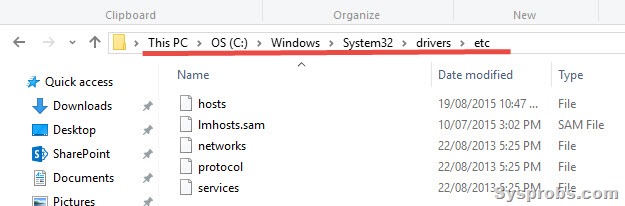
C – is the drive where Windows OS is installed in most cases. If your OS is installed in a different partition, then you need to change this letter.
Make sure you have administrative access/privilege on the computer before attempting to modify the hosts file.
Important Note: Some of the Antivirus software including Microsoft Security Essential (Windows Defender) will not allow modifying hosts file as a security precaution. This is to prevent hosts file modification by any virus, spyware or malware threat. If you experience this, you need to disable the Antivirus software temporarily or exclude the hosts file from the protection.
Method-1:
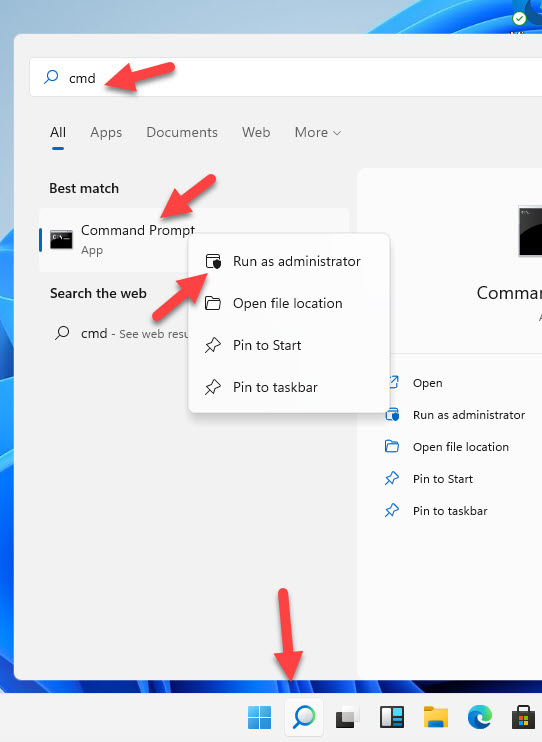
1) Open the command prompt as administrator.
Search ‘cmd’ on Windows 11 or 10 and right-click on the Command Prompt and select ‘Run as administrator.’ (This is an important step).
2) It will probably open from C:\Windows\System32, then type ‘cd drivers’ and ENTER.
Now type ‘cd etc’, ENTER as shown below. This is to go to the location where the host file is located.
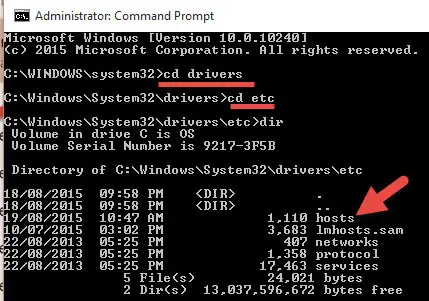
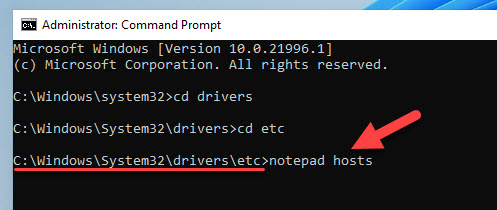
3) Make sure you are in the correct folder path, it should be C:\Windows\System32\Drivers\etc. Type ‘notepad hosts’ to open the file in notepad.
4) We assume that you know the content of the file. Type the IP address of the domain/hostname and DNS name of it. You can see the examples in the same file.
Here is an example, Let’s say if I need to block Facebook on a PC, I can enter the wrong IP address and map it to facebook.com as we showed here.
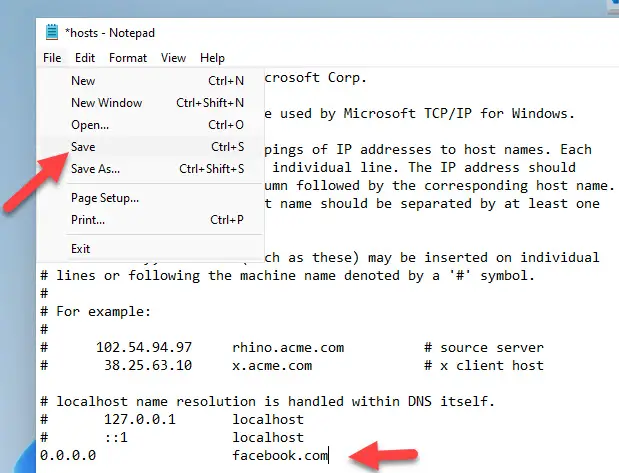
Once you have modified the file with appropriate settings, click Save from File menu.
Important Note: If you haven’t opened the notepad from the ‘Run as Administrator’ command prompt, then you can’t save the Hosts file in the above case.
Method-2:
This could be the easiest way to edit hosts file in Windows 11 without typing any commands in the command prompt.
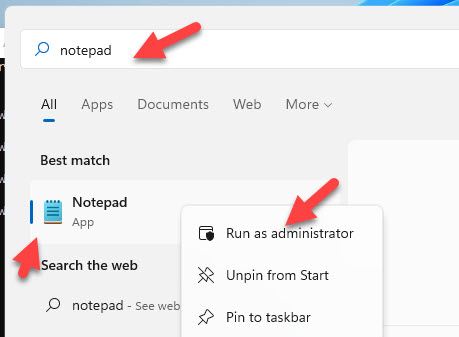
5) Search for the notepad and open it with administrative access. Right-click and ‘Run as Administrator’.
6) Navigate to the hosts file location. It’s under C:\Windows\System32\Drivers\etc.
Change the file format to ‘All files,’ then open the hosts file and modify the settings as you want.
7) Save the file once changes are done as we did in method 1.
Since these changes are related to DNS, it is better to clear the DNS cache before checking the impact of hosts file modification.
Open command prompt, and type;
ipconfig /flushdnsWhy Modify Hosts file in Windows OS or other Operating Systems?
This is an advanced user action and most of the time you do not need to touch the hosts file. But, here are the possible scenarios you may need to modify.
- Block a website by giving the wrong IP. So, the PC will look for wrong IP for particular website and ultimatly it will not work.
- You are testing a website which was migrated to a different host. Before changing the public DNS entries, you can modify the hosts file on your local PC with the new IP and test.
- Unintentional changes by any programs or virus attacks to the hosts file. In this case, you need to clear or edit the hosts file to default settings.
- Manipulate the DNS entries. If you need to resolve a name to IP which can’t be done by the DNS servers, the modifying the hosts file is the only one option.
We hope this guide is helpful in editing the hosts file in Windows 11/10 or earlier Operating Systems.


thank you
Thank you! Helped a lot!
Manually accessing the HOSTS file by folder addresses, the HOSTS file edited and save as expected and created a dated HOSTS.backup. But
Winpatrol (https://www.winpatrol.com/winpatrol/) Options can no longer find the HOSTS file.
I did not need to disable the anti-virus or Windows Defender.
Usin 64-bit Windows 8.1 with a 64-bit machine.