This guide shows you how to edit hosts file in Windows 10 and Windows 11 easily without any additional system tools. The hosts file is an important system file that maps the host/website names with its IP addresses. Basically, it translates the hostname to IP and vice versa. So browsing and accessing network websites and shares by the name becomes easy by avoiding DNS server requests or remembering the relevant IP addresses.
We can manually edit DNS names and IP addresses for specific websites in the hosts file which will be helpful in several ways. The hosts file is a simple text file without any file extensions.
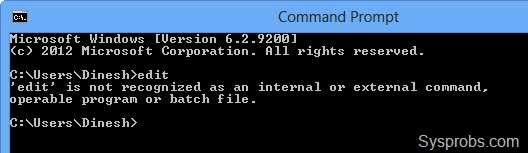
We used to modify this file by ‘edit’ DOS command in earlier Windows operating systems, but the edit DOS command is not included in Windows 11 and 10/8.1 anymore. You will get the following error message when you try the edit command in recent Operating Systems.
“ ‘edit’ is not recognized as an internal or external command, operable program or batch file.”
This is because of edit DOS command requires 16-bit QBASIC.EXE which will not work on the 64 Bit versions of Windows Operating Systems. So how to edit the hosts file here? we can use the built-in Notepad program for this purpose.
Two Methods to Edit Hosts File in Windows 11/10
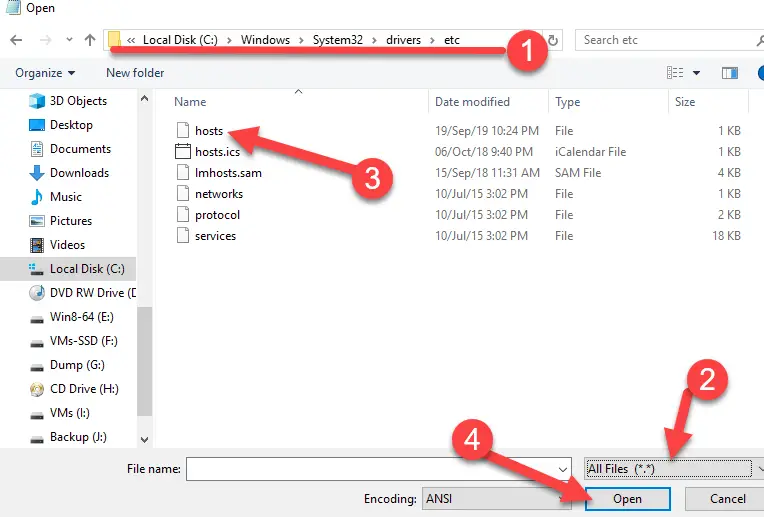
In Windows Operating Systems, the hosts file is located here,
C:\Windows\System32\Drivers\etc
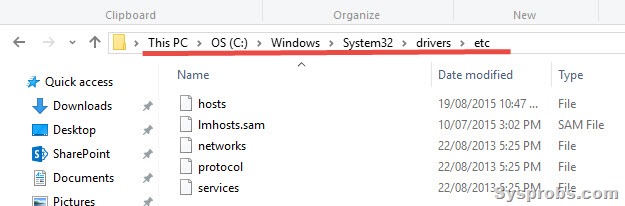
C – is the drive where Windows OS is installed in most cases. If your OS is installed in a different partition, then you need to change this letter.
Make sure you have administrative access/privilege on the computer before attempting to modify the hosts file.
Important Note: Some of the Antivirus software including Microsoft Security Essential (Windows Defender) will not allow modifying hosts file as a security precaution. This is to prevent hosts file modification by any virus, spyware or malware threat. If you experience this, you need to disable the Antivirus software temporarily or exclude the hosts file from the protection.
Method-1:
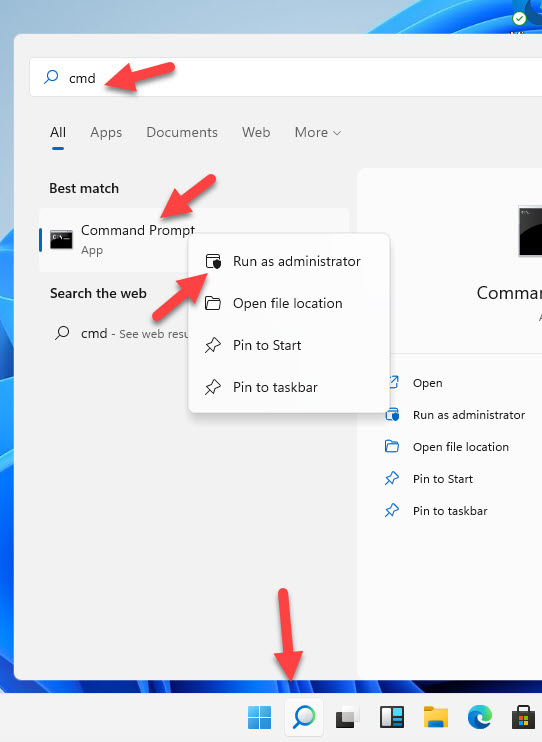
1) Open the command prompt as administrator.
Search ‘cmd’ on Windows 11 or 10 and right-click on the Command Prompt and select ‘Run as administrator.’ (This is an important step).
2) It will probably open from C:\Windows\System32, then type ‘cd drivers’ and ENTER.
Now type ‘cd etc’, ENTER as shown below. This is to go to the location where the host file is located.
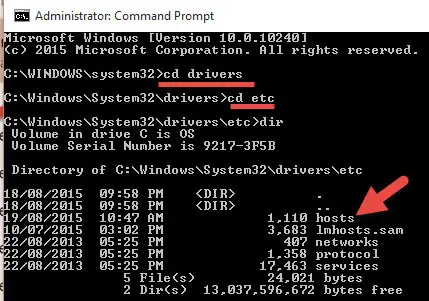
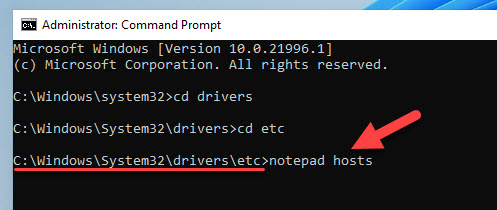
3) Make sure you are in the correct folder path, it should be C:\Windows\System32\Drivers\etc. Type ‘notepad hosts’ to open the file in notepad.
4) We assume that you know the content of the file. Type the IP address of the domain/hostname and DNS name of it. You can see the examples in the same file.
Here is an example, Let’s say if I need to block Facebook on a PC, I can enter the wrong IP address and map it to facebook.com as we showed here.
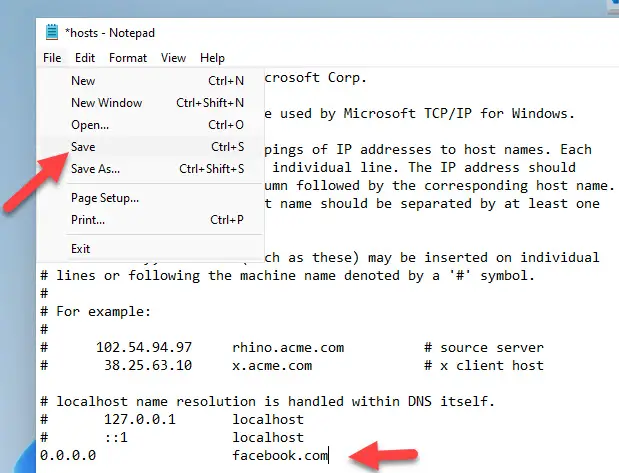
Once you have modified the file with appropriate settings, click Save from File menu.
Important Note: If you haven’t opened the notepad from the ‘Run as Administrator’ command prompt, then you can’t save the Hosts file in the above case.
Method-2:
This could be the easiest way to edit hosts file in Windows 11 without typing any commands in the command prompt.
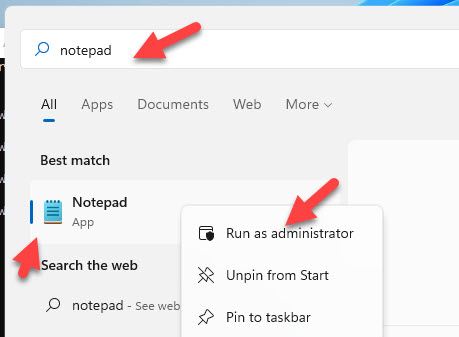
5) Search for the notepad and open it with administrative access. Right-click and ‘Run as Administrator’.
6) Navigate to the hosts file location. It’s under C:\Windows\System32\Drivers\etc.
Change the file format to ‘All files,’ then open the hosts file and modify the settings as you want.
7) Save the file once changes are done as we did in method 1.
Since these changes are related to DNS, it is better to clear the DNS cache before checking the impact of hosts file modification.
Open command prompt, and type;
ipconfig /flushdnsWhy Modify Hosts file in Windows OS or other Operating Systems?
This is an advanced user action and most of the time you do not need to touch the hosts file. But, here are the possible scenarios you may need to modify.
- Block a website by giving the wrong IP. So, the PC will look for wrong IP for particular website and ultimatly it will not work.
- You are testing a website which was migrated to a different host. Before changing the public DNS entries, you can modify the hosts file on your local PC with the new IP and test.
- Unintentional changes by any programs or virus attacks to the hosts file. In this case, you need to clear or edit the hosts file to default settings.
- Manipulate the DNS entries. If you need to resolve a name to IP which can’t be done by the DNS servers, the modifying the hosts file is the only one option.
We hope this guide is helpful in editing the hosts file in Windows 11/10 or earlier Operating Systems.


Thanks a lot Dinesh. I was facing issue with editing host file in Windows 8 but now I learnt how to edit it. Thanks!
This doesn’t work. Access to file denied.
This doesn’t work. Access to file denied.
Would people please stop saying that this does not work, of course it works. Read the article:
“Make sure you have administrative access/privilege on the computer before attempting to modify it”
If you do not understand that then you’re out of your depth. That is no-one’s problem but your own.
And how are they meant to solve the problem on their own? Their looking for help, mr depressed
Just disable ur antivirus
Thanks! It worked for me.. I followed the First method but with certain changes..
if this method doesn’t work with u
u have to disable your antivirus
simply run first NOTEPAD as administrator then click file>open then locate HOST at local disk>windows>system32>drivers>etc from there do any changes you want and just hit close and save
Thank you very much. This is the right instruction to avoid permission problem.
yes that’s right. It is the easiest and correct solution. Thanks so much
I can edit this file but the record I added in it do not work
It appears that Windows 8.1 now sets the file attribute to ‘Read Only’. If you go into properties and uncheck the box, you can edit the file normally without having to go through the copy and paste procedure.
THANK YOU DINESH!
I was searching for a while on Windows 8. It worked perfectly. you brighted my day 🙂
Well, I have to shout out a big thank you. This has been the one, and only clearly illustrated, clearly explained way to edit the host(s) file in order to validate PS Elements 13. All the ‘troubleshooting ‘ posts they have in their forums, etc, reference the host file, but the ‘how-to’s’ were useless. One thing I found repeatedly were the references to disabling the AV, which made sense, They also said to turn off the firewall, etc. When people posted the their Windows Defender had a msg that the app had been turned off.. and therefore another AV program must be running… well, that happened to me , as well. So, I turned off MalewareBytes, but ran into the same thing, over and over and over. So, I did more research and discovered that depending on which Windows operating system you have, what year you bought it, Windows revamped Defender, and renamed it Security Essentials, and sometimes the OS had both programs, so, at one point, or another I must have activated Security Essentials, which effectively disabled Defenders. I don’t remember doing it, forgot all about Security Essentials, until today. So, I search my pc for it, turned it off, followed your extremely well composed instructions. I, too, got the ‘ administer rights’ msg, but I had the option to ‘continue’, so I did. The hosts file saved, and I opened PS Elements, and low, and behold, I was able to validate my purchase. I cannot thank you enough.
I am unable to follow those steps at the very end. I save the hosts file as “All file types” and yet, the file still comes out with a .txt extension. Why is that and how can I stop that from happening?
I don’t get it…Why is it important to save as “all files”.. then it’s a different file extention and therefore won’t replace the original file, but just add a new “hosts” file…
Hi,
I’ve edited my hosts file but the saved file now has a .txt extension (and a different icon from the others in that folder). Does this matter and if so how can I change it back to what it was before? It seems to have defaulted to .txt as a result of editing with Notepad – help please!
Yes, you can rename the file and delete the .txt extension. It will become the normal hosts file.
You modify host file by making changes in properties.
hosts rigth click properties>security>edit
works fine….. thanks
Worked for me on windows 10, thanks a lot
Followed the guide with both methods, keep getting the same result. Even went to as far as to uninstall spybot and malwarebytes, having Defender disabled to see if it helps, nope ><
here's what I get : http://i.imgur.com/ivA1CkB.jpg
someone help me
works like a charm. I am not from computer background, but when I open cmd i feel like a coder. 🙂 . Thanks Dinesh for the procedure.
hi dinesh, thank you very much, this tutorial also works in windows 10. i am very happy when successful
thank you so much! 🙂
Hi! dinesh my hosts file is in fully chinese language & it is too much long… even the verticle scrollbar is left of 1 cm in size…
I use windows 8.1. please help how to edit or change the language of hosts file. please.
there are two notepad.exe in x64 windows,
you must use full path c:\windows\system2\notepad.exe ,this one is 64 bit version,
only type notepad whithout path may be launch 32 bit notepad.
(c:\windows\syswow64\notepad.exe)
“Run as administrator” just let you enforce launch 64 bit notepad.exe
using 32 bit software to edit c:\windows\system32\drivers\etc\hosts
the x64 system will automatic redirect to c:\windows\syswow64\drivers\etc
and there is no hosts file.
the GUI stiil display current folder is c:\windows\system32
but the real folder is c:\windows\syswow64
…On keying “Notepad Hosts” notepad opens with on-screen message ‘Cannot find the Hosts.txt File’, followed by ‘Do you want to create a new file’ with options of ‘Yes’, ‘No’ and ‘Cancel’…
As I have no knowledge of the Hosts File format I selected Cancel…
Question: Is there a Windows Automated way to create the Host.txt file..? (so I can edit adding websites I’d like to block…)
Win8.2 Pro
Works perfect!!!!