Telnet is one of the famous network protocols widely used to manage network devices and other equipment that support this protocol. If you are a system or network administrator, I’m sure you know the importance of having a telnet client on your desktop or laptop. Since it is an optional feature, the latest Windows OS versions do not come with an installed telnet client. By default, you can’t use Windows 10 or Windows 11 to connect other network devices without installing the built-in or third-party telnet clients.
If you search for telnet in apps or type ’telnet’ in the command prompt, it will return an error message saying ’not recognized as an internal or external command’. Installing the Microsoft telnet client from the control panel in Windows 10 and 11 will solve this issue easily.

Any installation disks, ISO or downloads are not required for this purpose.
Steps to Enable Telnet on Windows 11 and Windows 10/8.1
1) Go to Control Panel.
In Windows 10, you can use the start button to access the control panel. Right-click on the button and select Control Panel as shown below.

On Windows 8.1 and 8, you can use the charm bar (by moving the cursor to the top right corner or press the Windows key + I ) from the desktop then select Control Panel. It is easy to access the Control Panel from Windows 7.
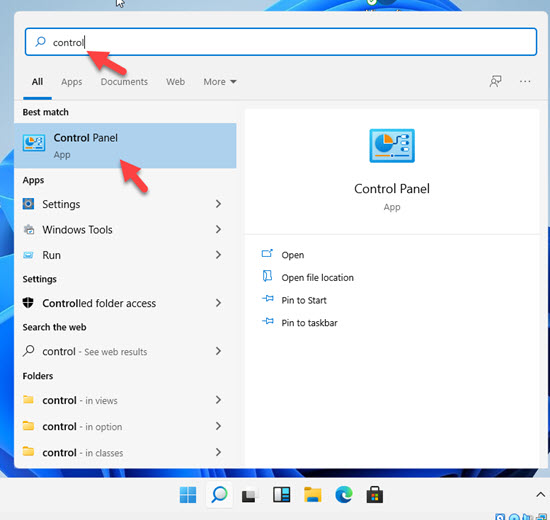
 On Windows 11, you can search for the Control panel as shown below in the screenshot.
From here onwards, installing or enabling Telnet on Windows 11/10 or older versions remain similar.
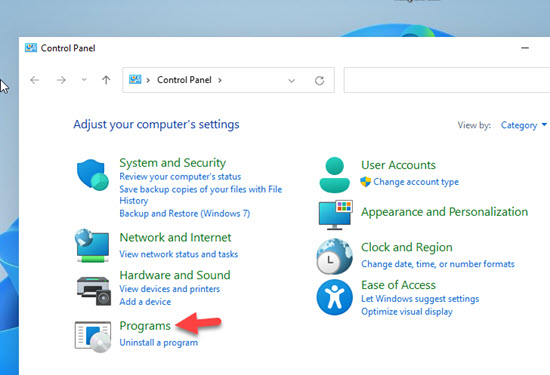
2) In the ‘Category’ view, click ‘Programs’.
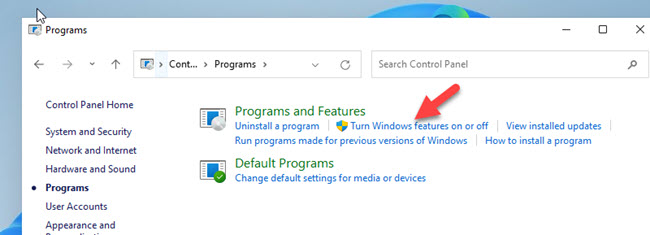
3) Click ‘Turn Windows features on or off’ on the next screen.
4) The earlier step will bring a dialogue box where you can select extra features to install. Select ‘Telnet Client’ by ticking the box. A small installation will run once you press OK.
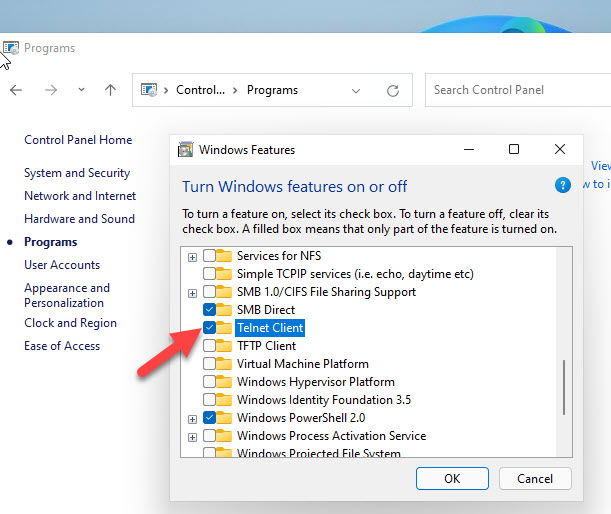
That’s it, we do not need to restart the PC after the installation. We have successfully installed the telnet client on Windows 10/11.
Install From Command Prompt
Open the command prompt as Administrator and execute the below command.
pkgmgr /iu:”TelnetClient”

Alternatively, you can try the below command from command prompt or PowerShell.
dism /online /Enable-Feature /FeatureName:TelnetClient
Now if you try the telnet command or search in Apps, you will get the correct telnet prompt as below.

How to remove Telnet Client from Windows OS?
From the same place where we installed the feature (Control Panel -> Programs -> Turn Windows features on or off), untick the ‘Telnet Client’ and press OK to remove from Windows computer.
Alternates for Windows Telnet
The built-in telnet client in Windows Operating Systems is pretty basic. You can’t manage or use it with more devices easily. If you are a professional network administrator, the built-in Windows telnet client utility will not be suitable for you. You must have an alternate and professional telnet client.
PuTYY is a great telnet client which is freely available and fully compatible with Windows 10 and Windows 11.

Here we have listed the PuTTY alternatives that can be used to manage and customize telnet sessions from your computer. You can follow the same steps to install Telnet client on Windows Server Operating Systems such as Windows 2012 R2 and Windows 2016/2019 server versions.


hello
thanks
Soooooooooo many thanks!
I went to the turn windows features on/off thing, but I couldn’t find the Telnet client or Telnet server box. could it be that it is because I have a windows RT as opposed to pro version?
windows RT has nothing to do with the “normal” versions of windows. the look may be the same but it is all different.
I was actually looking what was wrong and why my computer didn’t had telnet active. Thanks for sharing this, saved me from a lot of trouble.
i want to telnet with windows 8.1 … pls how can i achieve this
Thanks for this , im going to visit some BBS
Thanks a lot.
That’s very helpful for me.
Thank you very much
keep up the good work 🙂
Thanks.Was much helpful.
Thanks, saved my time.
Thanks for the tip!
Having an issue – When I check the box and click ok, nothing happens! If I go back into the menu it’s unchecked again. I think it’s an issue with my rights but I’m the only user of the computer and I’m the administrator so I should have admin rights. Tried to see if I could run control panel specifically as admin but didn’t seem to work.. Any thoughts?
I still can’t see the Telnet Client or Server on the list. How do I get it.? Thanks.
According to Microsoft, while telnet client can be activated as described, telnet server has been “deprecated”. IOW, no longer supported or provided. The image above that shows both client and server must be from Win8 — in Win10, telnet server does not appear so it cannot be enabled.
So my understanding is that you can telnet FROM a Win10 machine (I have done this myself), but you cannot telnet TO a Win10 machine (I am not able to connect with telnet to any Win10 machine).
I hope someone will correct me if this is wrong, but what I reported above is fact.
Thanks,
Worked for me.
Great WriteUp. Well done and thanks.
many thanks
Thank you for this tutorial!
Thanks.
I don’t have admin rights and there is this thing coming up and you have to put in a passcode that only my parents know. What do I do?