Why do my AirPods keep cutting out? This is a question that many of you Apple users have been asking.
As an Apple user, I understand how bothersome and disruptive your listening experience is if the audio keeps cutting out while using them. So don’t worry!
In this article, I’ll paint out the potential causes of this issue and give solutions for resolving it. Also, you can check this guide about how far you can keep your AirPod away from your phone.
Potential Causes Why My AirPods Keep Cutting Out
1. Low Battery Power
First, you need to know that when the AirPods’ battery dies, it loses its Bluetooth connection and can no longer play audio. The sound will keep playing from whichever device you’re using to play it.
2. Software Problems
Another reason may be due to software difficulties. This usually occurs when your AirPods are not running outdated software.
3. Hardware Issues
If your AirPods have been dropped, immersed in liquid, or haven’t been used for a while, it will severely damage the inside hardware. Your AirPods will perform poorly as a result.
4. Distance
As an AirPod user, I assume you know that AirPods connect to your device using Bluetooth technology. If you walk too far away from it, the connection may decrease, causing the music to go out.
5. Problems with the Audio Source
If you are confident that the AirPods are in good condition, but the audio continues to shut out, the audio source might be the issue.
Too many programs may be using the audio source’s resources, preventing it from providing a stable enough Bluetooth connection for the AirPods.
6. Interference in Signals
When there are other Bluetooth devices in the vicinity, they might interfere with your AirPods. Wireless networks, microwave ovens, and inadequately protected wires can all trigger signal interference.
7. AirPods Sensor Problems
AirPods have a sensor known as Automatic Wear Detection that helps you to sense when you are wearing AirPods and play audio. If the sensor becomes faulty, then it will make the AirPods stop working.
This may occur if the detection isn’t reliable; for example, if you’re wearing your AirPods, but they can’t detect it.
7 Ways to Fix AirPods that Keep Cutting Out
I’ve put together the best solutions to help you fix your AirPods that keep cutting out. Try each one of the solutions until you find one that we’ll resolve your problem.
Solution 1: Enhance the Bluetooth Connection
As we mentioned earlier, the connection between AirPods and your Apple device is via Bluetooth. I advise monitoring your Bluetooth and ensuring it connects seamlessly as your first step.
This is how to go about it:
- When using AirPods, move close to your iPad, iPhone, or Mac. Ensure no barriers exist between you and the device, such as Doors or thick walls.
- Get out of places where there is a lot of interference from things like Wi-Fi, microwaves, cables, and other wireless equipment. Your AirPods won’t perform as well in this setting.
If the connection of your AirPods continues to cut out all the time, try resetting your AirPods Bluetooth.

How to Reset the AirPods Bluetooth
STEP 1: Inset your AirPods in the charging case, then close the lid.
STEP 2: Wait for 60 seconds.
STEP 3: Now open the charging case lid, and place the AirPods in your ears.
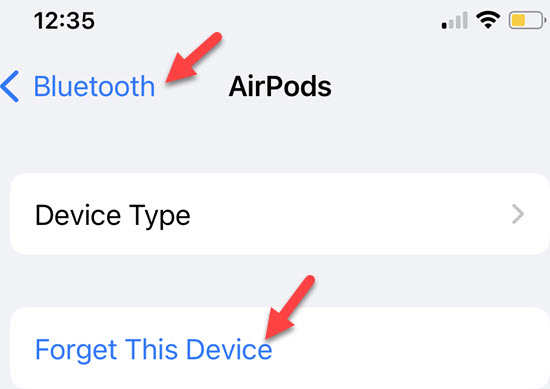
STEP 4: Go to Settings, select Bluetooth or Settings, and tap your AirPods.
STEP 5: In case the AirPods shows it’s connected, tap the More Info button beside your AirPods, afterward select Forget This Device option
STEP 6: Insert your AirPods in the charging case, and keep the lid open.
STEP 7:Hold the setup icon on the case’s rear for approximately 30 seconds until it illuminates white.
STEP 8: Place your AirPods close to your iPhone or iPad. Reconnect the AirPods to your device.
Solution 2: Unpair your AirPods and Pair Them Again
You need to check if your AirPods are pairing well with the device. I’ve encountered this problem several times. The good news is that you can solve it by unpairing and re-pairing your AirPods with your device.
Here’s how to go about it:
Unpair your AirPods with an iPhone or iPad:
STEP 1: Go to the Settings app on your iPhone.
STEP 2: Tap on Bluetooth.
STEP 3: Find your AirPods in the paired device list and tap the “i” icon.
STEP 4: Tap on Forget This Device.
STEP 5: Confirm that you want to unpair the AirPods by tapping Forget Device.
Re-Pair your AirPods to your iPhone or iPad:
STEP 1: Ensure your AirPods are in their charging case and the lid is open.
STEP 2: Go to your iPhone’s Settings app and select Bluetooth.
STEP 3: Ensure Bluetooth is turned on, then select your AirPods from the list of available devices.
STEP 4: Follow the on-screen instructions to complete the pairing process.
STEP 5: Once your AirPods are paired with your iPhone, you can customize their settings by going to Settings > Bluetooth > selecting your AirPods > tapping on the “i” icon.
You should now pair your AirPods with your iPhone and be ready to use.
Solution 3: Update the Firmware of your AirPods
I strongly advise that you use devices that have updated firmware. Many people tend to ignore but forget that you are prone to malware and virus attacks when you have outdated firmware. This attack affects the regular operation of the devices.
In the case of AirPods, you’ll need the latest firmware if you want a stable wireless connection with your devices.
Use these methods to see if your AirPods are running the most recent firmware:
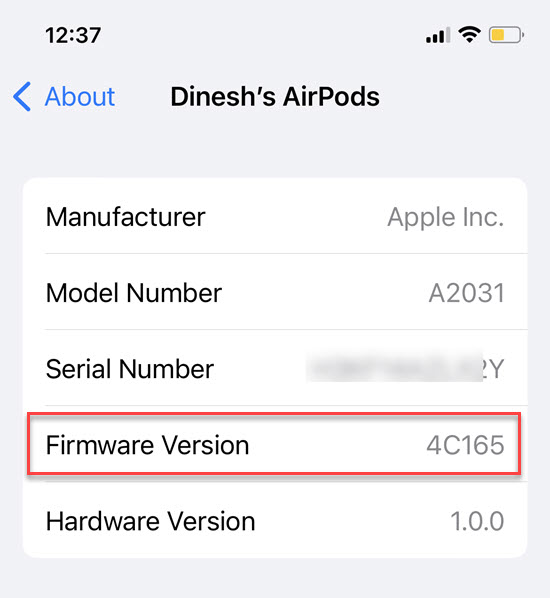
STEP 1: Ensure your AirPods are connected to your iPhone or iPad.
STEP 2: Go to the Settings app on your device.
STEP 3: Select General and then tap About.
STEP 4: Scroll down to “AirPods” and choose it.
STEP 5: If an update is available, you will see an option to Install. Tap on “Install” and follow the on-screen instructions to update the firmware of your AirPods.
There are no options to manually upgrade your AirPods because they automatically update when the latest firmware version becomes available.
Solution 4: Check the AirPods’ Battery Level
Many of you need to remember to look at your AirPods battery levels. It is important to check the battery levels before using AirPods. If the battery in the AirPods runs low, it might cause interruptions and unexpected disconnections. Also, ensure your device’s battery is above 40% capacity.
To check the battery level of your AirPods, follow these steps:
STEP 1:Connect AirPods to your iPhone or iPad.
STEP 2: On your iPhone, swipe down from the top right corner of the screen on your device to access the Control Center.
STEP 3: Look for the Batteries widget and tap on it.
STEP 4: You’ll see battery levels for your AirPods
Alternatively, you can ask Siri about the battery level of AirPods; “Hey Siri, what’s the battery level of my AirPods?”
If the battery is low, please charge the AirPods.
Solution 5: Clean the AirPods
How do I clean my AirPods? This is a question that I used to ask myself before I got to know this trick that I am about to share with you. The cleaning removes all the dirt and dust that might have accumulated within the Airpods.
You need to note that if you do the cleaning recklessly, you will damage your AirPods.
Here are some steps to clean your AirPods and the charging case:
- Take your AirPods out of the charging case.
- Use a gentle, dry cloth to carefully wipe down the exterior of your AirPods and charging case. Keep moisture out of any apertures.
- Clean the speaker meshes of your AirPods with a dry cotton swab. Take care not to press the cotton swab too deep into the mesh.
- Remove any dirt from the charging ports or the connections of the AirPods or charging case with a dry cotton swab.
- If required, wipe the outside of the AirPods and charging case with a slightly moist cloth. After that, be sure to dry them properly.
Following these steps, you should be able to clean your AirPods and charging case safely.
Solution 6: Disable Automatic Ear Detection
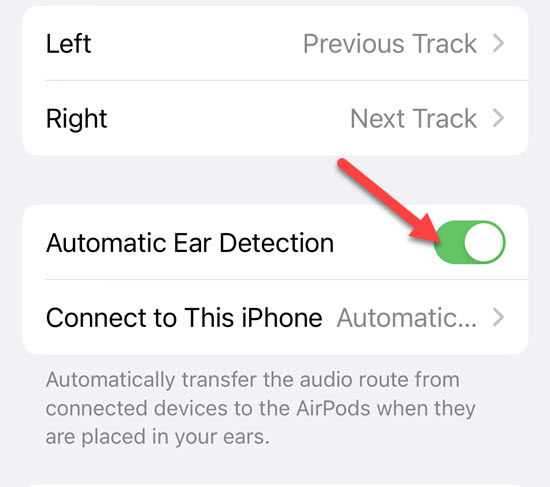
Automatic Ear Detection is a unique function of your AirPods, which detects whether or not the AirPods are connected to your ear. Despite being a useful feature, it can sometimes create disconnections.
This occurs often, but a lot of you will not be in a position to know. So, please deactivate Automatic Ear Detection to see if that will solve the problem.
Here are the steps to deactivate Automatic Wear Detection on your iPhone:
STEP 1: Ensure AirPods are connected to your device.
STEP 2: Go to the Settings app on your device.
STEP 3: Select your AirPods from the list of paired devices.
STEP 4: Then turn Automatic Ear Detection Off
Solution 7: Reset your AirPod to Default Settings
The last solution I’ll recommend you perform if the above steps don’t work is resetting AirPods to default settings. As you know, this will erase all configurations.
Follow these steps to reset your AirPods to their default settings.
STEP 1: Insert your AirPods into the charging case.
STEP 2: Keep the charging case lid open.
STEP 3: Press and hold the setup button for at least 15 seconds until the status light on the front flashes amber and then white.
STEP 4: Release the setup button and wait for your AirPods to reconnect to your devices.
After resetting, you must set up your AirPods again with your devices as if they were brand new.
Frequently Asked Questions
How long do AirPods last?
You receive up to 18 hours of talking time or more than 24 hours of listening time with various charges in your situation. A single charge for your AirPods will provide up to 5 hours of playback or 3 hours of conversation.
Why do my AirPods keep cutting out on Spotify?
There could be several reasons your AirPods keep cutting out when listening to Spotify. It’s possible that the issue is with your AirPods themselves, or it could be related to your device or the Spotify app.
Some potential causes include low battery levels, Bluetooth connectivity issues, or problems with the Spotify app. To fix the issue, try resetting your AirPods, ensuring your device is up to date, or reinstalling the Spotify app.
Why do my AirPods keep cutting out when I move?
Your AirPods may keep cutting out when you move because you’re moving too far away from their connected device.
AirPods use Bluetooth technology to connect to your device, and if you move too far away, the connection may weaken, causing the audio to cut out. Try moving closer to your device to see if that resolves the issue.
Why is AirPods cutting out on phone calls?
AirPods can be cut out during phone calls for a variety of reasons. Some possible causes include low battery levels, Bluetooth interference, outdated firmware, or a faulty connection. Also, microphone, speaker, or phone issues can result in choppy or dropped calls.
Troubleshooting may include resetting the AirPods, updating the firmware, and checking for any physical damage or obstructions.
Conclusion
Now you know why your AirPods keep cutting out, which includes low battery life, distance, interference, dirty or damaged AirPods, and software issues. Following the fixes outlined in this article, you should be able to troubleshoot and resolve the issue.