How to make Windows 7 faster on your old laptop or desktop? Here are the 30 easy and free steps you can follow to boost the performance of your computer. If your PC is slow while playing games, using high-end graphics/processor-hungry applications or multitasking, the below methods will be useful.
I combined these methods from my experience and the experiments, which worked in improving Windows 7 and Windows 10 computer performance in my organisation. Any normal home/business user can do the following steps without other third-party or paid software and technical skills.
The network is a major factor in deciding the performance of a computer. Slowness in networks, such as local networks or the Internet, directly affects the speed of Windows computers. Especially nowadays, we use the Internet and cloud applications a lot daily. Therefore I added some tweaks to improve network performance also.
Though the below steps are mainly made for Windows 7 to make it faster, you can still apply some steps on the other versions like Windows 8.1/10 and servers.
28 Free Steps to Make Windows 7 Faster on old PC or Laptop
1) Make Windows 7 Startup faster by removing unwanted programs and services
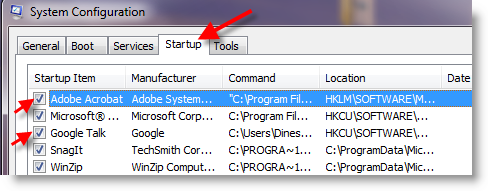
To do this, type ‘msconfig‘ in the Run or Search box, go to the Startup tab and uncheck programs and services not required during startup.
The programs and services listed here start with Windows 7 every time, so we can reduce the startup time by removing them. This will boot up your Windows 7 laptop or desktop more quicker.
Do not remove any important/known and Microsoft-related startup programs/services from the startup.
2) Disable Aero Experience
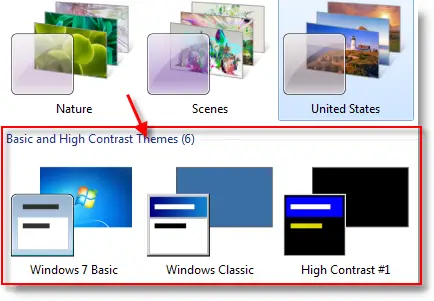
If you are not a fancy appearance lover but looking for better performance, disable the aero experience. This step affects the performance of Windows 7. By disabling Aero, you can gain some physical memory and display card workload for other programs.
Also, it is a recommended step for the PC with a shared display card.
Right Click on Desktop, go to Personalize, then select any of ‘Basic and High Contrast Themes.’
3) Increase Virtual Memory (Paging File)
Windows 7 consumes more memory than Windows XP but lesser than Windows Vista. You can increase virtual memory if you are a heavy computer user who simultaneously opens more programs and screens.
Virtual memory works with physical memory (RAM). The local hard disk space will be used as the virtual memory to keep temporary information that is rarely used by programs and OS. Increasing the virtual memory in Windows 7 computers can help other programs and OS to work smoothly.
Right Click on My Computer, and select Properties. Go to the Advanced tab and click the setting button under ‘Performance’.
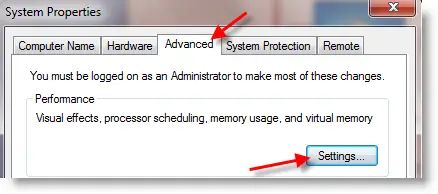 Go to the Advanced tab in the next window, and press the change button under virtual memory.
Here you can see the current virtual memory size. Virtual memory is called a ‘paging file’ also.
On the next screen, under “custom size”, enter the size you want to allocate for virtual memory (paging file). It depends on your hard disk size and physical memory. Make sure it’s not less than the system recommended size. The normally recommended paging file is 1.5 of physical RAM (1.5 x RAM size).
This example’s recommended virtual memory size is 4605MB because my Windows 7 RAM is 3GB. So, enter 4605MB in the Initial size and Maximum Size fields.
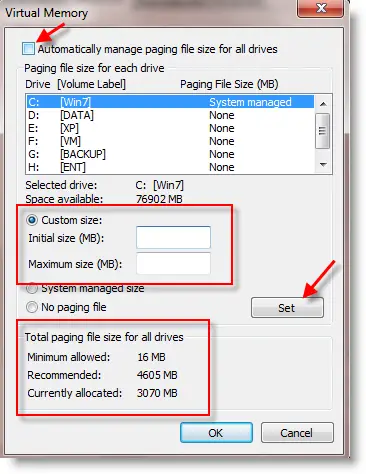
Press the Set button; you may need to restart the computer.
4) Disable Visual Effects
Disabling the full visual effects will reduce the load on RAM and VGA.
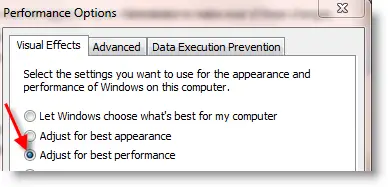
In the same settings tab under performance (mentioned in step 3), navigate to Visual Effects and set for Adjust best performance. It will bring down all visual effects to a standard level, improving the PC performance.
5) Windows 7 Disk Clean up
Removing unwanted and temporary files from the C drive reduces the access time of the system files, which makes Windows 7 faster.
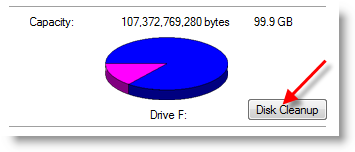
Right-click on each disk, go to properties and press the Disk Cleanup button. You can select file types to delete and start cleaning up on the next screen. Remove system files, such as old operating systems, error dumps, and update logs.
6) Do Defragmentation
Defragmentation helps improve each file’s access time by managing free space and arranging file locations on disks. It’s recommended to run the defragmentation tool frequently, especially when you have a lot of data. In our case, running the disk defragment tool is better after deleting unwanted files by disk cleanup in the previous step.
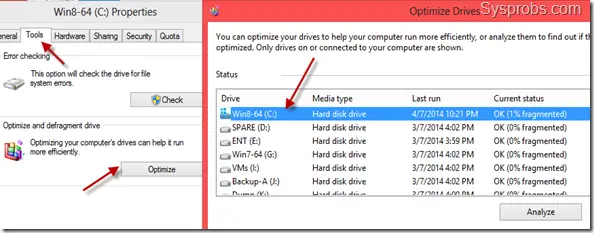
Go to Properties of each disk, select defragmentation under tools and start. Defragmentation takes time, depending on the size of the partition and data.
7) Run Error-Checking on disks
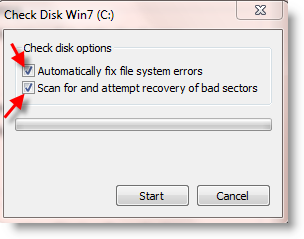
This is another method to improve the performance of the disk. It will check and correct any system files and disk errors on Windows 7 computers.
Select Error-check under disk tools in each partition with both options selected. If the particular partition is a system, boot or has the paging file, then error-checking will start in the next system reboot.
8) Disable Side Bar (Gadgets)
If you don’t use the sidebar and gadgets in Windows 7, remove them. This helps to gain some resources on RAM, Network, and Processor.
9) Disable Windows Defender
When you use third-party protection software such as Norton, AVG, or MacAfee, disable the built-in Windows Defender. It does almost the same job. So it’s not required to use two similar programs simultaneously, which puts unwanted system load on Windows 7.
You can disable Windows defender in the control panel.
10) Disable UAC
UAC (User Access Control) is a window pop-up that may disturb and slow down your administration tasks. If you are annoyed by it, disable it from the control panel.
11) Make Windows 7 shutdown faster
You can make the shutdown process faster by editing one registry key.
Open the registry editor with administrate access and navigate to HKEY_LOCAL_MACHINE\SYSTEM\CurrentControlSet\Control.
Spot the WaitToKillServiceTimeout key and modify it by right-clicking.
Setting it to a lower 4-digit value (say 5000 for 5 seconds) will make your PC shut down faster, but you may lose data.
12) Disable Autotuning in Windows 7 Network
This method greatly helps me improve the network/data transfer speed in Windows 7. You must do this step if you face slowness in the network.
Read more about improving Windows 7 networks.
13) Remove RDC to improve Windows 7 Network
Remove the additional RDC network feature to improve data transfer speed over the local network. You can follow the earlier network improvement guide to remove RDC.
14) Remove IPv6
You can remove the IPv6 protocol from Windows 7 network adapter settings if it’s not required. If you are not using IPv6 on internal or external networks, remove IPv6 to improve Windows 7 network performance.
15) Compatibility of drivers and programs
Before installing any drivers or programs, make sure it’s compatible with Windows 7. It should be officially supported and certified for Windows 7 OS. Installing non-compatible drivers and programs may impact system performance and crash your system.
16) Disable Indexing (Windows Search)
Indexing in Windows 7 and Windows 8.1 is made to improve the speed of search inside the Operating System. When you search a file or folder, if an indexing service already indexes it, then results will appear immediately from the indexed cache.
When you use third-party indexing programs or the Windows search feature severely slows down the computer, you can disable the built-in indexing services. This step can help in reducing the unnecessary workload on the local disks.
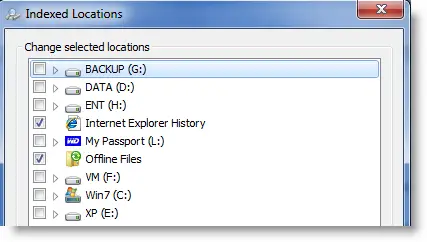
You can find indexing options in Control Panel -> Indexing Options -> Modify button.
Also, the Windows search service can be disabled in Computer Services.
Go to Computer Management, Services and look for ‘Windows Search’. Set Disable to startup type and Click Apply.
17) Sync Centre Synchronization
If any network shares are set to sync with your Windows 7 computer and when it is happening in the background, you will feel the slowness of the PC. During this time, the network and disk activity will be very high. Two options are available to avoid this issue.
a) Remove the sync partnership.
b) Let the synchronization complete fully without any errors.
Sync Center is located in the Control panel.
18) Remove Unwanted Programs
Sometimes we install programs for testing purposes or one-time use, then forget them.
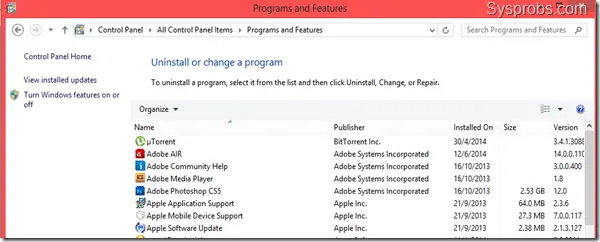
We can uninstall these old and unwanted programs from Windows 7 computers. Even though we don’t open these programs, some of the services and system files of these programs get loaded into the OS. Completely uninstalling these unwanted programs from our computer can help to improve the system’s performance. Programs can be uninstalled from the control panel.
19) Speed up Menu Show delay time in Windows 7
Editing a registry key speeds up menu show time in Windows 7. I suggest trying the manual registry editing (2nd) method available here. So next time, menus will appear quicker than earlier and improve Windows 7 speed.
20) Change the power plan to maximum performance.
This method is most suitable for laptops. If you don’t use the laptop with a battery only most of the time, then change the power plan to maximum performance. This can be done on desktop computers also.
To do it, go to the control panel and power options, select ‘High Performance’ plan, and press OK.
21) Scan for viruses
Make sure your Windows 7/8.1 computer is virus free. Viruses/malware/spyware make any computers slow by giving additional work to processors, memory, and disks. You can run a virus check and clean viruses using existing 3rd party tools. The free version of Malwarebytes is a great option to scan and clean malware and viruses.
22) Malicious software check and Removal
Check your computer for infection by specific, prevalent malicious software (including Blaster, Sasser, and Mydoom) and remove the infection.
Download Microsoft’s free latest malicious removal software for Windows 7/8.1 and scan. It will help clean the system and regain the computer’s actual power.
Additional Steps Make Windows 10 Run Faster
Whatever version of Microsoft’s operating system is being discussed, one of the most common questions is how to make it run faster. Here, we will discuss why Windows 10 is slow, how to speed it up, what can affect its performance, and what actions can improve it in certain situations.
Automatically running applications at Windows 10 startup are the most common reason for the slower operation.
23) Some Apps that can be run Automatically, Consume resources & Slow Down the PC
- Printer and scanner programs – almost everyone with a printer, scanner or MFP automatically downloads various (2-4) programs from their manufacturer. Thus, by and large, nobody uses them (the programs), and you can print/scan without them – in your standard office and graphics apps.
- Download apps, torrent clients – if you are not busy constantly downloading any files from the Internet, there is no need to keep uTorrent, MediaGet or something similar on autorun. They will start themselves if needed (when downloading a file that should be opened through an appropriate app). At the same time, constantly running and sharing torrent clients, especially on a laptop with a regular HDD, can lead to noticeable system lags.
- Cloud storage that you don’t use. Windows 10 runs OneDrive by default. You don’t need it to autoload if you don’t use it.
- Unknown programs – you may find that you have many programs in your autoload list that you know nothing about and have never used before. These may be programs from a laptop or computer manufacturer or some hidden software. Search the Internet for apps by their names – it is very likely that they will not be required to autorun.
24) Slow Interface in Windows 10
According to ItRate.co, with the latest Windows 10 updates, some PCs and laptops have been experiencing interface lags. In some cases, the problem is caused by the CFG (Control Flow Guard) feature, which stops certain kinds of exploits from working and increases the difficulty of exploiting a PC.
The threat, though, is not too frequent, and if getting rid of lags is more important than providing additional security features, you can disable CFG.
a) Go to the Windows 10 Defender Security Center (use the icon in the taskbar or via Options – Updates and Security – Windows Defender) and open the section “App and Browser Control”.
b) At the bottom, find Exploit protection and click Program Settings.
c) In the Control Flow Protection (CFG) field, set “Off by default”.
d) Confirm.
Disabling the CFG should work immediately, but I recommend restarting your computer (keep in mind that in Windows 10, shutdown and turning on your PC are not the same as a reboot).
25) Background Processes in Windows 10
Sometimes it happens that incorrect operation of some background process causes system lags. You can detect such processes using the Task Manager.
a) Right-click on the Start, then “Task Manager”. If it is displayed in a compact form, at the left bottom l click “More details”.
b) Open the Details tab and sort by the CPU column (by clicking on it).
Pay attention to the processes that use the maximum CPU time (except for “System Idle”).
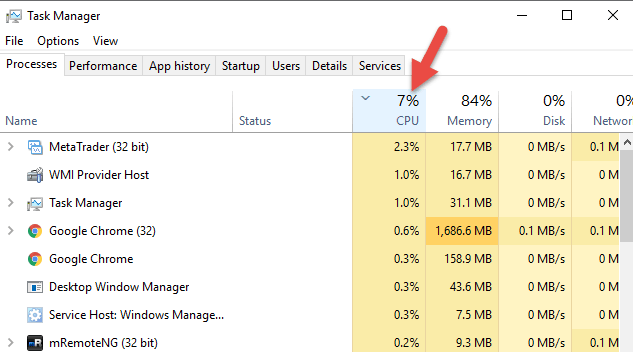
If among these processes, some are actively using the processor (or a significant amount of RAM), search the Internet for what kind of process that is and, depending on what is detected, take action.
26) Windows 10 Tracking Features
Many people have read that Windows 10 spy on its users. And while I am not personally concerned about this, these features may harm the system’s speed. For this reason, disabling them may be a good idea.
27) Apps in the Start menu
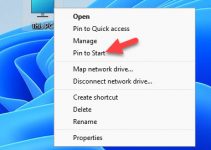
Immediately after installing or upgrading to Windows 10, you will find a set of Live Tiles of apps in the Start menu. They also use the system’s resources (albeit insignificantly) to update and display the information. Do you use them? If not, it’s a good idea to at least remove them from the Start menu or disable Live Tiles (right-click Unpin to remove from “Start”) or even delete them.
28) Drivers
Another reason for a slow Windows 10 is the lack of original hardware drivers for more users than expected! This is especially true for graphics card drivers but can also apply to SATA drivers, the chipset in general and other devices.
Even though the new OS seems to have “learned” to install a large number of original hardware drivers automatically, it is not superfluous to go to the Device Manager (right-click on “Start”) and look at the Properties of all the key devices (graphics card first) in the “Driver” tab. If Microsoft is a supplier, download (update) and install the drivers from your laptop’s/PC’s official manufacturer website, and if it’s a video card matter – from NVIDIA, AMD or Intel, depending on the model.
Non-Recommended Actions for Boosting Windows 10

And now a list of some things often recommended here and there on the Internet to speed up your OS that I would NOT advise.
- Disable the Windows 10 Paging File. It is often recommended if you have a significant amount of RAM to extend the lifespan of SSDs and similar things. I would not do this: first of all, with a high probability, there will be no performance gain, and some apps may not run without the Paging File, even if you have 32 GB of RAM. At the same time, if you are a novice user, you may not even understand why they do not start.
- Constantly “clean your PC from junk files.” Some clean up the browser’s cache daily or with automatic tools and clean the registry and temporary files using CCleaner and similar apps. Although using such utilities can be useful and convenient, your actions may not always lead to the desired result – you need to understand what is being done. For example, clearing the browser cache is needed only for problems that, in theory, can be solved. By itself, the cache in browsers is designed specifically to speed up the loading of pages and speeds them up.
- Disable unnecessary Windows 10 services. Same as with the Paging File, especially if you are not very good at it – when there is a problem with the Internet, an app or something else, you may not understand or remember that it was caused by the absence of once disconnected “unnecessary” service.
- Keep apps running on startup (and use them as well) “to speed up your PC.” They are not only able to boost your OS but also slow down its work.
- Disable file indexing in Windows 10. Except, perhaps, in those cases when you have an SSD installed on your PC.
- Disable services.
Related: How to fix the current active partition is compressed error in Windows 10/11
Additional Information
Keep Windows 10 updated (it is not difficult since updates are installed involuntarily), monitor the status of your PC, programs in a startup, and malware alerts.
If you feel confident, use licensed or free software from official sites only and have not encountered viruses for a long time. It is possible to consider using only the built-in Windows 10 protection tools instead of third-party antiviruses and firewalls which will also speed up the OS.
Keep track of free space on the system partition of the hard disk. If it is small (less than 3-5 GB), it is almost guaranteed to lead to problems with speed, moreover, if your hard disk is partitioned.
Keep an eye on the free space on the system partition of the hard disk. If there are less than 3-5 GB, it is almost guaranteed to cause performance problems. Moreover, suppose your hard drive is divided into two or more partitions. In that case, I recommend that you use the second of these partitions only for data storage but not for software installation – it is better to put them on the system partition (if you have two physical disks, this recommendation can be ignored).
Important: do not keep two or more third-party antivirus programs on your PC – most people know about it. Still, it became impossible to work with Windows after installing two antivirus programs on your computer regularly.
You should also remember that the reasons for a slow Windows 10 can be caused not only by some of the above but also by many other problems, sometimes even more serious: a failed hard drive, overheating and others.
Wrap Up
The above 28 free and easy tips can help you to make Windows 7/8.1 and Windows 10 run faster on any old laptop or desktop PC. As mentioned, a few steps help to reduce the workload on RAM and display cards to play computer games better. I combined the above steps, which worked in my experience and experiments.




Nice tips bro 🙂
Only disable UAC if you know what you are doing. Disabeling UAC is one of the main features of Windows 7 that prevents virus and malware from taking hold.
I think it is poor form that you do not at least put a note next to disabling UAC is for advanced users.
You are correct, I agree with your point. I will change it, thanks for your comment.
Man these suggestions SUCK. Stick with windows xp instead. LMAO
Thanks for the tips.
Your readers may find the post on my blog interesting: How to make my laptop faster
WHile the theory behind UAC is sound the implementation is as frustrating and annoying as the malware, I agree with just disabling it. Your suggestions are sound and many of them I have been doing since the early days of Windows XP, Great tip article for the novice user.
Hi mates, nice piece of writing and pleasant urging commented here, I am really enjoying by these.|