Ever since Windows OS is evolving, we still see many errors on Windows 10/11. There are a few specific errors that keep coming up in almost all versions of Windows. One such error that we know as error 0x8024a105.
In this post, we will discuss error 0x8024a105, why it occurs, the root cause and how to fix it.
The error 0x8024a105 occurs due to many reasons. Still, one of the top few issues is corrupt Windows files, connectivity issues either at the client or Microsoft server location and third-party application/driver conflict.
There is no specific reason why error 0x8024a105 occurs; we have to try all available options to fix this issue.
11 Ways to Fix Windows Update error 0x8024a105 in Windows 11/10
1) Reboot:
Restarting the device solves the issue most of the time. If in the case due to Internet connectivity or some other update issue we encounter 0x8024a105, then restarting the device resets the system & network cache and resolves the problem.
2) Perform Clean boot on Windows:
There is a chance that any third-party application driver may have a system-level conflict and could be causing this issue.
Performing a clean boot on Windows 11 helps stop all third-party services running along with Microsoft services.
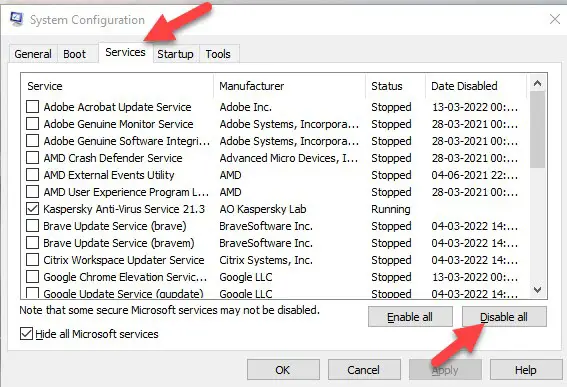
- Go to the search bar on the bottom left-hand side of the Windows 10/11 screen, Type in the search box as “msconfig” -> enter
- The System Configuration window will open on the screen, select the “Services” tab
- From the bottom left-hand side, select “Hide all Microsoft services” > now click on “Disable all” -> Apply -> ok
- The system will prompt to restart the machine for changes to reflect.
After the system is restarted, try performing Windows Update and see how it works.
3) Run Windows Update Troubleshooter:
Windows 10/11 comes with an inbuilt Troubleshooter that helps find and fix that system files, reset the services, and solve the update issue.
Windows Update Troubleshooter looks for all dependent services needed for Windows to run updates on the device, reset and check its performance. If it can do so, it displays the message as an issue found and successfully resolved.
- To run Windows Update Troubleshooter, go to Start -> In the Type here to search enter “Troubleshoot settings” -> enter
- At the bottom of the window, click on “Additional troubleshooters.”
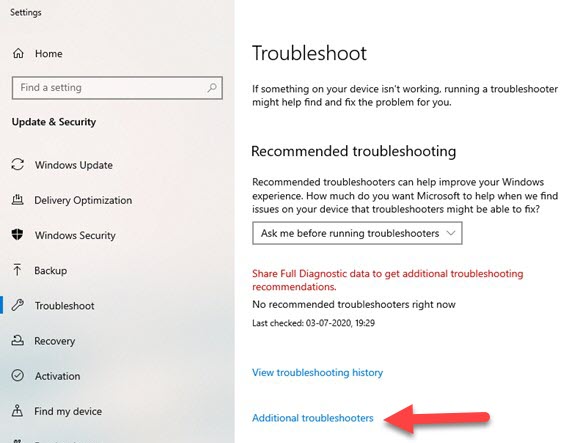
- In the next screen, from the Get up and Running section, select Windows Update -> Click on Run the Troubleshooter

- Windows Update troubleshooter will now run and find and fix all possible issues with Windows Update.
If the Troubleshooter cannot fix the issue, we need to look for other options to manually locate and reset those files, folders, and services.
4) Switching Internet Connection:
Switching the internet connection could be one of the steps that can solve the Windows Update error 0x8024a105.
Due to the slow download speed or ping issue, the files fail to download and configure within time and throw an error.
If connected to a wired connection, then switching to Wi-Fi or cell phone data for a while can be used to check whether there is any connectivity issue or not.
5) Reset Software Distribution Folder:
The Software Distribution folder holds all Windows Update files. Sometimes, due to permission issues on that folder or files in it or because one of the components is corrupt, it causes the Windows Update to fail, resulting in error 0x8024a105.
To fix this problem, the user has to rename the folder, the next time Windows Update runs, it will create a fresh copy of the Software Distribution folder and download a new copy of all required updates.
But before we proceed to rename the folder, we have to stop four critical Windows Update services that run behind the scene to rename.
- Go to the search bar on the bottom left-hand side of the Windows 10/11 screen, Type in the search box as “command prompt” -> click on the run as admin
- Key in the below commands one by one and wait for them to complete executing.
net stop bits
net stop wuauserv
net stop appidsvc
net stop cryptsvc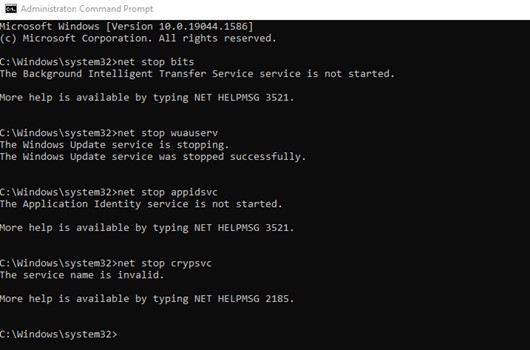
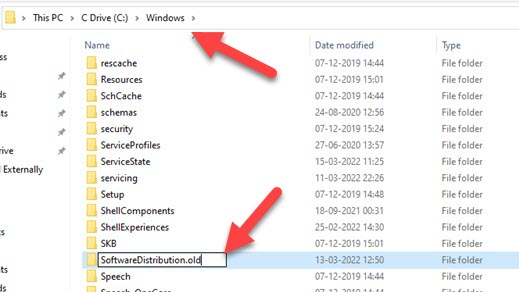
- After all the above services are stopped, navigate to C:\Windows look for the Software Distribution folder-> right-click -> rename it to SoftwareDistribution.old
- We have to start all the dependent services for Windows Update to work before checking for updates.
So, we’ll start all the services using the below command one-by-one
net stop bits
net stop wuauserv
net stop appidsvc
net stop cryptsvc- After all, services are started, restart the system for new changes to reflect.
6) Reset Catroot2 Folder:
Catroot2 is also responsible for receiving Windows Update Apart from the Software Distribution folder. In some cases, when Catroot2 folder files get corrupt or don’t allow a user to install an update, we can try to reset the folder.
- Go to the search bar on the bottom left-hand side of the Windows 10/11 screen, Type in the search box as “command prompt” -> click on the run as admin
- In the command prompt window, enter the below command one-by-one
net stop cryptsvc
- After entering the above command, all dependent services for the Catroot2 folder will stop, and we are good to proceed
- Navigate to C:\Windows\System32\ and locate catroot2 folder-> right-click -> rename it to catroot2.old

- Now go back to command prompt, run it as admin -> type in net start cryptsvc and enter
- The above step will restart the service, and a system restart is required for changes to reflect properly
- After system restart, try checking for Windows Update
7) Customize Windows Update:
Sometimes due to missing third party files, Windows fail to update. As it is not able to locate the base file.
We need to enable update settings for all other Microsoft products that run on the machine to fix this.
- Go to the search bar on the bottom left-hand side of the Windows 10/11 screen; type in the search box as “Windows Update option” -> enter
- The above step will open the Advanced options window, wherein enable “Receive updates for other Microsoft products when you update Windows.”
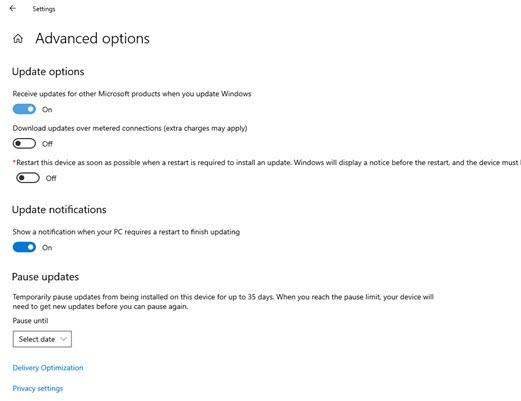
- Now press the back button and click on “Check for Updates.”
- After the scan is completed, the user should see under “View optional updates” for all other products Update that is available to install -> select the one you want to install and click on “Download and Install.”
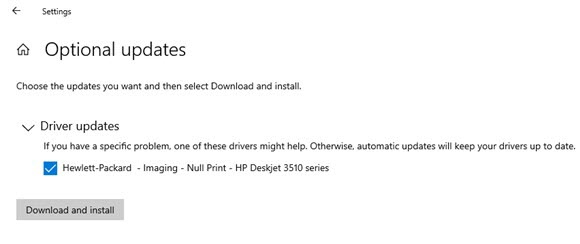
- Once all optional updates are installed, go back to the Windows Update page and hit “Check for updates.”
8) Using DISM Tool to find and fix corrupt files:
The DISM tool is an inbuilt feature in Windows 10/11 that stores a copy of original Windows core files and tries to restore any corrupt file when it is executed.
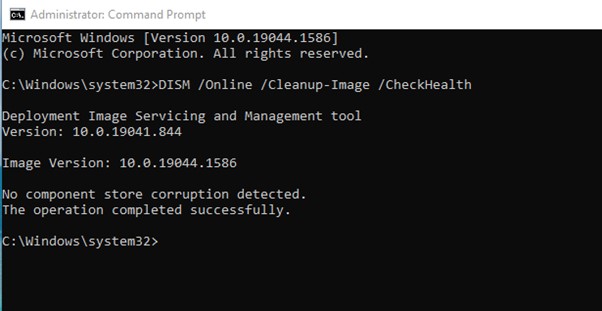
- Go to the search bar on the bottom left-hand side of the Windows 10/11 screen, Type in the search box as “command prompt” -> click on the run as admin
- In the command prompt screen, key in the below command
DISM /Online /Cleanup-Image /CheckHealth
- The above command will scan to locate and repair damaged or corrupt files. This process will take a while as it examines the whole Windows directory, and based on the applications installed on the computer, the execution time will vary.
- A restart is required after the DISM command finds the issue and fixes the problem.
- Restart the device for the changes to reflect and check for updates.
9) Update Missing Drivers:
Outdated or missing drivers for hardware components could be one of the reasons for error 0x8024a105.
- If, after enabling the additional Windows Update setting, the system cannot find and update missing files, we can use a free all in one driver identifier by the name DriveIdentifier.
- DriveIdentifier scans the system when downloaded and installed and displays files that must be updated with official download links.
- After installing all the required drivers, go back to Windows Update settings and check for updates.
10) Fix the Windows Update file using Media Creation Tool:
Media Creation Tool, which is used to download Windows OS, can also be used to repair Windows or can be upgraded.
The tool helps to get the updated files from the server and replace all damaged Windows files.
- Go to the official download for Microsoft Media Creation Tool
- Download the tool and run the exe file
- It will offer two options: Upgrade this PC now and Create installation media for another PC
- By default, upgrade this PC now option is selected -> hit next and let it download
- A fresh copy of Windows 10/11 and replace all corrupt files. All personal files and folders will remain intact.
- Let the above process complete afterwards; try to update Windows.
11) Reinstall Windows 10/11:
Reinstalling a fresh copy of Windows 10/11 is the last option one can look for when nothing works.
- To reinstall Windows 10/11, get Microsoft Media Creation Tool
- Download the tool and run the file
- Select Create installation Media option and get a copy of the latest Windows
- Use a flash drive to create a bootable ISO of Windows 10/11
- Restart the computer and press F12 (any other key based on the device) to boot the device with the flash drive
- Press next and complete the rest of the process to install Windows.
Always backup all data before reinstalling the Windows.
Conclusion:
These are the 11 ways users can fix the Windows Update error 0x8024a105. Let us know which option helped you resolve the error on your device in the comment section below.