After several days of attempts and findings, finally, I managed to install Mac OS X Snow Leopard on VirtualBox with my Windows OS PC. We are going to use the original OS medium for this installation purpose. That will give the freedom to have the vanilla kernel and possible software updates from the official Apple website.
This method is completely for testing and learning purposes. Please buy the original Mac OS and Apple hardware. From version 3.2, the Oracle VirtualBox officially supports Mac OS X as the guest virtual machine on Apple hardware. So, technically you can virtualize macOS on Apple devices only. But still, we can do some workarounds to install Mac OS X on non-Apple hardware with different bootloaders on Windows computers.
Note: This post was originally published in the year 2010. You may find the older version of products on the screenshots. But still, these methods are applicable for the latest version including Windows 10 and VirtualBox 6 x. But there will not be many valid reasons to try an older version of Mac OS 10.6 when we have macOS 11.0 Big Sur now. If you are a developer who wants to test several older versions of macOS, then you can try these methods.
Requirements
- Oracle VirtualBox
- Mac OS X 10. 6 Snow Leopard Retail DVD or ISO (You may need to search for ISO on the Internet)
- EmpireEFIv1085.iso for Intel Processors (This is the boot loader we will be using to boot Mac OS DVD/ISO, download the correct version here)
- Hardware VT Checker (Read more here and make sure Hardware Virtualization is enabled on the host computer BIOS)
- Sound driver (Mentioned under sound)
Installation Steps of Mac OS X 10.6 on VirtualBox
1) Create a Mac OS X Virtual Machine with the following configuration (If you have the latest VB, then select Mac Server version)
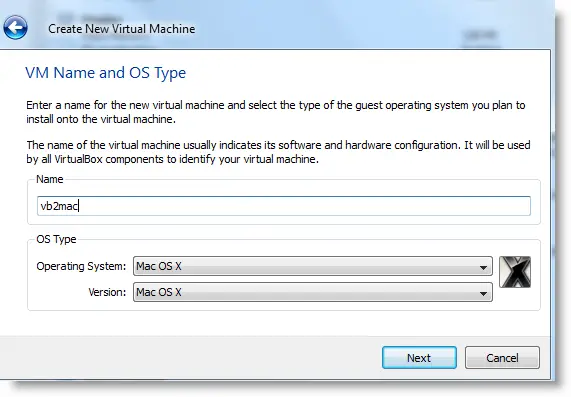
Memory – Minimum 1GB
Processor Cores – 1 or more (Change it to one core if you face any issues. Two cores worked for me)
Enable PAE/NX, VT-x,
Nesting Page – Enabled
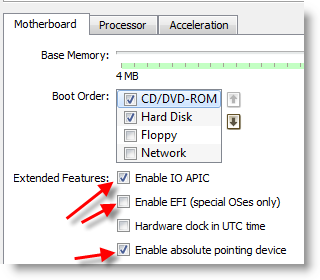
Enable IO APIC and Enable Absolute pointing device.
Remove Enable EFI. Built-in EFI loader may work with Apple hardware only.
Enable 3D Acceleration under the display and set up maximum video memory.
Storage Controller type ICH6 and create a 20 GB Hard disk.
2) Mount empireEFIv1085.iso to CD drive. Make CD ROM the first bootable device. Keep your Snow Leopard DVD or ISO file ready.
3) Start the virtual machine. When the following screen appears, eject bootloader ISO and load Mac installation DVD or ISO.
To do it, right-click on CD drive and select drive or ISO image. Wait for a while and press F5 then ENTER key when DVD loaded.
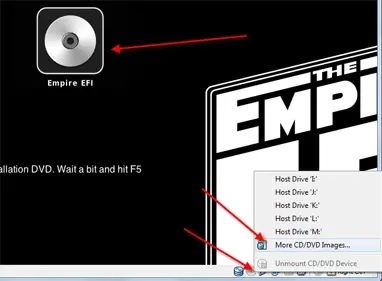
4) Wait for some time. If you see the installation screen, you are almost done. Go through the installation process.
Go to disk utility and create a partition if you can’t see the installation disk.
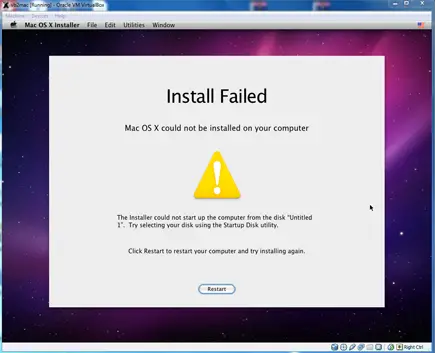
5) I got the following warning message at the end of the installation. It’s not an issue, just restart the Virtual machine.
Note – Shutdown or Restart will not happen normally, you have to do it manually from the VirtualBox console. You have to load the empireEFI ISO again to boot the OS from the installed hard disk.
6) This time, select Mac OS hard disk by right arrow key and press Enter to boot. I’m sure after several initial configurations you will land on the Snow Leopard desktop successfully.
Let’s Fix Some Issues on Snow Leopard Virtual Machine
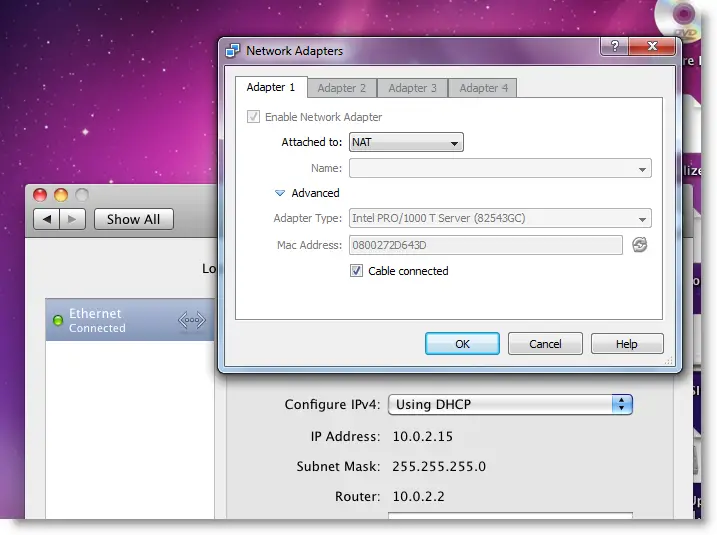
1) Network worked straight away. NAT and Bridged type worked without any patches.
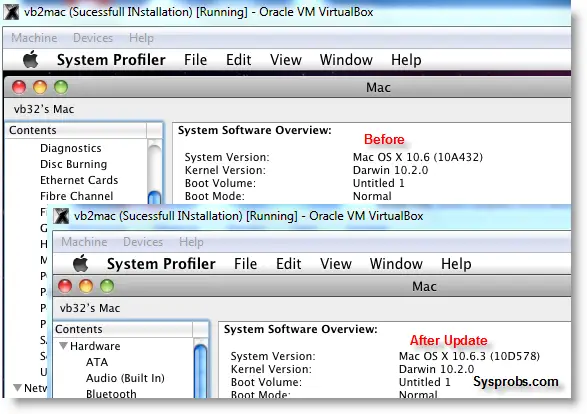
2) Software Update: Yes, it worked. Since we used the vanilla kernel, this VM can be updated. I managed to update till 10.6.4.
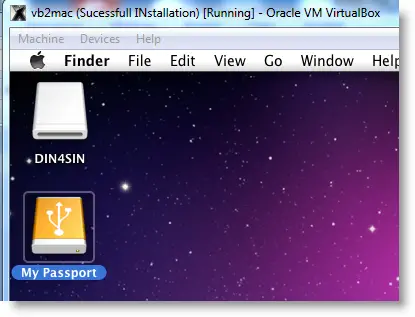
3) USB Support: It worked well. Somehow data transfer is slow but manageable. It detected my USB hard disk and flash drive.
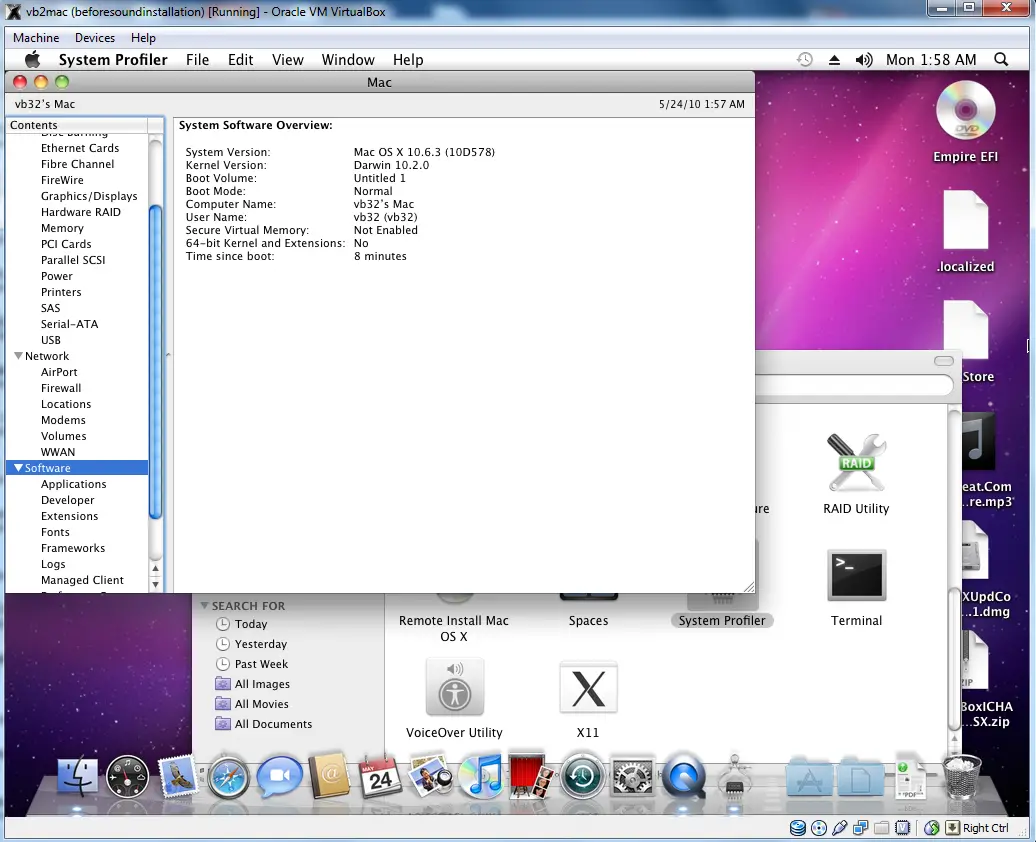
4) The sound in Mac OS X Guest: Sound is a little issue here but worked. I’m sure it will not bother you much.
Follow these steps to install sound drivers. For me it worked, one side speaker worked with little distraction. Something is better than nothing. You need to follow this guide to install sound drivers.

5) Screen Resolution and Screen Size: Follow these steps to adjust the screen size. Widescreen size didn’t work for some users.
6) Shutdown and Restart: We can’t shut down or restart Mac VM in a normal way. You may see the messages ‘CPU halted’ (for Shutdown) or ‘MACH Reboot’ (for restart), this means nothing will happen after it. We need to power off or reset the virtual machine from the VirtualBox console. Here is the working Snow Leopard on VirtualBox.
7) Update 1
Install Boot Loader permanently and some fixes
To avoid attaching empireEFI ISO every time to boot OS X virtual machine, we can install bootloader permanently on Mac hard disk. This method will install the Chameleon bootloader and some other drivers.
Go to Empire EFI CD which is already mounted and open the Post Installation folder. Take a snapshot before doing anything at this point. Run myHack Installer Package.
Select Customize in Installation Type.

Read each package description and select it if you need it for your computer hardware. I recommend not deselecting anything selected by default. Press the Install button to continue.

After successful installation, remove empireEFI ISO and start the virtual machine, it should boot from the hard disk as shown below.

If this doesn’t work, restore the virtual machine to the latest snapshot and install the Chameleon bootloader from a separate installation file in the Post Installation folder. This might fix the boot loader issue and improve performance.
8) Some fixes for booting issues
a) Mac DVD reading error – EBIOS read error: Error 0×0c Block 0×1ed48a Sectors 0
This is due to accessing data from a Mac retail DVD. Convert the DVD with some cloning software to ISO. Most people faced this issue and that was the solution.
b) Booting errors after installation.
Try Boot verbose or Boot Ignore Caches options. In the empireEFI bootloader, go to Mac disk by pressing the right arrow key. Once it’s selected, press the down arrow key which will bring more options. Select and press Enter.

c) Change boot loader for old type of processors: Select legacyempire_efi1085.iso, which is inside the same folder.
If this bootloader and method didn’t work on the Intel processor then try this method with a different iboot loader.
I hope these methods will be helpful to install the original Mac OS 10.6 Snow Leopard on Oracle VirtualBox with your Windows 10 or 8.1 computer. I mentioned a few troubleshooting steps which may be helpful as well.




That seems to have been the problem.
Tried a retail DVD, and that did not work giving some sort of EBIOS error. Ripped the DVD to an ISO and that is now working.
I will post an update when complete.
Thanks!
@Nik,
Thats good news. Hope you managed to install successfully.
Share your result.
I have a problem
I keep on getting a black screen when using the retail disk and it doesn’t work shall i make an iso image because i got the similar problem?
MK,
Yes, you can make a image and try.
Are you using proper boot loader for your processor type?
The below post may give some ideas,
https://www.sysprobs.com/install-mac-os-1065-snow-leopard-virtualboxseveral-issues-fixed
Try and let me know
Dinesh, are you aware of the VBoxInternal2/SmcDeviceKey method? I’ve used it right now and results are impressive:
– works “out of the box” (no loaders needed to install or run)
– installs from the vanilla dvd converted by dmg2img – enable EFI
– shutdown and restart working
– lol, About This Mac working!
atm the small downsides are:
– still need to install VirtualBox ICH AC97 Audio Driver
– limited resolution choices with VBoxInternal2/EfiGopMode, CustomVideoMode1 does not seem to work
my config:
– intel mobile core 2 duo P8400
– windows 7 hp 64 bits
– vb 3.2.10 64 bits
main issue: mac cpu load is allways around 50%, but was like that with previous hacked installation
this method is very clean and deserves a tute, imo
@atreyu,
Thanks for your valuable input, sorry for late reply.
Yes, I know this command initially, but unfortunately it did not give anything extra as you mentioned. May be I did something wrong 😉 but it was suggested in one blog before start the installation.
I will try again and update this post, thanks again and keep visiting.
Well, I have 10.6.4 up and running, which is great to see and shows some promise. But I must say it is quite buggy. Apple->About crashes Finder.
Also, none of the screen resolution fixes work for me. Kind of unusable at 1024×768. Any other suggestions?
Haven’t had much time to play around with it much more yet, I’ll post more updates as time goes on.
@atreyu
Wow, this method you mention worked great!
Any way to get screen size larger than 1440×900?
Thanks a lot!
Hi,
I’ve been trying to install OSX on in virtual box 3.2.10 on my laptop for a while now, but I can’t get the installation to start. I tried both iBoot and empireEFI and when I switch the dvd image to retail OSX dvd and hit refresh, I always end up with this:
it loads a lot of stuff than after about 30 secs, I get:
Errors encountered while starting up the computer.
Pausing 5 seconds
and then another page with a lot of stuff, but mainly:
Kext es,osx86.driver.EvOreboot – library kext com.apple.kpi.iokit not found
Can’t load kext es.osx86.driver.EvOreboot – failed to resolve library dependencies
and then a panic message and it finally ends with system uptime nanoseconds.
Any idea what could be wrong?
I successfully installed OSX on another laptop using this exact same tutorial, but this time, I can’t get it to work. Here is my setup:
Core 2 duo T8300 2,4Ghz
Windows 7 – 32 bits
VT is enabled in bios.
Thanks!
@magimat,
Are you using the same installation medium? I think something corrupted in DVD or ISO.
I’m getting the same error as Nik: “memory allocation error”.
How can I solve this?
@Tom,
Whats your PC configuration?
Try this new method,
https://www.sysprobs.com/install-mac-os-1065-snow-leopard-virtualboxseveral-issues-fixed
Let me know if this helps.
Hi
I’m trying to install Mac OS X on Windows & 32 bit
AMD processor
alloted 1 GB Ram
Able to boot to the screen, where it ask for Snow Leopard DVD, got errro when pressed F5.
Tried creating image of the os
Still getting the error:
EBIOS read error: Error 0x0c
@Ripen,
Still it can be issue with ISO. How you made it?
Try with DVD and select ‘Passthrough’ option under CD drive option in VB.
Thanks for the guide, I´ve now mac os x, from retail DVD, working on ubuntu 10.04 and Vbox 3.2.10 (non Open Source).
BUT, (there is always a BUT), the links linking to AC97 kext are not working. I´ve found them in another web, but, just to advice you.
Thanks again, Tango!
@Tango!,
Thanks for your information.
Yes, VirtualBox people removed it.
I will find out and fix the link.
Thanks again.
Thank you! It cost me some time to make it work on Oracle VM Virtualbox but it’s awesome. My PC is: AMD quad core, 4 GB ram, Nvidia chipset running Windows 7 – 64 bits.
THE TRICK WAS: After setting up and rebooting I installed myHack 1.0 (from the DVD) customizing it by adding the CHOCOLATE KERNEL option. I made a couple of previous unsuccesful attempts and this one was the great one.
Hello please help me.. getting an error.
ACPI table not found: DSDT.aml
Starting Darwin x86
Press any key to continue..
{ now hanged }
that’s all. I clicked many keys.. but failed.. please 🙁
thanks,
please help me.. getting an error.
ACPI table not found: DSDT.aml
Starting Darwin x86
Press any key to continue..
{ now hanged }
that’s all. I clicked many keys.. but failed.. please 🙁
thanks,
Can we install snow leopard on windows7 64bit?
So, what will change in this tutorial with vbox4.0? I noticed a new audio virtual device (Intel HD Audio) that, maybe, might fix the audio issue.
At least, my mac still boots.
So, what will change in this tutorial with vbox4.0? I noticed a new audio virtual device (Intel HD Audio) that, maybe, might fix the audio issue.
At least, my mac still boots
Hi,
Thanks for the info. I tried the above steps but was paused after the bootloader. When i select the leopard iso image or dvd and press enter to install from it, the screen goes black and it stays like that for ever. How can i correct it.
Hi, got my SN system running in VBox on Fedora14 with your EmpireEFI & info – thx!
When I click “About This Mac” it always restarts the desktop (which it shouldn’t) but never gives the “About This Mac” dialog box – any ideas?
I’ve fiddled with every setting I can think of, none made any diffwerence – any info would be great – thx again! – KR
I’m having this same exact issue.
Running VirtualBox 3.2.12 r68302 on Windows 7 Ultimate x64
Physical Hardware:
MSI NF750-G55 Motherboard
AMD Phenom II X4 965BE @ Stock
MSI/NVidia Twin Frozr GTX260 768MB
8GB DDR3/1600
4x 500gb Spinpoint F3 in RAID-0 (this shouldnt matter)
Using: EmpireEFI4AMD.iso as my boot-helper/EFI tool.
I’ve tried the others without any success on this hardware.
Also tried several VirtualBox options to no avail.
The other problem I have is that it gets stuck in console on a reboot or shutdown attempt, spamming “Backtrace (CPU X), Frame , Return Address” and then complaining about 4 potential args on the stack and a “double panic”.
You can refer below post with some additional preparation commands.
https://www.sysprobs.com/install-mac-os-1065-snow-leopard-virtualboxseveral-issues-fixed
Above method will fix the ‘About Mac’ issue.
1) Third party boot loaders not required. This goes with VirtualBox built in EFI boot loader.
I might be wrong, but you can’t get it to work with the VirtualBox EFI when using an AMD cpu. It just doesn’t work right.
I’ll try again, but I’m pretty sure it doesn’t work this way.
Hi, firstly i want to thank for this great method for installing SL
every thing seemed to be right with me, cause i didn’t need to do anything for the sound (it just worked :)) and the screen resolution worked fine for with typing (“Graphics Mode”=”1680x1050x32”) when booting in my 1680×1050 wide screen, and not to forget about my PS2 Mouse and Keyboard without any single thing to install…..
but the only problem i had is booting from hard disk
when i try to boot from hard disk it gives me the same Image you got in this post :
“https://www.sysprobs.com/wp-content/uploads/2010/05/clip_image006.jpg”
but after that it keeps saying
My Hack
“Taking the iSuck out of iHack”
and i tried booting verbose(it gives me a black screen) or boot ignore cash (it keeps saying
My Hack
“Taking the iSuck out of iHack”)
but i can still boot from Using: EmpireEFI4AMD
my Computer
windows 7 Ultimate X86
AMD Phenom 8650 Triple-Core
4GB of Ram
Note i am using VB 4.0.0
I’m also sing VBox 4.0 w/ AMD Phenom running Windows 7 x64 to install Mac OSX 10.6.6. Err…I should say I installed 10.6.0 then upgraded to 10.6.6. Everything installs correctly but I can’t boot without using Empire loader, which means I can’t increase the resolution, and I really would like to increase the resolution. Without the loader it just hangs “Taking the iSuck out of iHack”. From the comments above it does seem like an AMD problem. I really would like to find a solution though.
Thanks for the help. I just used your setup to get Snow Leopard working on Fedora 14 64bit with VB4. It worked just fine. (I can’t get the graphics to work in a wide screen (1680x11050x32) mode, but, it did work as 1280×1024.) If I figure that out, I’ll pass on what I found.
Thanks again,
Jerry Lumpkins
My hardware:
Core 2 dual 2.66
Asus P5k motherboard
6 GB RAM
NVidia 9400GT
Fedora 14 – 64bit fully patched
(I’m going to try it on my I3 laptop running Windows7 next)
Well the install went fine on a Win7 (64) with Virtual Box 4 and no errors on install, Got audio working. Make sure the setting in VB says Intel HD Audio and Not ICH AC97.
Just cant change display. I have edited the com.apple.Boot.plist
Added the various options in the vboxmanage and any thing I add makes the boot hang. It either just stops during the boot of I get a display screen with a rotating colour icon.
So I’m stuck on 1024×768 Everything else is fine.
Working fine now. Works in 1280×1024.
I edit the /Extra/com.apple.Boot.plist file (which I didnt see before) and installed the Boot loader.
Wow!
Everything working brilliant now
VB 4 on Win 7 (64)
G
Using vbox 4.0 core2duo osx 10.6.3 install disk, I got panic and hang with 2 CPUs selected. Changed to 1 CPU and installer ran, but I interrupted it to start over using the xml edit method instead. Seems like it would likely work to completion with vbox4.
Thanks a apple mac setup texts! 🙂
It worked great for me, and I was even able to update my VirtualBox install to 10.6.6 without any difficulty. Only problem I’m having is with my mouse. When I installed 10.6.3 from my retail disk, I had full mouse integration with VirtualBox; I didn’t have to press Ctrl to release my mouse and go back to Windows. However, this update totally messed that up, so now I have to press Ctrl to release the mouse. Much more annoying. Any ideas on how to fix that?
Thanks for the great tutorial!
No idea. Unfortunately, without proper guest additions we have to manage these type of issues.
how long will it wait on “STILL WAITING FOR ROOT DEVICE”??
how long approximately will it keep posting “still waiting for root device” before installation screen?
It should not wait for long time.
Try to change the virtual hard disk attached mode IDE to SATA.
Whats your computer processor type?