Follow these steps to download and install working OS X 10.9 Mavericks pre-installed VMware image for Windows 10, and 7 on Intel processor computers. Doing a fresh installation of OS X 10.9 on VMware workstation by Apple’s original DMG file is not so easy. We already published a guide about installing Mavericks on VMware from the DMG file. Instead of going through those difficult tasks, you can simply download this pre-installed and configured image and use it instantly. Since this was made by the vanilla kernel (without modifying the original kernel), future software updates also possible with it.
Steps to Use OS X 10.9 Mavericks VMware Image on Windows 10/8.1/7
1) Make sure that your physical computer supports hardware virtualization technology ( vt-x). Mostly all the recent desktop and laptop computers support virtualization technology nowadays. In some computers this feature is already activated, in others it should be activated manually in computer BIOS settings.
You can read our earlier guide to find out how to enable hardware virtualization technology ( vt-x) in BIOS and how to test it.
2) Download the Mavericks retail image. Since the owner’s website is not working anymore, you can download it from this link.
3) Extract the main file which is in 7z format. You can use WinRAR or 7z.exe program for this purpose.

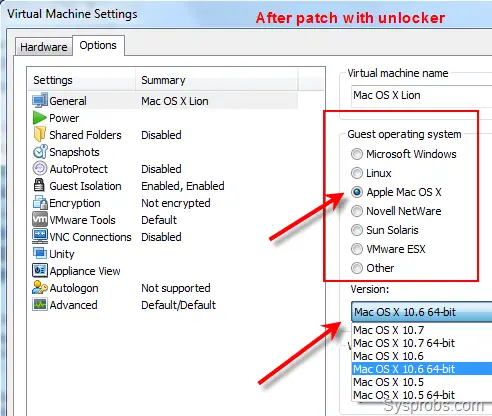
4) We need to use an unlocker patch to make VMware workstation to support Mac guest in Windows OS.

If you are using the latest VMware workstations such as 14 or 15, use this link to download the unlocker – how to use VMware unlocker in Windows OS.
Note: Sometimes after using unlocker in VMware workstation, the Apple Mac OS X guest support may not appear. But still, the OS X guest will boot and work fine.
5) Open the vmx file of the retail Mavericks virtual machine as shown below.

6) Before starting the virtual machine, you can modify the settings on the next screen. I have increased the RAM to 2GB and the number of processors to 2.
7) Power on VM now. If VT-X is enabled properly and unlocker worked fine, you could see the initial configuration screen without any issues.
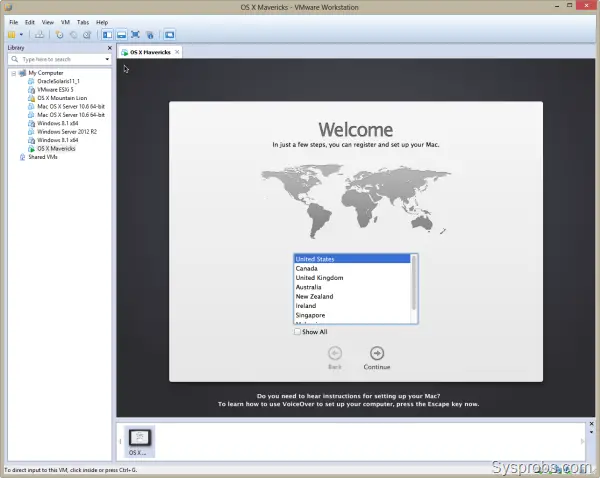
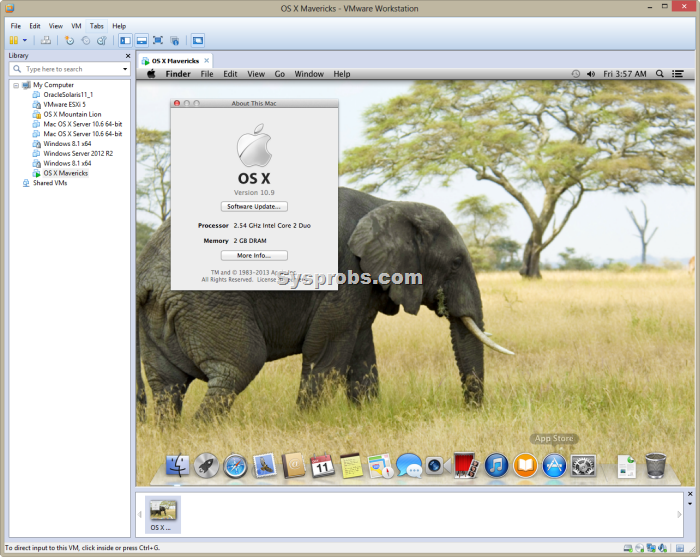
8.) After doing a few configurations, you will land on well working Mavericks virtual machine.
Remember- This is just for testing and learning purposes only. In the virtual environment, you will not get all features of OS X as running it on Apple hardware.
VMware Tools for OS X 10.9 Mavericks on Windows OS
Sound and network work fine in this method without installing VMware tools. It is already having multiple screen resolution options which normally come only after VM tools installation. Also, full-screen mode and auto-adjust screen size did not work after installing tools. Therefore, I do not see any valid reasons for VMware tools on OS X 10.9 except VMware shared folder.
If you need VMware shared folders on Mavericks with Windows 10 or 8.1 or 7 to share Windows OS folders and drives with guest OS, then continue the installation.
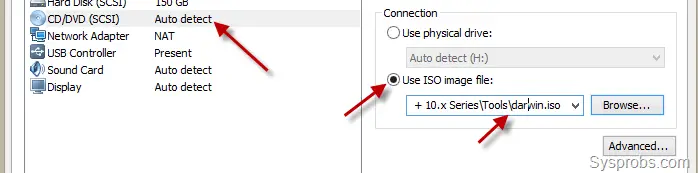
9) Mount the (attach to VM’s CD drive) darwin.iso file which is included in the same folder.

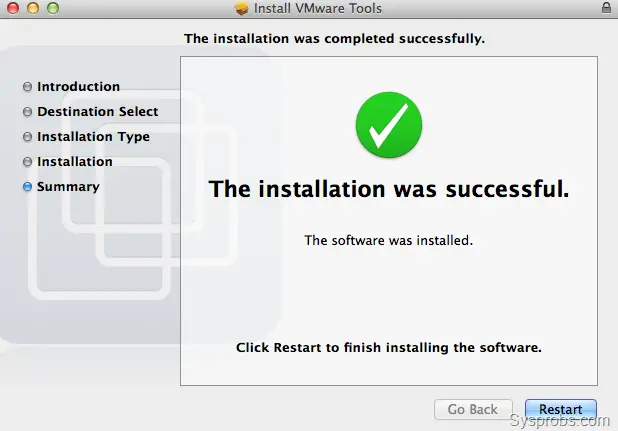
10) When the CD drive opens automatically, double click ‘Install VMware Tools’ and begin the installation.
Recommended: Take a snapshot of the virtual machine before beginning the installation. It will be easy to rollback if anything goes wrong in the future.
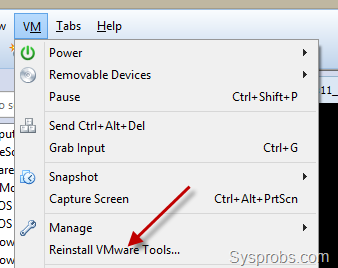
After restarting, to make sure that VMware tools have been installed properly, go to VM in the menu and see for the below option. If the ‘Reinstall VMware tools’ option is available, that means it’s already installed and working inside the virtual machine.
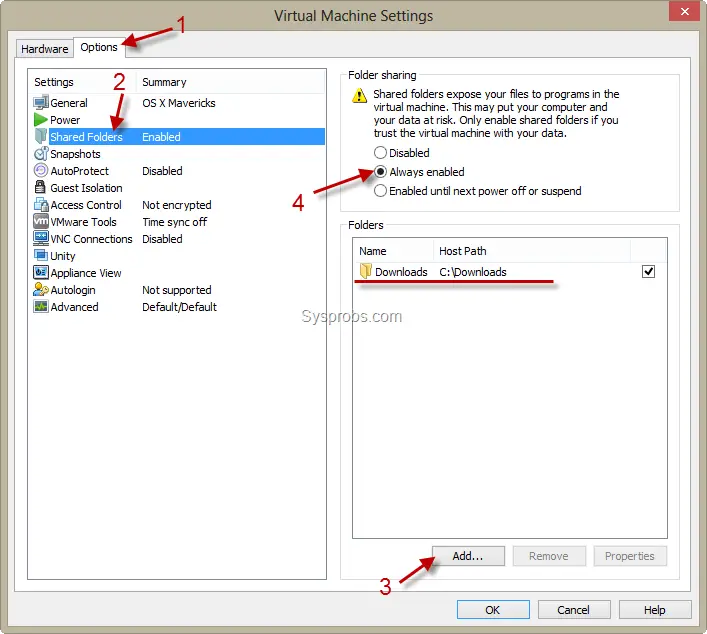
Configure VMware Shared Folder in OS X 10.9 Mavericks with Windows 10 and 8.1
11) Go to settings of the virtual machine and add a Windows OS host folder/partition. While setting up, you can select ‘Read Only’ if you like to protect the host data.
Remember: VMware shared folder doesn’t require any network connectivity or configuration between host and guest. This purely works with VMware tools and integration services. So, it is very simple to configure and use without network connectivity.
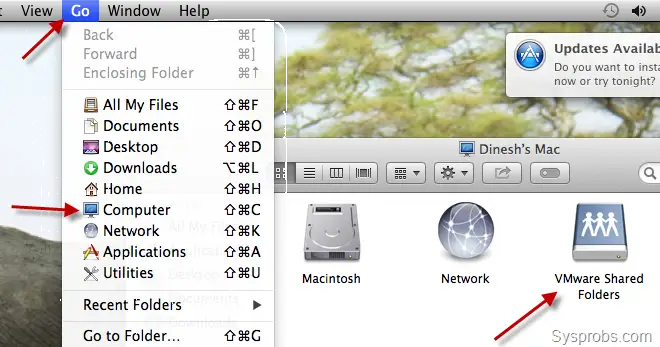
12) Inside Mavericks guest OS, you can access VMware shared folder in Computer as shown below.
Here is a video tutorial guide made by the owner of this OS X 10.9 VMware image.
This build can be upgraded to the latest versions of macOS. Take a backup or snapshot and start upgrading to the latest releases if you really need to have the recent macOS for your learning or development purpose.
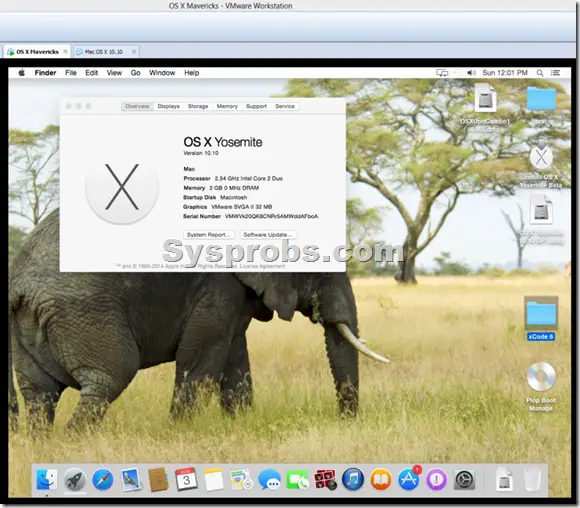
Upgrading 10.9 to 10.10 Yosemite in VMware
We used this same pre-installed 10.9 image to update to 10.10 Yosemite and it worked fine. Without downloading any DMG files separately, the Apple App store update worked fine since we used the Vanilla kernel here.
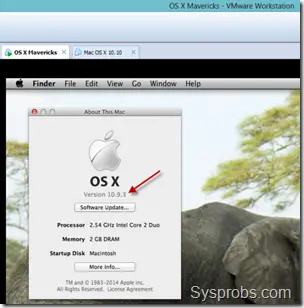
Here is the status of the virtual machine before upgrading. If you notice, we already upgraded 10.9.0 to 10.9.3 which was the minor release from Apple.
As suggested, take a snapshot of VM before starting the upgrade process.
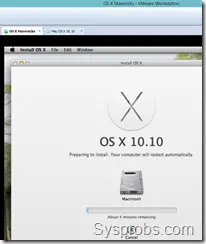
The installation will begin normally.
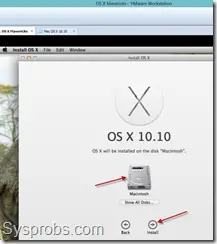
Select the existing OS disk to over the current version. Click next to continue.
Here is the working 10.10 Yosemite OS which was upgraded from 10.9 on VMware workstation.


Nice Guideline, Good to read it. Dear Dinesh Your blogs makes more easier our searches and and also increase our knowledge too…………
Hi! Thanks for the post, it’s been so useful, but I have a problem
I can’t set the screen resolution in 1920×1080. I installed VMware tools too, but I can’t set that resolution. I tried it in the operative system (OSX 10.9), and on Vmware (full screen icon).
Could you help me? Thanks!
Did you try this settings under display settings in OS X?. You can see where to change it in middle or end of video tutorial.
Try and let me know.
Thanks for your answer. I watched the video and tried to change display settings on OS X, but finally I solved it changing the resolution on VMware, on OS X virtual machine custom display settings
Can you tell us how you do that ? Thanks.
I run OS X Mavericks on vmware 10. My display is 1920×1080. I use QuckRes Application to solve this problem.
But Important: In QuckRes Preferences, in “Advanced” Tab, select ‘Show Stretched Sizes” and then you’ll see this resolution.
Actally, on new version of QuickRes (Version 3.2) no need to select “Show Stretched Sizes”
Checked it Again… Even on QuickRes version 3.2, I need to select “Show Stretched Sizes” in order to reveal 1920×1080 resolution, but after this resolution is acknowledged by restart, I can switch “Show Stretched Sizes” off, of I want.
Will it support VirtualBox too?
Has anyone managed to see a screen resolution option after installing VMware Tools? With 10.8 ML I could go to Preferences, Displays and change the resolution. No such option now in Mavericks…..
Thanks
I am getting stuck just after bluetooth initialization according to verbose boot. Tried turning off bluetooth, to no avail. Any tips?
Did notice that the issue was the unlocker didn’t work the first time. Make sure you run the unlocker in admin mode or nothing may work in the end.
I`ve user a app called SwitchResX
It resolved my problem
can we please have a release for virtualbox as well ?
for sure… Virtualbox
That’s great!!! I’d say.. awesome… but there is a “but”… there always is a “but”… 🙁
I’ve not been using a mac for a while, and I did this to have iMovie worked on my ASUS N56VZ.
I used an old dmg of iLife11, istalled iMovie only… launched…. error…
Hardware accelleration is ok, but what went wrong is the “Quartz Extreme”
I have on my notebook a NVIDIA 650M.
Do I have to change the notebook? 🙁
Second question… iMovie is an old application… is there something new?
Thank you guys.. anyway the guide and your work is totally awesome !!!
Hi all,
may be You can help. I installed Mavericks using a tutorial at the website and as well I checkd some info at the internet sides.
Everything works fine, but when I reboot the machine after installation finished, I see the Apple logo and the circels showing action… but after a long time the machine then crahsed/stopped or something else.
I tried a copy of a running maschine as well as a new one. And the same behavoir when I update inside the existing running maschine…
Thanks
If you forgot the unlocker (see in the article), it explains why you are “stuck” forever in the rotating circle.
Hi,
I posted another message before,but I don’t see it here. It was related to “iMovie”
My Hardware is a Notebook ASUS N56VZ with Intel Graphics 4000 and NVIDIA 650M GPU,
Anyway I downloaded iMovie 10 istaed of iLife11 and I let the process “C:\Program Files (x86)\VMware\VMware Workstation\x64\vmware-vmx” usable from NVIDIA 650M instead of intel graphics 4000.
That works because I see the NVIDIA icon lit when I start the virtual image of mavericks..
This time when I run iMovie I have a different error:
“The graphic configuration does not support hardware acceleration needed to have iMovie executed”
Any help?
Thank you very much.
Hey guys! Which is the file to be downloaded in step #2? I cant find anything like MAvericks on that site?
download as torrent from
http://kickass.to/os-x-mavericks-10-9-retail-vmware-image-t7981468.html
Hi,
Thanks for putting out a detailed explanation
How do I get iPad connected to this Mac virtual machine. I mean I connect iPad to the USB on my host (Windows 7) but when I try to disconnect it from usb of host to connect to usb of guest in VMware it keeps on giving me message “The connection for the USB device Apple iPad was unsuccessful. The device is currently in use”.
I am using Xcode on Mac virtual machine and so trying to get the iPad detected in the Mac Guest.
I am using VMWare workstation 9 on Windows 7 host. I have also installed the client tools as mentioned in this post.
Thanks in advance for your support
Thanks.
Jon
I can’t get the video drivers working, when I install VMsvga2_v1.2.5_OS_10.9.pkg finder keeps crasing and after a while everything i crashing.
Any solution for the video problem? now I have a small 1024×768 screen 🙂
and I can’t change this.
Thanks in advance.
Is it possible to use VMWare 6 Professional for the below referenced article?
“Working OS X 10.9 Mavericks VMware Image For Windows OS and Intel Processor”
Many thanks, Steve.
The App Store is not loading anything on this installation of Mavericks via VMWare. Any ideas?
I have VMware Workstation 10.0.1 on 64 bit Windows 7 Enterprise. The screen shows “Update VMware Tools…” under the VM tab. Anyone has any idea how to update it?
Thanks,
I’ve got a 10.8.5 VM that I installed following a previous article on the site. Been working great, but I can’t seem to upgrade to 10.9. The installer starts, it reboots and then it just hangs at boot. I get the spinning circle under the Apple logo and then after a couple of minutes a spinning beachball, but it never progresses past that point. Are there any special steps necessary?
Thanks!
Hi there
Thanks for your nice guidance
In step 2 (2) Download Mavericks retail image from owner’s site here.) I couldn’t find Mavericks os
Please let me know how to download that
Thanks in advance
I don’t see any distribution on that download page…
Hi,
Even I do not see the download links from the owners site. I’m checking the reason for that. Will update soon.
Sorry guys.
Hey Dinesh, trying to find the download link of 10.9 and there is nothing…can you guide me through this please?
I found the file on a bit torrent site and installed which worked well up to the point where I am supposed to install VMware Tool. I mounted the darwin.iso and tried to install VMware Tools, and got this error on the Select Destination screen:
VMware Tools can’t be installed on this disk. VMware Tools required Max OS X version 10.5 or higher.
Keep in mind this occurs on a 100% clean install of OSX 10.9. I searched Google and could not find this error, so I removed the VM and reinstalled VMware workstation 10 and started from scratch, and got the same error again. I am not sure what VMware Tools is checking here but preventing the install of VMware tools for Mac.
I found a link to the most recent VMware Fusion tools for Mac (6.0.2 I believe) copied over the new darwin.iso and fired up the VM (same error message) . Does anyone have any ideas what VMware Tools is referencing that is giving the incorrect version on Mac OS X? I am stuck.
I managed to run this VM with VMware 10.0.1 successfully on an Alienware M11X-R2 (adjusting RAm to 2GB and 1 processor with 2 cores)
However, on the setup screen, when trying to sign to my already existing account, I get the message that “This computer cannot create new accounts” or something like this. I get the message when I try to sign in to my existing account or also if I try to create a new account. If I skip this step, the OS loads fine, but without being able to sign into my account. does anyone know why this is happening?
Thanks
I follow the guide, but there is only up to 10.8.2 fix ? where is the link to download the 10.9 vmware image?
Hello, all.
I have downloaded the virtual mac and got it running with ease on workstation 10, but the problem is that my ethernet is connected and it’s green, but my website are loading forever and never come up. The app store also doesn’t show any apps.
Any help is greatly appreciated.
Thanks for the nice Guideline. I’m using i7-4770K Gigabyte Z87x-UD3H with VM workstation 9, everything running OK and i can install the VM tools on the mavericks VM, however, i dont see my USB pen drive detected under the “VM>removable Device” . when i try to connect it “connect(disconnect from host), it shows “the connection for the usb device was unsuccessful vmware” the device is currently in use.
Here is the setting on the VM,
Virtual Machine Setting. Hardware> USB Controller> all checkbox is on
Automatically connect new USB devices,
Show all USB input devices,
Share Bluetooth devices with the virtual machine.
I also try to update the USB drive to sure it is Microsoft (http://ericwijaya.wordpress.com/2010/03/12/VMware-USB-cannot-connect-to-host-USB/) , but nth works
Please Help.
Note: If you can’t detect your USB pen drive and you can’t see it under the VM ware, please shutdown and close the VM and restart the following services under the windows, services.msc>Vmware USB Arbitration Service
Is there a way to use my GPU?