If you are looking for the pre-installed Mac OS X 10.6 Snow Leopard VMware image, then this post will be useful to find out the correct image and show the steps to install it on VMware Player or Workstation. In this guide, we discuss the 10.6.4 version which can be upgraded to a certain level in VMWare on your Windows computer.
The following method is completely for testing and learning purpose only. Do not use in the production or permanent use. Obviously, we can’t expect a good performance inside the VM, but overall it will be a good experience to learn and test macOS on Windows computer.
We have already mentioned several guides to install Mac on Windows computer by using virtualization technology, you can check them here to find out the latest version.
Installing the Mac OS on VMware which is based in Intel-based is not straight forward. You need to prepare the installation medium on a real Mac computer (or in a working Mac OS X VM), setup the proper boot loader, patch the software, and modify the VMX configuration file. To avoid these all steps, we can use the preinstalled image as shown in this guide.
Why Pre Installed Mac Snow Leopard Image?
- Easy to import in VMware and start using it.
- Mac Installation already is done, DVD or ISO not required.
- Saves your time by avoiding installation and patching for x86 computers.
- Drivers already installed. Sound, Network and Screen resolution working fine in this image.
- Updating to other versions working well.
- Not required to install any boot loaders.
My PC Configuration;
I have done the below demonstration on my Intel computer which has the following configuration.
- Intel Core2Duo 2.66GHz
- 3GB DDR2 RAM
- Intel P35 Chipset
- Windows 7 32 Bit Host
Required Products: Mac 10.6.4 Snow Leopard on VMware
I’m going to install and use this image on VMware Player, you can try on the VMware workstation as well. I have published similar posts about installing OS X 10.5 Leopard on VMware and Oracle VirtualBox with a pre-installed image earlier, you can check the links below.
Install Mac 10.5 Leopard on VMware Workstation
Install Mac 10.5.5 Leopard on Oracle VirtualBox
Products Needed for this method:
- Latest VMware Player or Workstation.
- Snow Leopard VMware Image (It’s a torrent download. Size is approximately 2.3GB with 7z compressed format.)
- Read this post and make sure VT is enabled on host computer BIOS.
Installation Steps
1) Extract the image. It contains VMX, VMDK and other tools required.
2) Make sure hardware VT is enabled.
3) Open Mac OS Snow Leopard.vmx file in VMware Player.
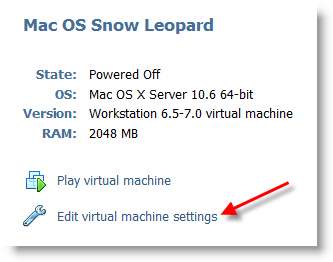
Edit virtual machine settings as you like. I suggest increasing the RAM and number of Processor Cores. If Mac OS stuck with any kernel errors, then change processor core to 1. Do not change any more settings in virtualization engine under processors.
4) Power on the virtual machine. I’m sure you will get Snow Leopard desktop without any problems. Do not worry about the language you see on the screen. I already changed it to English. Follow the steps below to change the language inside the virtual machine.
5) Click on Preferences icon on the desktop.

6) Click Languages icon.

7) Press Edit List button and remove unwanted language and leave U.S English. Also, go to Formats and change the region that matches your location.
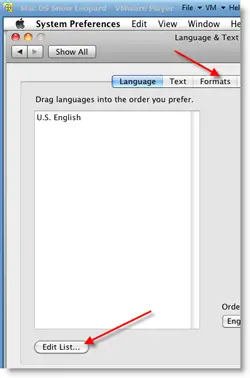
Log off and log in, you will see the U.S English desktop and menus.
8) Admin Password for Image
Admin user name for this image is svp and the password is 123. You can use this 123 password to reset a new password for root.
9) USB devises Access
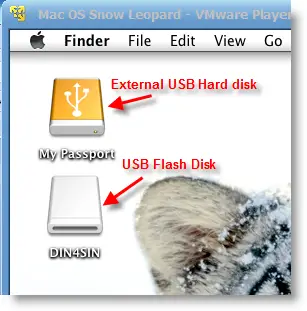
Yes, it worked. My external USB hard disk and flash disks worked inside Mac Virtual machine without any glitches. I had to mount the external hard disk in disk utility to make it work.
10) Network
Bridged and NAT network worked out-of-the-box without any patches in this image.

11) Multiple Screen resolutions and Wide Screen support available on this VM. The best part is, if you change the VMware Player screen size, Snow Leopard screen size also changes according it to fit the screen.
Check my earlier post here to learn how to install multiple screen resolutions in Mac OS X virtual machines.
12) Sound
For some reasons, the sound did not work for me straight away. If it doesn’t work for you, go to the extracted folder (from the download) and locate the SVP folder. Install EnsoniqAudioPCI.mpkg in Mac virtual machine. Restart the machine, the sound will work after it.

13) Software update
This image is having updates up to 10.6.2. Software update to 10.6.4 worked without any issues. I downloaded 10.6.4 combo updates from Apple site and updated successfully.
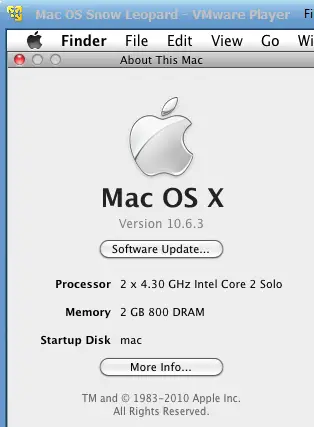
There you go, you are having a working Mac OS X 10.6 Snow Leopard on VMware with your normal Intel PC. I’m sure this will work on the all latest Intel processors as long as hardware virtualization (VT) support available.
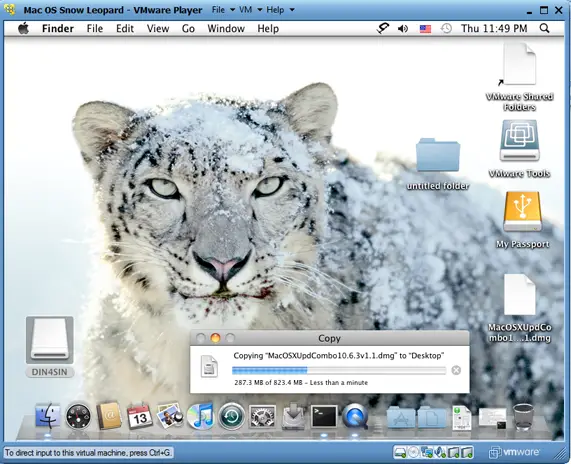
Here is a screenshot of a working virtual machine with this pre-installed VMDK image. If you are using it on VMware workstation, you will be able to take snapshots. That will be helpful to revert back the VM state if anything goes wrong.
14) Booting Issues
If the booting process stuck with the Apple logo, you can try this method.
Shut down the VM completely, open Mac OS Snow Leopard.vmx file in a text editor, look for smc.present=”TRUE” line. Change this value to FALSE. So, it should be smc.present=”FALSE”.
This step may solve any booting issues and keyboard, mouse delay. We have published a new guide on using macOS Bug Sur on VMware.





Hi,
My Vmware Player seems to be stuck at boot up saying “Operating System not found” .I even tried using the darwin_snow.iso version but still does not help.Is there something wrong with the config file .It is the same as posted above,the one i got from the torrent download.Why is it not recognizing the .vmdk image ?
Any idea .I have installed the Leopard successfully earlier and woks preety smooth.I enabled VT and have 4GB of RAM. Any idea ?
do you used the darwin_legancy.iso? or darwin_snow.iso?
you must add that to the setting from hour Vmware.
Wesley
And please pardon me if i am wrong ..In the above article i see you have suggested to change the smc.present to FALSE >BUT in the config file below which i got from torrent download i see no such entry as smc.present ?
.encoding = “windows-1251”
config.version = “8”
virtualHW.version = “7”
maxvcpus = “4”
scsi0.present = “TRUE”
scsi0.virtualDev = “lsilogic”
memsize = “1000”
ide0:0.present = “TRUE”
ide0:0.fileName = “Mac OS Snow Leopard.vmdk”
ide1:0.present = “TRUE”
ide1:0.autodetect = “TRUE”
ide1:0.deviceType = “cdrom-image”
ethernet0.present = “TRUE”
ethernet0.connectionType = “nat”
ethernet0.virtualDev = “e1000”
ethernet0.wakeOnPcktRcv = “FALSE”
ethernet0.addressType = “generated”
usb.present = “TRUE”
ehci.present = “TRUE”
sound.present = “TRUE”
sound.fileName = “-1”
sound.autodetect = “TRUE”
pciBridge0.present = “TRUE”
pciBridge4.present = “TRUE”
pciBridge4.virtualDev = “pcieRootPort”
pciBridge4.functions = “8”
pciBridge5.present = “TRUE”
pciBridge5.virtualDev = “pcieRootPort”
pciBridge5.functions = “8”
pciBridge6.present = “TRUE”
pciBridge6.virtualDev = “pcieRootPort”
pciBridge6.functions = “8”
pciBridge7.present = “TRUE”
pciBridge7.virtualDev = “pcieRootPort”
pciBridge7.functions = “8”
vmci0.present = “TRUE”
roamingVM.exitBehavior = “go”
displayName = “Mac OS Snow Leopard”
guestOS = “darwin10-64”
nvram = “Mac OS Snow Leopard.nvram”
virtualHW.productCompatibility = “hosted”
extendedConfigFile = “Mac OS Snow Leopard.vmxf”
ide1:0.fileName = “darwin.iso”
isolation.tools.hgfs.disable = “FALSE”
sharedFolder0.present = “TRUE”
sharedFolder0.enabled = “TRUE”
sharedFolder0.readAccess = “TRUE”
sharedFolder0.writeAccess = “TRUE”
sharedFolder0.hostPath = “C:\Mac OS Snow Leopard\SVP”
sharedFolder0.guestName = “SVP”
sharedFolder0.expiration = “never”
sharedFolder.maxNum = “1”
floppy0.present = “FALSE”
monitor.virtual_exec = “hardware”
monitor.virtual_mmu = “software”
ethernet0.generatedAddress = “00:0c:29:da:96:f9”
tools.syncTime = “FALSE”
uuid.location = “56 4d 52 58 78 b9 27 89-92 a8 a3 c8 dc d7 54 3b”
uuid.bios = “56 4d 16 a7 88 f3 6a 23-1b 8c bb 5f 89 da 96 f9”
cleanShutdown = “FALSE”
replay.supported = “FALSE”
replay.filename = “”
ide0:0.redo = “”
pciBridge0.pciSlotNumber = “17”
pciBridge4.pciSlotNumber = “21”
pciBridge5.pciSlotNumber = “22”
pciBridge6.pciSlotNumber = “23”
pciBridge7.pciSlotNumber = “24”
scsi0.pciSlotNumber = “16”
usb.pciSlotNumber = “32”
ethernet0.pciSlotNumber = “33”
sound.pciSlotNumber = “34”
ehci.pciSlotNumber = “35”
vmci0.pciSlotNumber = “36”
vmotion.checkpointFBSize = “16777216”
usb:0.present = “TRUE”
usb:1.present = “TRUE”
ethernet0.generatedAddressOffset = “0”
vmci0.id = “-1982163207”
usb:1.deviceType = “hub”
usb:0.deviceType = “mouse”
Where am i going wrong ?
Hi i see that you have asked to make the change smc.present to TRUE in the config file.But the config file which i got from Torrent which is the one same as posted by BILL above has no entry like “smc.present ” ? So is something wrong with my config file ?
Hi i see that you have asked to make the change smc.present to FALSE in the config file.But the config file which i got from Torrent which is the one same as posted by BILL above has no entry like “smc.present ” ? So is something wrong with my config file ?
Sorry for that pre-last post .I meant smc.presnt = FALSE to be set
hi… i tried all day long and no luck
– like NEO above me.. i cant find that smc.present line…
– i tried adding cpuid.1.eax = “0000:0000:0000:0001:0000:0110:1010:0101″ -> nothing
– i tried with darwin.iso and Darwin_SnowLeopardv2.0.iso -> same
all the above result in getting stuck in the apple logo screen with the unending spinner…
i have a toshiba satellite L655 with an i5 processor…
please help
Hi,do you solve the problem with frozen mouse cursor? i try all the solutions and nothink works …i update to 10.6.6 and my cursor froze in the left corner …do you have any solutions? thanks
Have you checked this post,
https://www.sysprobs.com/fix-usb-mouse-stopped-working-snow-leopard-1066-update-vmware
You must replace some kext files before restart after the update.
i have downloaded vlc for vmware mac os but when i play video only sound can be heard no picture..
wats the solution?
but a great work!!! thanks alot..
Thank you all!! The install is working fine. I just have one question. I Increase the size of the harddrive in Vmware form 30 to 100g ( since i have 1TB ). I’m new to any mac operating system.. how do i increase the size inside the virtual mac? it detect the virtual drive as 100g but it only show capacity for 30.. in the window of disk utility you can see the 107.37GB vmware virtual .. then below ( i guess a partition ) using 32.21 GB.. how can i make it to use all?
Help please 😉
Julio
I have exactly the same problem. Disk utlity won’t allow the boot partition to expand. Anyone knows how to expand the space from 30G to let’s say 80G( I have expand the VM size to 80G) but only 30 is seen.
I have the same problem. How to fix it?
I’ve created about 10 different VM’s using the standard procedure and after I update to 10.6.7 the system fails to come back up. It tries to boot, and then after it says “Loading Darwing” or w/e it shuts down VMWare completely. I’m running Sandy Bridge, not sure if that has anything to do with it, but just curious what to do!!!
Even after changing ‘smc.present’ to FALSE
It strucks with Apple Logo Screen
– I have enabled VT in my machine,
– I am using Windows 7 – 32 bit
– VMWare Player 3.1.3
Any other solution for this ?
Semi-OT, but if anyone can get a Portable VirtualBox setup properly tweaked with an installed VM, that would dispose of individual computer software configuration.
Just torrent the complete program folder containing the VM, and life would be grand.
I’m going to try to convert the VMWare image to a VirtualBox image, but I’m new to this and wouldn’t complain if Someone Smarter Than I did it first.
In fact, you do not need to convert VMware image to VirtualBox VDI, VMDK works fine in VirtualBox, but this image will not work with VirtualBox. I already tried all possible methods with this image and VB.
You could try this method for fresh installation, then take the VDI and boot loader.
https://www.sysprobs.com/install-mac-snow-leopard-1063-oracle-virtualbox-32-apple-intel-pc
hey i have installed it (amd) and it works very good but will it crash or something if i update to 10.6.7 because i saw it on the apple’s website 🙂 PLEASE REPLY
It will not crash.
But, I suggest few things,
1) Take a snapshot
2) if you are running with VMware Player, then take a backup of complete folder of virtual machine (including VMDK, ..etc)
Check this guide and do the necessary steps before restart after the update,
https://www.sysprobs.com/fix-usb-mouse-stopped-working-snow-leopard-1066-update-vmware
Let me know the result.
hey its working fine but i bit slow,
anyways i was thinking to restore this working image to my macs hard drive on power pc 4, would it work?
or it be a waste of time?
Annus,
I’m not sure how this will work in Apple host.
But if it works, then it will be more fast and usable than running on other PCs.
Let us know the result. Good luck.
Hi Dinesh
Everything is working fine for me. I am using i5, 4 gb ram, 500gb hd, 1gb nvida graphic card and windows 7 home premium. The OS loaded and and audio works fine. But the CD-drive and in build camera not connected how can i fix this one?
Thanks in advance
Arul,
I don’t think built in camera will work inside Virtual machine especially in Mac VM.
If you enable the physical host CD drive, it should work straight away. Is it added and enabled?
Normally the boot loader ISO file will be mounted initially and CD drive get disable in this method.
You have manually enable and point the host drive.
Hope this helps you.
Works for me … I even updated to 10.6.7.
I noticed that the image freezes if the screen saver comes on, so I disabled the screensaver and changed the power settings (never sleep, etc).
Thanks.
Ed,
Thanks for the information. Yes, power settings should be changed, otherwise it will not wake up from sleep while running as virtual machine
I am getting error msg like Operating system not found. IO followed given process. I had downloaded
Mac OS X 10.6.3 retail from torrent site. And path of this ISO file i passing from VMWare but getting such type of error msg. Please see the link where i have attached screen shot..
Please suggest me where i am doing mistake.
Thanks a lot in advance.
do you used the darwin_legancy.iso? or darwin_snow.iso?
you must add that to the setting from hour Vmware.
Succes!
Wesley
great down load….very easy..running free vmware player..but i cant connect to internet….im using ibm x61 with internal wifi card and i also have connected an alfa usb wifi card but i cant connect to internet,,,,,any advice ….thanks in advance
do you have selected on the network tab in the setting
-connected
-connect at power on
and selected NAT? if not do this!
hope it worked
Wesley
hello ! I’m just followed the steps above to install Mac Snow Leopard but when I’m run the VM files, it’s shows “No operating system found”.. how do I fixed this problems?? please help me.
I’m using Acer Aspire 4741G
do you used the darwin_legancy.iso? or darwin_snow.iso?
you must add that to the setting from hour Vmware.
Succes!
Wesley
Did you try adding this line to your VMX file?
cpuid.1.eax = “0000:0000:0000:0001:0000:0110:1010:0101”
It seems to work for i3, i5 and i7 processors.
hi i follwed every step of yours. when i tried to power on the vitrual machine
i get the following error
please help :(((
Cannot open file “C:\ProgramData\VMware\dndlogs\dndlog.conf”: The system cannot find the path specified.
A virtual CPU has entered the shutdown state. This would have caused a physical machine to restart. This can be caused by an incorrect configuration of the virtual machine, a bug in the operating system or a problem in the VMware Player software. Press OK to restart the virtual machine or Cancel to power off the virtual machine
Hi Dinesh,
Thanks a lot for posting this wonderful blog on making Mac OS X work on VMWare. I am writing this post using Safari from my virtual machine (Mac OS X 10.6.7 post upgradation) running on VMWare WorkStation 7 with base OS Windows 7 x64 Ultimate, AMD Phenom II X4 965 BE.
Eclipse is working great too. Will download and test remaining Java frameworks tonight.
I probably owe you a drink!
Anyways keep those good posts pouring in…
Cheers
Soumya
Hi,
after a long time i am back and i am trying to use my Mac OS X that i’ve updated to 10.6.6
but… i have a small problem:
every time i want too start the TimeMachine it shows a window and then Mac OS X freezes.
do you have a sulution Dinesh?
thanks for all the things that you already have done for me! 😀
Wesley
Hi Dinesh,
I encounter some problems and want you to help me out 😉
I want to connect my iPhone to my guest VMware Mac OS X system,
although I did connect it to VMware (disconnect from host),
the Mac OS X shows no detection of my iPhone.
Please help me to connect my iPhone to the Mac OS X on VMware.
Thanks for your help 😉
Hi Dinesh,
I cannot get OS X working! I did set cores and processors to 1 but it does not work! (see link to picture)
https://rapidshare.com/files/460395507/123.jpg
(if it shows a RapidPro required! window click no)
Please help!!
Maxwell Dreytser
Hi Dinesh,
I cannot get OS X working! I did set cores and processors to 1 but it does not work! (see link to picture)
https://rapidshare.com/files/460395507/123.jpg
(if it shows a RapidPro required! window click no)
Please help!!
Maxwell Dreytser