If you are looking for the pre-installed Mac OS X 10.6 Snow Leopard VMware image, then this post will be useful to find out the correct image and show the steps to install it on VMware Player or Workstation. In this guide, we discuss the 10.6.4 version which can be upgraded to a certain level in VMWare on your Windows computer.
The following method is completely for testing and learning purpose only. Do not use in the production or permanent use. Obviously, we can’t expect a good performance inside the VM, but overall it will be a good experience to learn and test macOS on Windows computer.
We have already mentioned several guides to install Mac on Windows computer by using virtualization technology, you can check them here to find out the latest version.
Installing the Mac OS on VMware which is based in Intel-based is not straight forward. You need to prepare the installation medium on a real Mac computer (or in a working Mac OS X VM), setup the proper boot loader, patch the software, and modify the VMX configuration file. To avoid these all steps, we can use the preinstalled image as shown in this guide.
Why Pre Installed Mac Snow Leopard Image?
- Easy to import in VMware and start using it.
- Mac Installation already is done, DVD or ISO not required.
- Saves your time by avoiding installation and patching for x86 computers.
- Drivers already installed. Sound, Network and Screen resolution working fine in this image.
- Updating to other versions working well.
- Not required to install any boot loaders.
My PC Configuration;
I have done the below demonstration on my Intel computer which has the following configuration.
- Intel Core2Duo 2.66GHz
- 3GB DDR2 RAM
- Intel P35 Chipset
- Windows 7 32 Bit Host
Required Products: Mac 10.6.4 Snow Leopard on VMware
I’m going to install and use this image on VMware Player, you can try on the VMware workstation as well. I have published similar posts about installing OS X 10.5 Leopard on VMware and Oracle VirtualBox with a pre-installed image earlier, you can check the links below.
Install Mac 10.5 Leopard on VMware Workstation
Install Mac 10.5.5 Leopard on Oracle VirtualBox
Products Needed for this method:
- Latest VMware Player or Workstation.
- Snow Leopard VMware Image (It’s a torrent download. Size is approximately 2.3GB with 7z compressed format.)
- Read this post and make sure VT is enabled on host computer BIOS.
Installation Steps
1) Extract the image. It contains VMX, VMDK and other tools required.
2) Make sure hardware VT is enabled.
3) Open Mac OS Snow Leopard.vmx file in VMware Player.
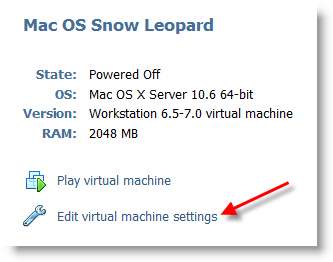
Edit virtual machine settings as you like. I suggest increasing the RAM and number of Processor Cores. If Mac OS stuck with any kernel errors, then change processor core to 1. Do not change any more settings in virtualization engine under processors.
4) Power on the virtual machine. I’m sure you will get Snow Leopard desktop without any problems. Do not worry about the language you see on the screen. I already changed it to English. Follow the steps below to change the language inside the virtual machine.
5) Click on Preferences icon on the desktop.

6) Click Languages icon.

7) Press Edit List button and remove unwanted language and leave U.S English. Also, go to Formats and change the region that matches your location.
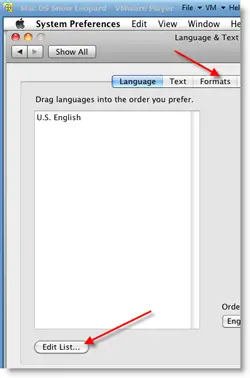
Log off and log in, you will see the U.S English desktop and menus.
8) Admin Password for Image
Admin user name for this image is svp and the password is 123. You can use this 123 password to reset a new password for root.
9) USB devises Access
Yes, it worked. My external USB hard disk and flash disks worked inside Mac Virtual machine without any glitches. I had to mount the external hard disk in disk utility to make it work.
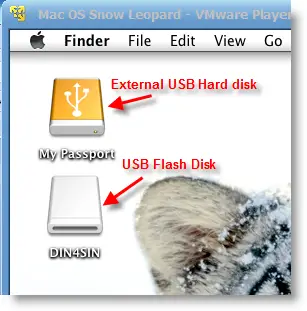
10) Network
Bridged and NAT network worked out-of-the-box without any patches in this image.

11) Multiple Screen resolutions and Wide Screen support available on this VM. The best part is, if you change the VMware Player screen size, Snow Leopard screen size also changes according it to fit the screen.
Check my earlier post here to learn how to install multiple screen resolutions in Mac OS X virtual machines.
12) Sound
For some reasons, the sound did not work for me straight away. If it doesn’t work for you, go to the extracted folder (from the download) and locate the SVP folder. Install EnsoniqAudioPCI.mpkg in Mac virtual machine. Restart the machine, the sound will work after it.

13) Software update
This image is having updates up to 10.6.2. Software update to 10.6.4 worked without any issues. I downloaded 10.6.4 combo updates from Apple site and updated successfully.
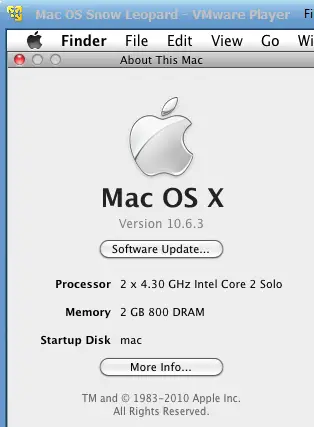
There you go, you are having a working Mac OS X 10.6 Snow Leopard on VMware with your normal Intel PC. I’m sure this will work on the all latest Intel processors as long as hardware virtualization (VT) support available.
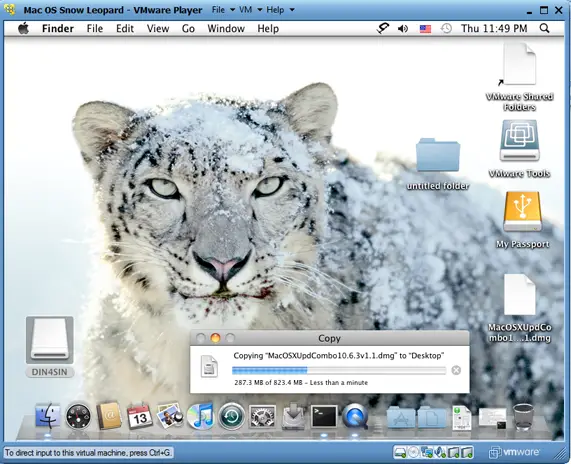
Here is a screenshot of a working virtual machine with this pre-installed VMDK image. If you are using it on VMware workstation, you will be able to take snapshots. That will be helpful to revert back the VM state if anything goes wrong.
14) Booting Issues
If the booting process stuck with the Apple logo, you can try this method.
Shut down the VM completely, open Mac OS Snow Leopard.vmx file in a text editor, look for smc.present=”TRUE” line. Change this value to FALSE. So, it should be smc.present=”FALSE”.
This step may solve any booting issues and keyboard, mouse delay. We have published a new guide on using macOS Bug Sur on VMware.





Got this working however I can;t view any of my photos in Preview or iphoto 11. The thumbnails are fine but double clicking a photo to view it opens Preview but is just grey were the picture should be (does the same in iphoto as well).
Any ideas on how to fix this? I’ve tried the vmware vga drivers for snow leopard but they didnt work.
I have the same problem. I don’t have a solution for Preview, but I did find a freeware program called “Just Looking” that works pretty well. I have viewed jpeg and png formats, slideshow etc.
Thanks for the reply, I’ll give that a go, It’s a shame I can’t get iphoto to work correctly, the main reason I’m running this is so I can tag my photos with faces/places/events for my iPad. Although imovie doesn’t work either, something to do with Quartz Extreme, which from what I’ve read elsewhere its a graphics card related thing that can only run on Mac hardware and doesn’t work in a VM.
hi I have the same problem. we are install the mac os in virtual machine everything will be working fine. But i try to open the .png images its open but it shows white screen. and also i try to take a screenshot but it shows warnings please help me.
When I play the virtual machine the following message appears: “Operating System not found”. What am I doing wrong?
I had this problem too. The problem appeared after completely finishing and then I updated. I just restarted the system.
Also, the first time I installed, tried to expand the hard drive and had some issues where it wouldn’t boot. If you modified the system and it won’t boot, try starting over from the beginning.
you need to mount the darwin iso file and boot from the cd drive after pressing esc….worked for me…
It really works.
Thanks a lot.
hi
wow..thats good job sir….
but can you give me the user id and login pass to this image ??
oops…its there in the instructions
thanks
Thanks!!! Works great on my Win 7 64-bit PC.
After trolling the internet for days, finally something that works. Thanks much!
So far so good on my toshiba satelite p505d- win7_64bit-AMD Turion II dual core mobile m520 , 2.3 GHz only 4 gb ram installed 500gbhd. thanks
Hi, i’ve changed the language and after restarting the machine it says “Operating system not found”..
Any ideas?
It works well with my laptop :
AMD Athlon P320
3 Gb RAM
320 Gb HD
Got some problems with the Russian language, but after a restart, everything is fine.
Thanks a lot, I’m looking for running OSX on vmware since 1 year.
When I Play the Virtual Machine, I get this error: Mac OS X is not supported with software virtualization. To run Mac OS X you need a host on which VMware Player supports hardware virtualization.
What am I doing wrong?
This version of Mac OS X needs hardware supported virtualization meaning your processor should support virtualization. If you are using Intel processor then you can download an application to check whether your processor supports virtualization. You can find that software here.
http://downloadcenter.intel.com/Detail_Desc.aspx?ProductID=1881&DwnldID=7838
@ Ramesh, I downloaded processor visualization from the link you provided. I have a Intel core i5. When I opened up the download, it indicates that it does support by marking “yes”. However, when I start up the virtual machine, I am still getting the error. Do you see anything else that could go wrong?
hey dude, me to getting the same error its I think because the os type is set to mac os x server 64 bit! not sure, if you found the solution plz reply!
And to Ramesh , I am running mac os x 10.5.5 on the same machine without any problem!
any help would be gratefull!
hey dude, me to getting the same error its I think because the os type is set to mac os x server 64 bit! not sure, if you found the solution plz reply!
And to Ramesh , I am running mac os x 10.5.5 on the same machine without any problem!
any help would be gratefull!
sorry my processor doesn’t support VT! 🙁
You can run it even if your machine doesn’t support virtualization.
This software is pretty straight forward, it will patch a file to bypass the need for hardware virtualization on VMware.
Link: http://www.mediafire.com/?1xcc43pcqplceqh
Hey Vishal,
Check in your BIOS, alot of the newer BIOS do not have it enabled by default.
Hope that helps.
Bob
On Top of IT POS
Thanks Bob, I will definitely try that out! Thanks for the help!
You have to enable VT to get it to work. To do this, restart your PC, there will be a screen that shows for a brief second telling you which Function keys to press. You need to enter the BIOS Setup Utility, which is usually F2 or F8. If it’s not just play with the others. Find the BIOS control or look around until you find VT and enable it. Hope this works for you!
Help! I did everything right in downloading Mac OS X Snow Leopard onto VM workstation. But in order for me to make apps, I had to update the actual Mac OS to a more recent version suitable for XcodeSDK which is used to make apps. After I downloaded it, it rebooted as it naturally would but my cursor got stuck in the top left position near the apple symbol. The clock still tells time normally so the vm is not frozen but the cursor is. How do I fixed this? I restarted the mac vm multiple times and nothing happens.
Thanks,
Kyle
nvm about my thing. I looked at some old comments and found the solution, thank you “June”
Fix For Frozen Mouse:
Ok . I tried the update thing 3 times, and it worked.
Let’s see, the first time around the mouse froze.
so I went back to the snapshot, and when it asked me to restart, I did it from the VM machine settings, and not from the Mac itself. It seemed like a silly thing, but when i powered it on, there was no mouse issue.
Of course I was using an attached mouse.
So then I repeated the steps above, with no usb mouse connected and voila! It does the trick yet again.
So basically to correct this isuue:
1. update normally.
2. When asked to restart, use the Vm settings and not the Mac settings.
Also, the first time it won’t go in, instead you’ll be taken to the loading screen, but the second time around you’ll be able to log in normally. I hope this solves the issue for other computer
I’m not sure what i’m doing wrong, but it won’t work with 64-bit Win 7 on a Core i5 Processor. I tried the legacy boot loader but it won’t work. The machine shuts down after the empire efi screen. Can anyone help me?
go to the bottom left and click on disk, disconnect it then hit f5, you will see the harddrive icon pop up, click enter and boom you are set
Got it working on AMD Phenom 9850 Quad Core Windows 7..any idea how to get rid of this russian language? Thanks!
Got it to english..Updated it to 10.6.7 and mouse is frozen.
I have exact problem as Kevin.
I am running VMWare on an AMD athlon 64 x2 dual core 5000+ and from what i’ve read it looks like that it is supporting virtualization.
So, any other ideas to solve this problem?
Thanks!
Hi,
Thanks soul much, do you save my life, it’s work perfect and update for news release and fixes…!!!
Regards.
After about 15 mins OSX freezes and CPU maxes out. Any ideas? Seems like some timer is firing and starting a process or power saving feature that is causing the problem.
Thank you for your help and for this guide 🙂
Yep, seems to be power saver. I think I’ve fixed this by just disabling sleep of display and hard disk etc – not really necessary if running as a VM!
I got this working with ease in 5 mins, but the problem is thta when i update to 10.6.7,( for using the mac app store) , it shows operating system not found. Plz Help me with updates.
Sahil, its simple.
You need to mount the darwin.iso (boot loader) again to CD drive.
I am having the same issue. I am getting “Operating system not found” but not directly.
When I start the virtual machine, it detects darwin boot and after booting, I can see the apple grey screen. After 5 sec, VMWARE restart and I will get “Operating system not found”.
I have Win7-64bit-VMWare7
I am having the same issue. I am getting “Operating system not found” but not directly.
When I start the virtual machine, it detects darwin boot and after booting, I can see the apple gray screen. After 5 sec, VMWARE restart and I will get “Operating system not found”.
I have Win7-64bit-VMWare7
I too am getting the same error. Followed all instructions, in vmware workstation 7 that came bundled with the torrent, it goes past the darwin boot loader, shows up the apple gray screen and then gives the “Operating system not found” error. I’m running this on an Intel i3 system with Win-7 32Bit. Please help me out 🙁
I too am getting the same error. Followed all instructions, in vmware workstation 7 that came bundled with the torrent, it goes past the darwin boot loader, shows up the apple gray screen and then gives the “Operating system not found” error. I’m running this on an Intel i3 system with Win-7 32Bit. Please help.
I too am getting the same error. Followed all instructions, in vmware workstation 7 that came bundled with the torrent, it goes past the darwin boot loader, shows up the apple gray screen and then gives the “Operating system not found” error. I’m running this on an Intel i3 system with Win-7 32Bit. Please help me with this.
Hi,
My vmware don’t have more frozen of keyboard and mouse because i update version the Virtual MAC up 10.6.4, when updated to 10.6.5 this problem occurred, for me it’s is suffficient because could install the Xcode.
Follow the url to make download of version update 10.6.4: http://support.apple.com/kb/dl1048
Thanks,
Natanael Santos.
Doesn’t work in my case.
host: Dell Latitude E6500, Win7 32-bit, vmware player 3.1.4
Virtual machine crashes while booting in my case.
Have tried to turn off/on VT several times. Seems that no differense, just crashes.
Take a look at the screenshot:
https://lh6.googleusercontent.com/-L22Osrn5zLQ/Tf6D_7a0QZI/AAAAAAAAGzc/lE9VSAdfWC0/s800/vmwareMacLeopard.png
Here is my Mac OS Snow Leopard.vmx, which actually I didn’t changed downloading VM:
.encoding = “windows-1251”
config.version = “8”
virtualHW.version = “7”
maxvcpus = “4”
scsi0.present = “TRUE”
scsi0.virtualDev = “lsilogic”
memsize = “1000”
ide0:0.present = “TRUE”
ide0:0.fileName = “Mac OS Snow Leopard.vmdk”
ide1:0.present = “TRUE”
ide1:0.autodetect = “TRUE”
ide1:0.deviceType = “cdrom-image”
ethernet0.present = “TRUE”
ethernet0.connectionType = “nat”
ethernet0.virtualDev = “e1000”
ethernet0.wakeOnPcktRcv = “FALSE”
ethernet0.addressType = “generated”
usb.present = “TRUE”
ehci.present = “TRUE”
sound.present = “TRUE”
sound.fileName = “-1”
sound.autodetect = “TRUE”
pciBridge0.present = “TRUE”
pciBridge4.present = “TRUE”
pciBridge4.virtualDev = “pcieRootPort”
pciBridge4.functions = “8”
pciBridge5.present = “TRUE”
pciBridge5.virtualDev = “pcieRootPort”
pciBridge5.functions = “8”
pciBridge6.present = “TRUE”
pciBridge6.virtualDev = “pcieRootPort”
pciBridge6.functions = “8”
pciBridge7.present = “TRUE”
pciBridge7.virtualDev = “pcieRootPort”
pciBridge7.functions = “8”
vmci0.present = “TRUE”
roamingVM.exitBehavior = “go”
displayName = “Mac OS Snow Leopard”
guestOS = “freebsd”
nvram = “Mac OS Snow Leopard.nvram”
virtualHW.productCompatibility = “hosted”
extendedConfigFile = “Mac OS Snow Leopard.vmxf”
ide1:0.fileName = “darwin.iso”
isolation.tools.hgfs.disable = “TRUE”
sharedFolder0.present = “TRUE”
sharedFolder0.enabled = “TRUE”
sharedFolder0.readAccess = “TRUE”
sharedFolder0.writeAccess = “TRUE”
sharedFolder0.hostPath = “C:\Mac OS Snow Leopard\SVP”
sharedFolder0.guestName = “SVP”
sharedFolder0.expiration = “never”
sharedFolder.maxNum = “1”
monitor.virtual_exec = “automatic”
monitor.virtual_mmu = “automatic”
ethernet0.generatedAddress = “00:0c:29:a6:0b:bf”
tools.syncTime = “FALSE”
uuid.location = “56 4d 7a 05 d4 ad 8b ad-cd a2 4c d5 e4 a6 0b bf”
uuid.bios = “56 4d 7a 05 d4 ad 8b ad-cd a2 4c d5 e4 a6 0b bf”
cleanShutdown = “TRUE”
replay.supported = “FALSE”
replay.filename = “”
ide0:0.redo = “”
pciBridge0.pciSlotNumber = “17”
pciBridge4.pciSlotNumber = “21”
pciBridge5.pciSlotNumber = “22”
pciBridge6.pciSlotNumber = “23”
pciBridge7.pciSlotNumber = “24”
scsi0.pciSlotNumber = “16”
usb.pciSlotNumber = “32”
ethernet0.pciSlotNumber = “33”
sound.pciSlotNumber = “34”
ehci.pciSlotNumber = “35”
vmci0.pciSlotNumber = “36”
vmotion.checkpointFBSize = “16777216”
usb:0.present = “TRUE”
usb:1.present = “TRUE”
ethernet0.generatedAddressOffset = “0”
vmci0.id = “-1982163207”
usb:1.deviceType = “hub”
usb:0.deviceType = “mouse”
numvcpus = “1”
smc.present = “FALSE”
floppy0.present = “FALSE”
Please help!!
Thanks,
Dmitri
I am having the same issue.
My host: Dell inspiron 14R i5 2410M, Win7 64-bit, vmware player 3.1.4
Same issue here
AMD Phenom II x4 955 , Archlinux x64, vmware workstation 8
hi, I tried to upgrade the iTunes version but got an error saying “it could not open the file from the disk” and probably the error code was -4960. Have anyone encountered such error?
btw, what is the password for the administrator “svp”? It is a built-in account with this mac os.
One of the guides has the password as “123”
Got it all up and working on core i7 870 on Win7 x64 using darwin_snow_legacy boot loader. Just having some issues expanding the virtual disk.
I have expanded the virtual disk by editing the the VM settings but once inside the VM I cannot expand the partition. Even though the drive is 50GB, the mac partition (~30GB) still seems to occupy the whole drive.
Has anyone successfully increased the size of the main partition?
Cheers..
How did you make it work with darwing_snow_legacy ? did u point the DVD to that iso file and start the machine ? Because, when I do so, I get an intermediate screen asking me to press F5 and then nothing happens ?
It finally worked. When it asked me to hit F5, I disconnected the CD (that points to darwing_snow_legacy.iso) then I hit F5. I got a big icon for a hard-drive (The standard MAC HD icon) then I hit and it worked.
Great article!
I’m running Win7x64 and I had the issue where upon booting I got the error the CPU was disabled. The console showed a rtclock_init panic. This was caused by the bus ratio not being correct for my Intel Q9550. This fixed it: http://www.takwing.idv.hk/tech/virtual/faq/amd_bus_ratio.html. You can get your specific bus ratio from CPU-Z or other similar tool.
1 – Start with darwin legacy bootloader
2 – disconnect CD in VMWare and press F5
3 – once the hdd image shows, press Tab for console or just type in GUI – enter your CPU multiplier: busratio=8
4 – press enter
Then I upgraded to 10.6.8 and lost mouse/keyboard. I booted with the -f flag and installed the package as mentioned here: https://www.sysprobs.com/fix-usb-mouse-stopped-working-snow-leopard-1066-update-vmware
I now have 10.6.8 running well on Win7x64.
Thanks again for the great article!!!
I can’t do it.
please detail.
Hello! I am running it on a compaq cq60 with amd processor. i am using the darwin legacy and it boots ok. when i tried to do a software update in Mac osx on there, it worked ok until i had to restart. than it got stuck on pci initialization. Can someone please help i will really appreciate it!
i have the same problem when i update to 10.6.8
It`s working on Windows 7 Home Premium 32 bit?
thanks man it works